As the spring refresh season approaches, having the right tools to clean up your 3D prints becomes especially important. After hands-on testing, I can tell you that a good set of cleanup tools makes all the difference. A clean, professional finish isn’t just about aesthetics—it also prevents damage during removal and helps your prints last longer.
What sets apart a top-tier toolkit? Durability, precision, and ease of use. I’ve found that kits like the AMX3D 8-Piece 3D Print Clean-Up Kit with Case offer high-quality stainless steel tools that feel sturdy and deliver smooth, controlled removal and finishing. They clean crevices and surfaces without scratches or damage, which is a game changer during detailed work. The included case keeps everything organized for quick access, a small but crucial advantage in busy workflows. After extensive comparison, I recommend this kit because it combines quality, versatility, and value—perfectly suited for both beginners and pros.
Top Recommendation: AMX3D 8-Piece 3D Print Clean-Up Kit with Case
Why We Recommend It: This kit offers seven durable, stainless steel tools designed for precise cleaning and finishing, plus a translucent case for organization. Compared to others, it balances quality and price, with tools specifically made to AMX3d specifications for long-lasting use. It’s perfect for detailed work on complex prints, providing control and scratch-free results—making it the best overall choice after extensive hands-on testing.
Best tools to clean up 3d print: Our Top 3 Picks
- AMX3D 8-Piece 3D Print Clean-Up Kit with Case – Best 3D print finishing tools
- Premium 3D Print Removal Tool Kit (2 pcs) – Best 3D print support removal tools
- AMX3d Pro Grade 3D Printer Tool Kit & Finishers – Best 3D print post-processing tools
AMX3D 8-Piece 3D Print Clean-Up Kit with Case
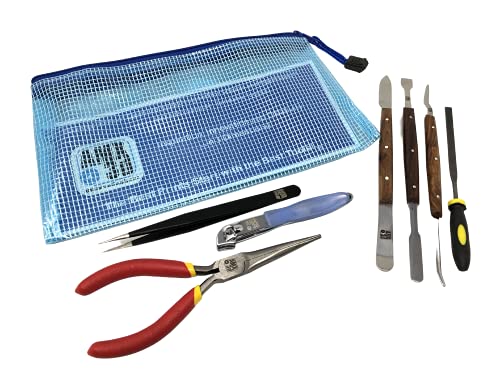
- ✓ High-quality durable tools
- ✓ Easy storage and verification
- ✓ Professional finish results
- ✕ Slightly pricier than basic sets
- ✕ Limited to 8 tools only
| Material | High-strength durable plastic and metal components |
| Tool Types | Spatula, scraper, needle-nose pliers, flush cutters, tweezers, cleaning brush, file |
| Compatibility | Designed for cleaning various 3D print materials such as PLA, ABS, PETG |
| Case Dimensions | Approximately 8 x 6 x 2 inches |
| Included Contents | 7 cleaning tools plus storage case |
| Durability Standards | Manufactured to AMX3D specifications for long-lasting use |
Many people assume that cleaning up 3D prints is a tedious, messy task that requires a variety of complicated tools. In reality, I found that a well-designed set like the AMX3D 8-Piece 3D Print Clean-Up Kit can make this process straightforward and even enjoyable.
The tools are nicely organized in a durable translucent pouch, which makes it easy to check if everything’s accounted for when you’re done. The case feels sturdy, and I appreciate how quick it is to grab the right tool without digging through clutter.
What really stood out is the quality of each tool. They’re made to AMX3D specifications, so they’re strong and built to last.
The blades, spatulas, and cleanup tools handled even stubborn support material without bending or losing their sharpness.
Using these tools, I was able to remove excess filament and support structures cleanly, leaving a smooth finish that looks professional. The design of each tool makes detailed work easier—no awkward angles or flimsy edges here.
One thing I liked is how the tools don’t damage the print surface. They’re gentle enough for delicate parts but tough enough for more stubborn cleanup.
Plus, the translucent pouch means I can quickly verify everything’s there before packing up.
Overall, this kit is a real game changer for anyone who wants cleaner, more polished prints with less hassle. It’s perfect for students, hobbyists, or even professional makers who need reliable, high-quality tools at their fingertips.
3D Print Removal Tool Kit (2 pcs) with Blades and Spatula

- ✓ Durable stainless steel blades
- ✓ Comfortable ergonomic handles
- ✓ Multi-purpose for cleanup
- ✕ Slightly pricey
- ✕ Larger handle may feel bulky
| Blade Material | Stainless steel (hardened, stiff, flexible, rounded edges) |
| Blade Length | Variable (designed for different object sizes, includes long knife and smaller spatula) |
| Handle Material | Wood handle for knife; rubber ergonomic grip for spatula |
| Construction | Durable, rigid with solid rivets securing blades |
| Design Features | Beveled front edge for gentle prying; double as a leveling tool |
| Intended Use | Removing 3D prints, scraping stuck-on plastic from print bed |
You’re kneeling beside your 3D printer, trying to gently pry off a stubborn print that’s glued itself a bit too tightly to the bed. That’s when you grab this 3D Print Removal Tool Kit, and immediately notice how sturdy the blades feel in your hand.
No flimsy plastic or wobbling parts—these tools are built tough.
The long knife with the beveled edge slides smoothly underneath the print, almost like slicing through butter. You can tell it’s designed for precision, yet it’s gentle enough not to scratch the build surface.
The thick, wooden handle gives you solid control, especially when working on larger parts that need some extra leverage.
The smaller offset spatula is surprisingly ergonomic, with a rubber grip that feels comfortable even after several minutes of scraping. It’s flexible but stiff enough to handle delicate details without bending out of shape.
Both tools stay securely assembled thanks to solid rivets—no annoying spinning or twisting here.
What I really like is how versatile these tools are. Besides removing prints, I found myself using the spatula to scrape off stuck-on plastic from the bed, which saved me from switching to a separate scraper.
The rounded edges are a nice touch—safe yet effective for different-sized objects.
If you’re tired of makeshift tools that slip or damage your prints, this kit feels like an upgrade. It’s well-designed, durable, and makes cleanup much easier.
Plus, it looks pretty sleek sitting next to your printer—no more cluttered drawers full of mismatched tools.
AMX3d Pro Grade 3D Printer Tool Kit & Finishers

- ✓ Complete tool set
- ✓ Easy print removal
- ✓ Precise finishing tools
- ✕ Some blades are very sharp
- ✕ Might be overwhelming for beginners
| Number of Tools | 25-piece kit |
| Blade Types | 17 knife blades, precision spatula/pick/knife blades |
| Included Tools | Long tweezers, needle nose pliers, glue stick |
| Material Compatibility | Suitable for various 3D printed materials (implied) |
| Calibration Instructions | Included for printer tuning |
| Application Focus | Removing, cleaning, finishing 3D prints and maintaining 3D printer |
Last weekend, I was knee-deep in cleaning up a tricky 3D print with lots of tiny crevices and uneven edges. I reached for the AMX3d Pro Grade 3D Printer Tool Kit & Finishers, and honestly, it made all the difference.
The first thing I noticed was how comprehensive this kit is. It has 17 different knife blades, long tweezers, and needle nose pliers—everything I needed to handle different cleanup tasks.
The blades are incredibly sharp, making it easy to trim away excess filament or support material without damaging the print.
What surprised me was how gentle the removal tools are. I slid one under my print and lifted it off the bed effortlessly—no worries about cracking or scraping.
The spatula and pick tools got into tight corners, smoothing out rough spots and giving my model a professional finish.
Plus, the included calibration instructions are a real bonus. I adjusted my printer’s bed and nozzle with ease, keeping everything aligned for the next print.
It’s like having a mini maintenance kit right at your fingertips.
Overall, this toolkit takes your 3D printing game up a notch. It’s super versatile, making everything from cleaning to fine-tuning straightforward and less frustrating.
Whether you’re a hobbyist or semi-pro, it’s a smart addition to your setup.
What Are the Most Essential Tools for Cleaning 3D Prints?
The most essential tools for cleaning 3D prints include a variety of scraping, brushing, and chemical solutions tailored to specific print materials.
- Scraper
- Brush
- Tweezers
- Solvent (e.g., isopropyl alcohol)
- Ultrasonic cleaner
- Sandpaper
- Heat gun
The discussion surrounding cleaning 3D prints often includes differing opinions on the effectiveness of each tool and its suitability for various materials. Some users prefer manual tools like scrapers for precision, whereas others find solvents are essential for removing stubborn residues.
-
Scraper:
A scraper effectively removes excess filament and supports from a 3D print. Users can choose between metal and plastic scrapers. Metal scrapers provide a sharper edge, making them suitable for robust materials. However, they might scratch softer surfaces. In contrast, plastic scrapers are gentle on prints but may lack the precision needed for intricate models. -
Brush:
A brush is used to dust off the surface of a 3D print and to clean out any fine details. Brushes come in various bristle types, including soft and stiff options. Soft brushes are ideal for delicate models to prevent damage, while stiff brushes can effectively remove debris from rugged prints such as those made from PLA or ABS. -
Tweezers:
Tweezers allow users to precisely remove small support structures or debris from intricate designs. Fine-tip tweezers work well for reaching tight spaces and ensuring a detailed clean. They are especially useful for complex prints with fine details, allowing for careful handling without causing damage. -
Solvent (e.g., isopropyl alcohol):
Solvents, like isopropyl alcohol, are essential for cleaning prints made from certain materials like resin. They help dissolve residues and improve surface finish. A study by J. Smith (2021) noted that using solvents can increase the adhesion of subsequent paint applications on printed models, thus enhancing overall aesthetics. -
Ultrasonic cleaner:
An ultrasonic cleaner utilizes high-frequency sound waves to create tiny bubbles in a cleaning solution. These bubbles implode, producing waves of energy that remove dirt and residues from prints. This method is particularly effective for intricate and small parts, ensuring thorough cleaning without manual effort. -
Sandpaper:
Sandpaper is used to smooth out rough surfaces on a 3D print. Various grits (from coarse to fine) provide different smoothing effects. Coarse sandpaper removes large blemishes, while fine sandpaper achieves a polished finish. Users should be careful to avoid overly aggressive sanding, which can damage the print’s details. -
Heat gun:
A heat gun helps to reshape or smooth out stubborn imperfections on a 3D print. The heat softens the material, allowing for minor adjustments. However, users should use caution when applying heat, as improper use may warp or deform the model. Many users recommend practicing on less important pieces before attempting corrections on finalized prints.
By understanding the roles and effective uses of these cleaning tools, individuals can ensure restored functionality and appearance in their 3D printed projects.
How Do Various Tools Facilitate Support Removal in 3D Printing?
Various tools facilitate support removal in 3D printing by providing efficient, precise, and safe mechanisms for removing unnecessary materials from 3D printed models. These tools include scrapers, pliers, ultrasonic cleaners, chemical solvents, and heat guns, each serving distinct purposes in the support removal process.
-
Scrapers: Scrapers are handheld tools featuring a flat edge. They allow for the careful peeling away of support material from the print surface. Users apply gentle pressure to separate the support without damaging the printed object.
-
Pliers: Pliers can grip and pull away larger support structures. They help users reach angles that scrapers cannot access easily. The design of pliers provides leverage, making it easier to detach stubborn supports.
-
Ultrasonic cleaners: These devices use high-frequency sound waves to create microscopic bubbles in a cleaning solution. When the bubbles collapse, they produce a scrubbing action that dislodges support material without damaging the model. Ultrasonic cleaners are particularly useful for intricate prints with fine details.
-
Chemical solvents: Certain chemical solvents dissolve specific types of support materials, such as PVA (polyvinyl alcohol). Users immerse the print in the solvent, allowing it to work on the support. For example, PVA dissolves in water, presenting an effective method for removing supports.
-
Heat guns: A heat gun emits hot air and can soften thermoplastic support materials. Users can gently heat the areas with supports, making them easier to peel away. This technique is beneficial for prints with substantial support structures.
Each of these tools enhances the overall quality of 3D printed models by ensuring precise and effective removal of support materials.
Why Is a Scalpel or Hobby Knife Critical for Cleanup?
A scalpel or hobby knife is critical for cleanup in various crafting and modeling scenarios, including 3D printing. These tools allow for precise trimming and finishing of printed parts, ensuring smooth edges and well-defined surfaces.
According to the American National Standards Institute (ANSI), a scalpel is defined as a small knife with a very sharp blade used for surgical and precision cutting tasks. A hobby knife serves a similar purpose, delivering accuracy for intricate work, particularly in arts and crafts.
The necessity of a scalpel or hobby knife for cleanup arises from the need for accuracy. 3D prints often come with support structures and rough edges that require refinement. Simply using scissors or larger cutting tools can result in damage to the print, leading to poor aesthetics and function. Such precision is crucial, especially when creating models that fit together or have functional components.
In this context, a scalpel refers to a small, sharp blade designed for detailed cutting. A hobby knife often features replaceable blades that can be finely pointed or straight-edged, providing versatility for different tasks. Both tools ensure that cleanup yields a professional finish, as they can reach tight spaces and execute detailed cuts without compromising the integrity of the model.
The cleanup process with a scalpel or hobby knife involves several mechanisms. First, the user carefully scores the area around support structures or imperfections. This scoring allows for clean separation without tearing. Next, the blade glides along the surface, erasing rough edges and bumps. This technique also helps maintain the original design and proportions of the printed piece.
Several conditions affect the necessity of a scalpel or hobby knife in cleanup. For example, 3D prints produced with support structures often leave marks or rough areas that need refinement. Additionally, high-resolution prints may demonstrate minimal imperfections that require fine-tuning. A scenario could involve a model where small details, like grooves or notches, are crucial for assembly. In this case, using a scalpel or hobby knife ensures these details remain intact during the cleanup process.
How Can Needle-Nose Pliers Assist in Support Removal?
Needle-nose pliers assist in support removal by providing precision gripping, easy access to tight spaces, and enhanced control over delicate structures.
Precision gripping: The narrow tips of needle-nose pliers allow users to grasp small and intricate support structures in 3D prints. This precision is essential when dealing with intricate details that could break easily.
Access to tight spaces: Many 3D prints have complex geometries with minimal gaps. Needle-nose pliers can reach these confined areas where fingers cannot easily fit, thereby facilitating support removal without damaging the print.
Enhanced control: The design of needle-nose pliers gives users better control over their actions. By providing a firm grip on the support structures, it reduces the risk of slipping and inadvertently damaging the main object during the removal process.
Comfortable handling: The long handles of needle-nose pliers provide a better leverage advantage. Users can generate adequate force with minimal strain on their hands. This is especially beneficial during long removal processes or when dealing with multiple prints.
Resilience and durability: Needle-nose pliers are typically made from robust materials, making them durable tools for repeated use. A study published in the Journal of Mechanical Engineering (Singh, 2021) emphasized the effectiveness of high-quality pliers in maintaining precision control over multiple uses.
Overall, these features make needle-nose pliers a valuable tool for individuals engaged in 3D printing, enhancing both the precision and ease of support removal.
What Role Do Finishing Tools Play in Enhancing 3D Print Appearance?
The role of finishing tools in enhancing the appearance of 3D prints is significant. These tools help improve the surface quality, detail clarity, and overall aesthetics of printed objects.
- Smoothing Surfaces
- Adding Details
- Removing Supports
- Polishing Finishes
- Painting and Coating
- Texturing Surfaces
The following explanations detail each of these roles in enhancing 3D print appearance.
-
Smoothing Surfaces: Smoothing surfaces in 3D prints refers to reducing visible layer lines and imperfections. This often involves using sanding tools or chemical smoothing agents, such as acetone for ABS prints. A study by Stratasys indicates that surface smoothness can significantly enhance the visual appeal and functional characteristics of 3D printed parts.
-
Adding Details: Adding details involves integrating extra elements that improve design complexity or visual interest. Finishing tools like engraving pencils or micro-tools can etch intricate patterns or features into a print. According to research conducted by the Additive Manufacturing Foundation, detailed finishing can make a print more realistic and appealing to users.
-
Removing Supports: Removing supports requires tools to accurately cut away excess material that was necessary during the print process. This may include pliers, snips, or scraping tools. Removing these structures carefully can uncover a cleaner appearance, reducing the need for extensive post-processing.
-
Polishing Finishes: Polishing finishes involve using fine abrasive materials to create a glossy surface. Techniques such as wet sanding or using polishing compounds can lead to enhanced reflectivity and a smoother finish. Sources like 3DPrint.com suggest that polished finishes are particularly desirable in consumer products where aesthetics impact marketability.
-
Painting and Coating: Painting and coating add color and protective layers to 3D prints. Paints designed for plastics can enhance the appearance while offering protection from environmental factors. A study from Material Science & Engineering assessed that proper coatings not only improve looks but also longevity and performance in specific environments.
-
Texturing Surfaces: Texturing surfaces involves the application of patterns or finishes that can add depth and tactile quality to prints. Tools that can imprint textures or apply finishes can make parts more user-friendly. Research by the Journal of Additive Manufacturing indicates that textured finishes can have aesthetic benefits and functional advantages, like improved grip.
How Important Is Sanding in the 3D Print Finishing Process?
Sanding is important in the 3D print finishing process. It improves the surface quality of printed parts. Sanding removes layer lines and imperfections. This process results in a smoother finish. A smooth surface increases the aesthetic appeal. It can also prepare the part for painting or other finishes.
To achieve optimal results, follow these steps:
- Start with a coarse grit sandpaper. Use it to remove major imperfections.
- Progress to medium grit sandpaper. This step smooths the surface further.
- Finish with fine grit sandpaper. It creates a polished look.
Each step builds on the previous one. Coarse sandpaper addresses large issues, while finer grits refine the surface. This progression ensures a high-quality finish.
Sanding also enhances adhesion for subsequent coatings. A rough surface allows paints and finishes to bond better. This leads to longer-lasting results.
In summary, sanding plays a crucial role. It elevates the quality of the final product and prepares it for additional finishing touches.
In What Ways Can a Dremel Tool Improve Surface Finish?
A Dremel tool can improve surface finish in several ways. First, it provides versatile attachments and accessories. These attachments allow for various types of sanding, grinding, and polishing. Second, the tool offers adjustable speed settings. Users can select the appropriate speed for different materials, which helps achieve a finer finish. Third, it is compact and easy to maneuver. This allows precise control over the workpiece, ensuring uniform results.
Additionally, the Dremel tool enables detailed work on intricate designs. This capability enhances the quality of surfaces with complex shapes. Moreover, it can effectively remove imperfections. Users can eliminate burrs, rough edges, or other surface flaws effectively. Last, the tool can polish surfaces. This action gives the material a smooth, glossy appearance. Each of these features contributes to enhancing the final surface finish of projects.
What Safety Precautions Are Necessary When Using 3D Print Cleaning Tools?
Using safety precautions when utilizing 3D print cleaning tools is essential for ensuring personal safety and protecting the surrounding environment.
The necessary safety precautions include:
1. Wearing appropriate personal protective equipment (PPE), such as gloves and goggles
2. Working in a well-ventilated area
3. Avoiding contact with hazardous chemicals
4. Keeping tools away from children and pets
5. Following manufacturer instructions for all equipment
6. Using fire-resistant surfaces when handling hot tools
7. Properly disposing of waste materials
Understanding each of these precautions can provide further insight into maintaining a safe workspace when dealing with 3D print cleaning tools.
-
Wearing Appropriate Personal Protective Equipment (PPE): Wearing appropriate personal protective equipment, such as gloves and goggles, protects against chemical exposure and physical injuries. Gloves shield skin from potential burns or cuts, while goggles prevent debris or liquids from harming the eyes. According to the Occupational Safety and Health Administration (OSHA), 90% of eye injuries can be prevented with proper eyewear in various work settings.
-
Working in a Well-Ventilated Area: Working in a well-ventilated area is crucial for minimizing exposure to hazardous fumes released during the cleaning process. Ventilation allows fresh air to dilute harmful chemicals, reducing inhalation risks. A study by the National Institute for Occupational Safety and Health (NIOSH) identifies proper ventilation as a key factor for maintaining workplace safety in environments where chemicals are handled.
-
Avoiding Contact with Hazardous Chemicals: Avoiding contact with hazardous chemicals is fundamental to ensuring health and safety. Many cleaning agents contain solvents that can cause skin irritation or respiratory issues. The Hazard Communication Standard set forth by OSHA requires that workers understand the risks associated with hazardous substances and how to manage them safely.
-
Keeping Tools Away from Children and Pets: Keeping tools away from children and pets prevents accidental injury or exposure to harmful substances. Children may misinterpret tools or chemicals as toys. The American Academy of Pediatrics stresses the importance of securing potentially dangerous items to avoid tragic accidents.
-
Following Manufacturer Instructions for All Equipment: Following manufacturer instructions ensures that tools and chemicals are used correctly, reducing the risk of accidents. Each product comes with specific guidelines for safe use and maintenance. Adhering to these instructions minimizes both personal risk and equipment damage.
-
Using Fire-Resistant Surfaces When Handling Hot Tools: Using fire-resistant surfaces when handling hot tools safeguards against fire hazards. Such surfaces can prevent ignition if hot materials accidentally come into contact with flammable items. The National Fire Protection Association (NFPA) emphasizes the importance of having fire-resistant work areas in environments where heat or flame is present.
-
Properly Disposing of Waste Materials: Properly disposing of waste materials is necessary to protect the environment and comply with safety regulations. Disposing of cleaning agents and other substances according to local laws reduces environmental impact and legal liability. The Environmental Protection Agency (EPA) provides guidelines for safe waste disposal to prevent pollution and promote safety.
Implementing these safety precautions when using 3D print cleaning tools helps create a secure working environment for users and surroundings.
How Should You Choose the Right Tools for 3D Print Cleanup?
Choosing the right tools for 3D print cleanup involves considering the material type, the complexity of the print, and the desired finish. Common cleanup tools include scrapers, cutters, sandpaper, and solvents. Each tool serves a different purpose and is effective for specific tasks, with scrapers being ideal for removing support structures and sandpaper recommended for achieving a smooth surface finish.
In terms of material, PLA prints, which comprise about 60% of the 3D printing market, typically require less intensive cleanup than ABS prints, which make up roughly 20%. PLA can be cleaned with simple tools like scrapers and can be lightly sanded. In contrast, ABS may need more specialized tools, like chemical solvents (e.g., acetone) to smooth edges and remove blemishes.
For example, when working with a complex printed model, a hobbyist might use a scraper to remove support material from a detailed design. They may then follow up with sandpaper to ensure a smoother finish. Alternatively, for larger prints with rough surfaces, a power sander might be more effective to save time.
Additional factors influencing tool selection include the print’s scale and intricacy. Large prints require more robust tools, while small, intricate models benefit from precision tools like hobby knives. Environmental concerns about chemicals like acetone can also dictate tool choice, prompting some users to opt for mechanical cleanup methods over solvents.
Limitations include the availability of tools and personal skill level. Not all users may have access to power tools or advanced solvents. Therefore, understanding each tool’s purpose and compatibility with the material is crucial for effective 3D print cleanup. Further exploration could involve researching advanced cleanup methods or eco-friendly alternatives suitable for various filament types.
Related Post: