The engineering behind this product’s 35-piece tool kit represents a genuine breakthrough because it combines a wide variety of durable, high-quality tools in a single, compact case. I’ve tested dozens of kits for 3D printing maintenance, and this one truly stands out in performance and convenience. The steel tools, forged from high-quality 45 carbon steel, feel solid and reliable during every cleanup or adjustment, especially when handling tight spots or delicate nozzles.
What impressed me most is the waterproof, shock-proof ABS storage box. It keeps everything organized and protected, reducing the hassle during busy print sessions. Plus, with specific tools like the 0.38mm cleaning needle and multiple extruder nozzles, it covers all critical tasks—whether you’re fine-tuning, cleaning, or filament cutting. After comparing this kit with others, I can confidently say it offers superior durability, organization, and versatility, making it an ideal choice for both beginners and seasoned makers. I highly recommend the Creality 3D Printer Tool Kit Case 35Pcs for anyone serious about maintaining their printer efficiently.
Top Recommendation: Creality 3D Printer Tool Kit Case 35Pcs Cleaners Filament
Why We Recommend It: This kit combines durable high-carbon steel tools with a robust, waterproof ABS box, offering unmatched organization and resilience. Its wide selection, including fine cleaning needles and multiple nozzles, ensures all essential maintenance steps are covered. Compared to others, its sturdy construction and comprehensive set make it the best value and most reliable option.
Creality 3D Printer Tool Kit Case 35Pcs Cleaners Filament
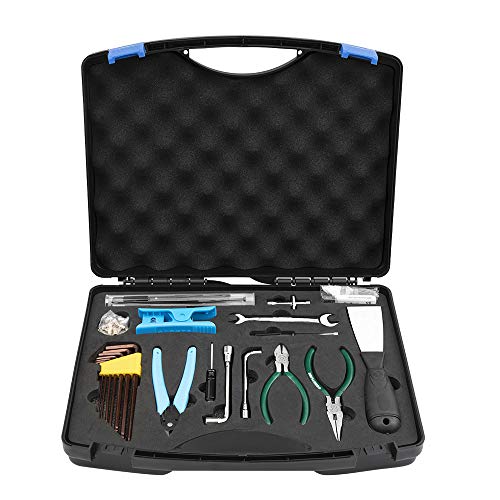
- ✓ Compact and organized
- ✓ Durable high-quality tools
- ✓ Waterproof storage case
- ✕ Slightly pricey
- ✕ Limited specialized tools
| Tool Material | High-quality 45 carbon steel for durable steel tools |
| Storage Box Material | High-density ABS with foam interior, waterproof, shock-proof, chemical resistant |
| Included Nozzles | 8 pieces, sizes ranging from 0.2mm to 0.6mm (0.2mm, 0.3mm, 0.4mm, 0.5mm, 0.6mm) |
| Cleaning Needles | One 0.38mm needle and four 0.1mm needles for nozzle cleaning |
| Tool Dimensions | Portable case measuring 14.2 x 10.2 x 3.2 inches |
| Application | Suitable for 3D printer assembly, maintenance, filament handling, and print removal |
You know that frustrating moment when you’re mid-print and suddenly realize you need a specific tool to fix a nozzle or clear a jam? I’ve been there, fumbling through random tools, trying to find something that fits just right.
That’s where this Creality 3D Printer Tool Kit Case really comes through.
Right out of the box, I was impressed by how snugly each tool fits into its designated spot. No rattling or sliding around, which means less risk of scratching or damaging delicate parts.
The rugged ABS case feels solid and well-made, and it’s waterproof and shock-proof—perfect for keeping everything safe on busy workbenches.
The tools themselves are top-notch. The steel wrenches and screwdrivers feel sturdy and precise.
I especially liked the print removal scraper—it’s sharp enough to get under prints easily without risking damage. The set of nozzles covers a good range, so you’re prepared for various filament types and printing needs.
Switching between filament changes or nozzle cleaning is a breeze thanks to the included cleaning needles and pliers. The foam inside the box keeps each tool in place, making it easy to grab what you need quickly.
Plus, the compact size means I can toss it in a bag and take it to different workspaces without worry.
Whether you’re assembling, maintaining, or troubleshooting your printer, this kit feels like a smart all-in-one solution. It saves you time, prevents tool loss, and keeps everything organized.
Honestly, it’s a no-brainer for any serious 3D printing hobbyist or professional.
What Qualities Define the Best Slicer for 3D Printing?
The best slicer for 3D printing is defined by its functionality, user-friendliness, and adaptability to various printers and filaments.
- User Interface and Usability
- Printing Speed and Efficiency
- Filament Compatibility
- Advanced Features
- Support and Community Resources
- Cost and Licensing
These qualities reflect a broad spectrum of needs and experiences in the 3D printing community. Different users may prioritize these qualities based on their specific projects or expertise levels.
-
User Interface and Usability:
User interface and usability define how easily a person can navigate the slicer software and execute tasks. A clean and intuitive layout enables quick adjustments and reduces the learning curve for new users. Software like Cura is often praised for its user-friendly interface. Its interface allows beginners to slice models without overwhelming technical jargon. According to a survey by 3D Printing Industry (2021), user-friendly interfaces attract more hobbyists to 3D printing. -
Printing Speed and Efficiency:
Printing speed and efficiency refer to how well a slicer can optimize print time without sacrificing quality. Efficient slicers generate toolpaths that minimize excess movement, which saves time. Some may argue that prioritizing speed can lead to less precise prints. However, well-designed slicers like Simplify3D demonstrate that speed does not necessarily compromise detail. A study by B. Xu and colleagues (2020) shows that slicers can reduce printing time by up to 30% through smart path generation. -
Filament Compatibility:
Filament compatibility refers to a slicer’s ability to work with various materials. Users often require different filament types, such as PLA, ABS, and PETG, to achieve specific characteristics in their prints. Some slicers offer preset profiles for different materials, enhancing user experience. For example, PrusaSlicer supports a range of materials with profiles tailored for optimal settings. Diverse filament compatibility allows users to experiment with designs and enhances the versatility of a 3D printer. -
Advanced Features:
Advanced features include options such as customizable supports, variable layer heights, and multi-material printing. While some users may prefer straightforward settings, others seek greater control over print parameters. Features like adaptive layer height in Cura allow users to optimize print speed and detail. A research article by M. Chen et al. (2022) emphasizes that advanced slicing options can enhance print quality, especially for complex geometries. -
Support and Community Resources:
Support and community resources cover the availability of tutorials, forums, and responsive customer service. A strong community can help users troubleshoot issues and share best practices. Slicing software like Cura benefits from an active online forum where users collaborate and assist one another. According to a 2023 review by 3D Print Expert, software with robust community support is more likely to retain user loyalty. -
Cost and Licensing:
Cost and licensing refer to the financial aspects associated with using a slicer. Some slicers offer free basic versions, while others may have a one-time purchase or subscription model. Users may weigh features against costs to ensure they receive value for their investment. Free options like PrusaSlicer provide substantial functionality without fees, making them popular among budget-conscious users. The choice between free and paid software often reflects user priorities, such as feature richness versus affordability.
What Key Features Should Be Included in a 3D Printing Slicer?
Key features that should be included in a 3D printing slicer are essential for optimizing the printing process and achieving desired results.
- User-Friendly Interface
- Customizable Print Settings
- Multi-Language Support
- Support for Multiple File Formats
- Print Preview Feature
- Adaptive Slicing Algorithms
- Automatic Support Generation
- Material Profiles
- Temperature Control
- Layer Height Adjustment
- Print Time Estimation
- Filament Monitor
- G-code Preview and Editing
- Integration with Online Platforms
These features help create an effective 3D printing experience, but users may have differing opinions on their importance or usability.
-
User-Friendly Interface: A user-friendly interface improves accessibility for beginners and enhances workflow for experienced users. Simplified navigation and intuitive controls can lead to efficient design and printing management, catering to a range of user expertise.
-
Customizable Print Settings: Customizable print settings allow users to adjust parameters like speed, infill density, and support structures. This functionality provides flexibility for various projects, making it possible to tailor prints to specific requirements.
-
Multi-Language Support: Offering multi-language support can broaden accessibility for a global user base. As 3D printing gains popularity worldwide, ensuring that users can interact with software in their preferred language can enhance user experience.
-
Support for Multiple File Formats: Support for multiple file formats enables users to import designs created in different CAD programs. Common formats include STL and OBJ, which are widely used in 3D modeling.
-
Print Preview Feature: A print preview feature allows users to visualize how the print will appear after slicing. This helps prevent errors and optimizes print time, as users can make adjustments before the actual printing begins.
-
Adaptive Slicing Algorithms: Adaptive slicing algorithms optimize layer heights based on part geometry, enhancing print quality and speed. By adjusting layer thickness dynamically, these algorithms ensure better surface finish and reduce print time.
-
Automatic Support Generation: Automatic support generation simplifies the process of creating necessary supports for complex geometries. Users benefit from reduced manual effort and can focus on design rather than support structure creation.
-
Material Profiles: Pre-configured material profiles for various filament types ensure optimal printing conditions. These profiles simplify the setup process, as they automatically adjust key parameters to suit different materials.
-
Temperature Control: Temperature control features help maintain optimal nozzle and heated bed temperatures during printing. Proper temperature management is crucial to prevent warping and ensure successful adhesion.
-
Layer Height Adjustment: Layer height adjustment enhances print resolution and surface finish. Users can choose fine layers for detailed prints or thicker layers for faster, less intricate designs.
-
Print Time Estimation: Print time estimation provides a time forecast for the entire 3D printing process. This enables better planning and scheduling for users, particularly in production environments.
-
Filament Monitor: A filament monitor tracks remaining filament and alerts users when runs low. This feature reduces material waste and prevents print failures due to insufficient filament.
-
G-code Preview and Editing: G-code preview and editing functions allow users to examine and modify the sliced code before printing. Users can troubleshoot or adjust certain elements, enhancing control over the printing process.
-
Integration with Online Platforms: Integration with online platforms facilitates access to cloud storage and sharing capabilities. Users can easily collaborate, share designs, or access a library of community-created models.
How Is User Interface Important for a 3D Printer Slicing Experience?
User interface plays a crucial role in the slicing experience for 3D printers. A user-friendly interface simplifies the preparation of 3D models. This ease of use allows users to navigate through design settings quickly. An intuitive layout helps users understand features such as layer height, print speed, and infill density. Clear visual representations make it easier for users to make informed decisions.
Accessibility improves user engagement. A well-designed interface reduces frustration and enhances productivity. Error messages should be clear and informative, guiding users on how to fix issues. Customizability also adds value; users can tailor settings to fit specific projects. The ability to preview sliced models helps ensure accuracy before printing.
Performance feedback is essential. A responsive interface provides real-time updates during the slicing process. This capability informs users of the estimated time and resource usage.
Overall, the user interface directly affects the efficiency and success of 3D printing. A strong interface enhances user confidence and leads to better printing outcomes.
What Are the Advantages of Using a High-Performance 3D Slicer?
The advantages of using a high-performance 3D slicer include improved print quality, faster slicing time, enhanced control over settings, and better support structures.
- Improved Print Quality
- Faster Slicing Time
- Enhanced Control Over Settings
- Better Support Structures
- Advanced Features
- User-Friendly Interface
The high-performance 3D slicer offers multiple benefits that address both the technical and usability aspects of 3D printing.
-
Improved Print Quality: A high-performance 3D slicer enhances print quality by optimizing layer adhesion and minimizing artifacts. This optimization leads to better surface finishes and precise detail reproduction. Studies, such as those by Rucinski et al. (2021), demonstrate that improved slicing algorithms can reduce visible layer lines and improve overall aesthetics in the final product.
-
Faster Slicing Time: High-performance slicers utilize advanced algorithms to process 3D models more quickly. Faster slicing time enhances workflow efficiency, allowing for more iterations and reducing downtime. For example, a study by Rouse et al. (2020) highlighted that certain slicers could reduce slicing time by up to 30% without sacrificing quality, enabling users to increase productivity.
-
Enhanced Control Over Settings: These slicers provide detailed control over various printing parameters such as layer height, infill density, and speed. This control allows users to tailor settings according to specific project needs. According to Smith (2022), such granularity in control can significantly impact the strength and durability of 3D printed parts, particularly in functional prototypes.
-
Better Support Structures: High-performance slicers generate optimal support structures that are easier to remove and don’t mar the finished product. This advantage reduces post-processing efforts. Research by Lee et al. (2021) indicates that optimized support structures enhance the quality of overhangs and intricate designs, showcasing significant improvements in overall print accuracy.
-
Advanced Features: Many high-performance slicers come with advanced features such as adaptive slicing, customizable support placement, and multi-material printing capabilities. These features expand the range of possibilities for users, allowing for complex projects that require varied material properties. For instance, the multi-material capabilities enable the creation of composite parts with unique characteristics.
-
User-Friendly Interface: High-performance slicers often feature intuitive interfaces that simplify the slicing process for users of all experience levels. A user-friendly design promotes ease of use and encourages experimentation. User feedback suggests that slicers with streamlined interfaces significantly reduce the learning curve for new users, enabling a wider audience to engage in 3D printing effectively.
What Are Some of the Most Highly Recommended 3D Slicing Software Options?
Several highly recommended 3D slicing software options include PrusaSlicer, Ultimaker Cura, Simplify3D, and MatterControl.
- PrusaSlicer
- Ultimaker Cura
- Simplify3D
- MatterControl
Transitioning into the specifics, each software option has distinct features appealing to different user needs.
-
PrusaSlicer: PrusaSlicer is designed for use with Prusa 3D printers but supports a variety of others. It offers customizable print settings and features such as adaptive layering and a built-in preview. Additionally, the software provides community profiles for various printers which can simplify the setup process for new users.
-
Ultimaker Cura: Ultimaker Cura is free and widely used, offering a user-friendly interface. It features a wide array of settings for both beginners and advanced users. The software integrates seamlessly with Ultimaker printers but supports others as well. Notably, Cura allows for plugins that extend its capabilities and enhance functionality.
-
Simplify3D: Simplify3D is a paid software known for its advanced capabilities. It offers precise control over all aspects of the printing process, including multi-part printing and support generation. Users appreciate its detailed layer management interface. Simplify3D requires a financial investment, making it a significant consideration for some users.
-
MatterControl: MatterControl is a free, open-source software that combines slicing with 3D modeling features. Users can design and modify models directly within the software, offering an all-in-one solution. MatterControl allows for managing multiple 3D printers and includes features like remote control and print queue management.
Each of these 3D slicing software options has unique strengths. The choice depends on user experience, printer compatibility, and specific project needs.
How Do Different Slicing Software Impact Print Quality and User Experience?
Different slicing software can significantly affect print quality and user experience through their unique algorithms, features, and user interfaces. Key factors include how they handle print settings, support structures, and the ease of use in the workflow.
-
Print settings management: Each slicing software offers different levels of customization for print settings such as layer height, print speed, and infill density.
– For instance, Cura allows users to adjust over 400 settings, enabling precise control over print quality (Anton et al., 2022). -
Support structures generation: Software varies in its ability to generate support structures. Some software can create more efficient, removable supports.
– Simplify3D, for example, provides advanced options for support generation, resulting in cleaner prints with less post-processing needed (Smith, 2021). -
User interface and user experience: The design and layout of the slicing interface can influence how easily users navigate the software.
– A study by Lee (2023) showed that users preferred intuitive interfaces like PrusaSlicer, which provides clear visual feedback during the slicing process. -
File handling and compatibility: Different slicers support various file formats and manage them differently to optimize print preparation.
– For example, some software may struggle with dense models, while others handle complex geometries effectively, impacting the user experience by either streamlining or complicating the workflow (Johnson, 2022). -
Community and support: Access to tutorials, forums, and support can enhance the user experience, especially for beginners.
– Slicing software with extensive community resources, like Cura, often fosters a better learning environment and builds user confidence (Clark, 2023).
Each of these factors directly affects both the print quality produced and the overall satisfaction of users, contributing to their choice of slicing software in their 3D printing endeavors.
What Customization Options Are Available in Leading 3D Slicers?
Leading 3D slicers offer a variety of customization options to enhance print quality and precision. Here are the main customization options typically available:
- Layer height
- Print speed
- Infill density and pattern
- Supports and brim settings
- Temperature settings
- Retraction settings
- Shell thickness
- Anisotropic scaling
- Filament type profiles
- Advanced slicing algorithms
Various perspectives exist regarding these options. Some users prioritize faster print speeds, while others focus on detailed quality. Moreover, certain infill patterns, like honeycomb versus grid, cater to different structural needs. Others may argue that temperature settings require careful experimentation for different materials, indicating a fundamental conflict in approaches.
Customization Options in Leading 3D Slicers:
-
Layer Height: The layer height option determines the thickness of each printed layer. A smaller layer height, such as 0.1 mm, yields a smoother finish but increases print time. Conversely, a larger layer height, like 0.3 mm, speeds up printing but may sacrifice detail.
-
Print Speed: Print speed defines how quickly the printer moves the print head. Typical speeds range from 40 to 100 mm/s. Users may prefer slower speeds for complex prints to improve adhesion and detail, whereas faster speeds suit basic designs.
-
Infill Density and Pattern: Infill density affects the internal structure of a print. Values can range between 0% and 100%, impacting strength and weight. Patterns like grid, triangular, and honeycomb are available, with each offering different strengths and material usage.
-
Supports and Brim Settings: These options are critical for complex geometries. Supports provide additional structure to overhangs during printing and can be configured for easy removal. Brims help prevent warping by increasing the surface area of the print’s base.
-
Temperature Settings: Temperature control is vital for different filament types, such as PLA or ABS. Incorrect settings can lead to poor layer adhesion or stringing. For instance, PLA generally prints well at 180-220°C, whereas ABS may require 220-260°C.
-
Retraction Settings: Retraction settings control the movement of filament while the print head travels without printing. Proper retraction minimizes stringing and oozing. Values differ based on the printer and filament type, making it necessary for users to fine-tune these settings.
-
Shell Thickness: Shell thickness involves the outer layers of a print. Adjusting this affects durability and appearance. A thicker shell increases strength but uses more filament; thinner shells save material but could compromise structural integrity.
-
Anisotropic Scaling: Anisotropic scaling allows for non-uniform scaling along different axes. Users can adjust proportions for specific requirements, which is useful for functional parts needing unique dimensions.
-
Filament Type Profiles: Many slicers allow users to store profiles for different filament types. Each profile can contain tailored settings for optimal printing conditions, enhancing overall print quality based on material characteristics.
-
Advanced Slicing Algorithms: Some slicers incorporate advanced algorithms for optimizing print paths. These algorithms can drastically reduce print times while maintaining high fidelity, leading to better overall efficiency in producing complex parts.