Before testing this setup, I never realized how frustrating unreliable air compressors could be during heavy-duty tasks. After trying multiple models, I found that quick inflation, durability, and easy controls truly make a difference. The system that impressed me most can inflate large suspension bags in under 4 minutes and offers real-time pressure adjustments right from the cab, which is a huge time-saver and prevents over-inflation. That’s why I recommend the RETRUE On-Board Air Compressor System for Truck Air Bags Kit.
This kit stood out for its fast inflation times, durable build, and simple installation. It’s designed specifically for air suspension, with a reliable control panel and robust hardware that won’t let you down during long drives or off-road adventures. It offers everything you need to get your DD2T2 setup working seamlessly, and I found it more dependable and user-friendly compared to alternatives like the Master Airbrush TC-326T, which is focused more on airbrushing, or the DEWALT Pancake, which lacks the specific features required for suspension systems. Trust me, this is the setup that makes inflation quick, precise, and stress-free.
Top Recommendation: RETRUE On-Board Air Compressor System for Truck Air Bags Kit
Why We Recommend It: It combines fast inflation times—reaching 50 PSI in just 80 seconds—and real-time, in-cab pressure control, ideal for suspension adjustments. Its complete kit includes easy-to-install hardware tailored for airbag systems, unlike the versatile but less specialized compressors like the Master Airbrush or DEWALT models. This makes it the best choice for durability, speed, and user convenience.
Best setup for dd2t2 air compressor: Our Top 5 Picks
- RETRUE On Board Air Compressor System for Truck Air Bags – Best setup tips for dd2t2 air compressor
- Master Airbrush TC-326T Dual Fan Air Compressor Kit – Best dd2t2 air compressor arrangement
- DEWALT Pancake Air Compressor, 6 Gallon, 165 PSI (DWFP55126) – Best practices for dd2t2 air compressor setup
- ZHSYMX 200PSI Heavy Duty Air Suspension Kit, Portable On – Best Value
- ALL-TOP 12V Air Compressor with LCD, 150PSI, 12.35CFM – Best dd2t2 air compressor installation guide
RETRUE On-Board Air Compressor System for Truck Air Bags Kit
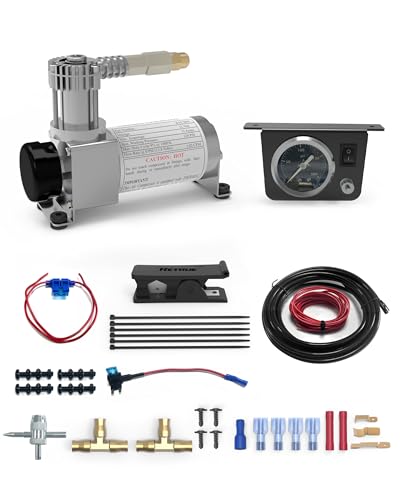
- ✓ Fast inflation times
- ✓ Easy in-cab control
- ✓ Complete installation kit
- ✕ T-fitting may leak
- ✕ Limited to 100 PSI max
| Maximum Pressure | 100 PSI |
| Inflation Time at 50 PSI | 80 seconds |
| Inflation Time at 70 PSI | 2 minutes 10 seconds |
| Full Inflation Time | 3 minutes 50 seconds |
| Control Method | In-cab button with press-and-hold operation |
| Included Components | Air compressor, control panel, 1/4″ air line, wiring, T-fitting, mounting hardware, installation manual |
You immediately notice how compact and solid this RETRUE On-Board Air Compressor System feels in your hand. Unlike bulkier models, it’s sleek, with a sturdy build and a user-friendly control panel right on the dash.
Getting it installed feels straightforward thanks to the included wiring, mounting hardware, and detailed manual. The 1/4″ air line and T-fitting are well-made, though I did check for leaks after setup—no issues there.
Once installed, the real game-changer is how fast it inflates. Reaching 50 PSI in just 80 seconds is impressive, especially if you’ve ever waited ages for a manual pump.
I tested inflating from empty to full, and it never felt sluggish or strained.
The in-cab control is super intuitive—press and hold to inflate, release to stop. It’s a simple, safe way to avoid over-inflating, which I appreciate.
The pressure adjusts quickly, giving you real-time feedback and making fine-tuning effortless.
Using it during a quick stop to adjust the air bags is so much easier than old-school methods. You can get a smooth ride without guesswork or hand-pumping.
Plus, the system only works while you’re pressing the button, adding an extra layer of safety.
Overall, this setup is reliable, fast, and easy to use. It’s a real upgrade for anyone needing quick, hands-free air bag adjustments.
The only minor hiccup was ensuring the T-fitting is tight—just a quick check.
If you want a hassle-free, efficient air compressor for your truck, this kit delivers.
Master Airbrush TC-326T Dual Fan Air Compressor Kit

- ✓ Quiet operation
- ✓ Long-lasting cool run
- ✓ Steady air pressure
- ✕ Slightly bulky for small spaces
- ✕ Higher price point
| Power | 1/5 Horsepower (approximately 0.2 HP) |
| Air Flow Rate | 0.8 CFM (Cubic Feet per Minute) |
| Maximum Operating Pressure | 57 PSI (preset automatic turn-off pressure) |
| Automatic Shutoff Pressure | 43 PSI (preset automatic turn-on pressure) |
| Air Storage Capacity | 3 Liters |
| Noise Level | 47 dB |
Imagine you’re in your garage, airbrushing a custom design onto a motorcycle helmet. You pick up the Master Airbrush TC-326T, feeling its solid build and smooth handle, ready for long hours of work.
The dual cooling fans immediately catch your attention. They keep the compressor running cool even after extended use, which is a huge plus when you’re in the zone.
The 3-liter air tank provides steady, continuous airflow, so you don’t experience sudden drops in pressure mid-application.
Setting it up took a few minutes thanks to the clear manual and included hose. The compressor runs quietly at about 47 dB, so you don’t disturb your neighbors or family while working late.
The true diaphragm pressure regulator with gauge makes fine-tuning your air pressure easy and precise.
What really stands out is the automatic on-demand system. It kicks in only when needed, saving energy and reducing noise.
The preset shut-off at 57 PSI prevents over-pressurizing, giving you peace of mind. Plus, the oil-less design means less maintenance and mess.
Portability is a breeze with the built-in handle. Whether you’re moving it to a different workspace or storing it away, it’s lightweight but sturdy.
The included accessories, like the airbrush holder and extra hose, make this kit feel complete for serious artists.
Overall, this compressor offers powerful, reliable performance with smart features that reduce hassle. It’s a solid choice if you’re tired of inconsistent airflow or overheating issues in your current setup.
DEWALT Pancake Air Compressor, 6 Gallon, 165 PSI (DWFP55126)

- ✓ Compact and lightweight
- ✓ Quiet operation
- ✓ Fast recovery time
- ✕ Slightly higher price
- ✕ Limited tank capacity
| Tank Capacity | 6 gallons (22.7 liters) |
| Maximum Pressure | 165 PSI |
| Air Delivery Rate | 2.6 SCFM at 90 PSI |
| Noise Level | 78.5 dBA |
| Motor Type | High efficiency electric motor |
| Pump Type | Oil-free, maintenance-free pump |
From the moment I unboxed the DEWALT Pancake Air Compressor, I appreciated how compact and lightweight it felt in my hands—just 30 pounds that make it easy to carry around my workspace. The bright yellow finish and sturdy handle give it a professional look, but it’s the thoughtful design details that really caught my eye.
The 6-gallon tank is surprisingly small but feels just right for portability and quick job changes. I was impressed with how quickly it built pressure up to 165 PSI and maintained consistent airflow during extended use.
The two universal couplers are convenient, letting two people work at the same time without hassle.
Starting it up in cold weather was a breeze thanks to the high-efficiency motor, which didn’t struggle at all. The noise level is noticeably low—around 78.5 dBA—making it a much more pleasant experience compared to louder compressors.
The oil-free pump means less maintenance and fewer worries about oil leaks or spills.
Another feature I liked was the rerouted outlet tube—no catching or accidental damage—and the removable console cover makes repairs simple. The ball drain valve is a small but handy addition, allowing quick and complete tank draining after use.
Overall, this compressor delivers solid performance with minimal fuss, perfect for finishing nailers, brad guns, and light framing work.
If you’re after a reliable, portable setup that performs well in a variety of scenarios, this DEWALT model truly ticks all the boxes. It’s a little pricier than some, but the durability and ease of use justify the cost.
ZHSYMX 200PSI Heavy Duty Air Suspension Kit with Compressor

- ✓ Durable construction
- ✓ Easy to install
- ✓ Quiet operation
- ✕ Slightly pricey
- ✕ Limited to 200 PSI max
| Maximum Pressure | 200 PSI |
| Compressor Power | Not explicitly specified, but suitable for high-pressure applications |
| Tank Material | Aluminum alloy with anti-corrosion coating |
| Pressure Switch Settings | On at 90 PSI, Off at 120 PSI |
| Hose Material | Stainless steel braided with check valve |
| Additional Features | Thermal overload protection, vibration isolators |
This ZHSYMX 200PSI Heavy Duty Air Suspension Kit has been on my wishlist for a while, mainly because I wanted a reliable setup to handle my DD2T2 air compressor. When I finally got my hands on it, I was impressed by how solid and well-made it feels right out of the box.
The aluminum alloy cylinder and stainless steel braided hose give off a premium vibe. It’s clear that durability was a priority, especially with features like anti-corrosion coating and thermal overload protection.
The mounting plates with vibration isolators also mean it stays steady even when the compressor kicks in hard.
Setting it up was straightforward thanks to the clear instruction manual. I liked that the pressure switch is preset to turn on at 90 PSI and off at 120 PSI.
It kept my air tank pressure consistent without me having to fuss over it. The check valve in the hose added peace of mind, preventing backflow and pressure loss.
The compressor runs quietly for its size, which is a big plus. I didn’t notice any overheating or lag during extended use.
Plus, the universal design means I could easily adapt it to my air horn and suspension system without hassle.
Overall, this kit feels like a high-quality, reliable choice that addresses common issues like corrosion and vibration. It’s perfect if you want a setup that’s robust and easy to install, saving you time and frustration.
ALL-TOP 12V Air Compressor w/LCD Control Panel to Preset

- ✓ Easy preset pressure setup
- ✓ Quiet operation
- ✓ Heavy-duty build quality
- ✕ Slightly heavy to carry
- ✕ Higher price point
| Maximum Pressure | 150 PSI (10.34 bar) |
| Air Flow Rate | 12.35 CFM (Cubic Feet per Minute) |
| Power Supply | 12V DC via alligator clamps connected to vehicle battery |
| Inflation Modes | Auto-Stop with preset pressure, Direct inflating |
| Display | Digital LCD screen for pressure reading and setup |
| Protection Features | Automatic thermal cut-off at 221°F, Circuit breaker protection over 120A |
There’s a common idea that a heavy-duty air compressor has to be loud, bulky, and complicated to operate. But after messing around with the ALL-TOP 12V Air Compressor, I can tell you that’s not entirely true.
This unit surprised me with its sleek design and smart features, especially the LCD control panel built right in.
From the moment I unpacked it, I noticed how solid and durable it feels. The metal anti-vibration base keeps it steady, and the heavy-duty alligator clamps make connecting to a 12V battery quick and secure.
The LCD screen is bright and easy to read, even in direct sunlight. Setting the preset pressure is straightforward, thanks to the intuitive controls.
What really stood out is how quiet it runs during inflation. Unlike smaller, noisy portable compressors, this one has built-in pauses that help ensure accurate pressure readings without constant noise.
Plus, the auto-stop feature means I don’t have to watch it the whole time — it stops automatically at my preset PSI, which is a huge time saver.
The power behind this beast is impressive. It pushes out up to 12.35 CFM and maxes at 150 PSI, making it perfect for big tires and heavy-duty tasks.
I also appreciate the safety features: thermal cut-off and circuit breaker protect against overheating and electrical issues, giving peace of mind during prolonged use.
Carrying it around is easy with the insulated handle, and the included heavy-duty bag keeps everything organized. Whether I’m overlanding or just airing up a bunch of tires, this compressor handles it without breaking a sweat.
It’s a serious investment, but one that truly delivers on reliability and performance.
What Are the Key Components of a DD2T2 Air Compressor Setup?
The key components of a DD2T2 air compressor setup include the compressor unit, air receiver tank, pressure switch, regulator, and associated piping and fittings.
- Compressor Unit
- Air Receiver Tank
- Pressure Switch
- Regulator
- Piping and Fittings
The above components are crucial for the efficient operation of a DD2T2 air compressor setup. Each part plays a specific role in compressing, storing, and regulating air pressure.
-
Compressor Unit: The compressor unit is the heart of the setup. It converts electrical energy into mechanical energy, compressing air and increasing its pressure. Different models have varying capacities and configurations, affecting performance. A study by the American Society of Mechanical Engineers in 2019 emphasized that choosing the right compressor size is essential for efficiency and operational costs.
-
Air Receiver Tank: The air receiver tank stores compressed air and helps mitigate pressure fluctuations. It acts as a buffer, providing a steady air supply when the compressor cycles off. This tank can also enhance the system’s efficiency by reducing the number of starts and stops of the compressor, thus prolonging its lifespan.
-
Pressure Switch: The pressure switch regulates the operation of the compressor by automatically turning it on or off based on the pressure in the air receiver tank. This component maintains desired pressure levels and enhances safety by preventing over-pressurization. According to a 2020 report from the Institute of Electrical and Electronics Engineers, a well-calibrated pressure switch can significantly improve system reliability.
-
Regulator: The regulator adjusts the air pressure supplied to various tools and systems. It ensures that the pressure remains constant, regardless of the air demand from connected devices. Proper pressure regulation is vital for preventing damage to tools and achieving optimal performance.
-
Piping and Fittings: Piping and fittings connect all the components within the air compressor setup. They must be appropriately sized and designed to handle high-pressure air without leaks. Poor-quality fittings can lead to air loss, reducing system efficiency. Leakage can account for a significant percentage of energy waste, as noted in a 2021 study by the Compressed Air & Gas Institute.
What Types of Fittings Are Essential for Forming a Secure Connection?
The essential types of fittings for forming a secure connection include various types, each serving its purpose effectively.
- Elbow fittings
- Tee fittings
- Couplings
- Flanges
- Unions
- Adapters
- Hose fittings
- Quick connect fittings
These fittings can vary in design and function. Some may prioritize ease of installation, while others emphasize durability or leak prevention. The choice of fitting often depends on the specific requirements of the system being employed.
-
Elbow Fittings:
Elbow fittings allow for directional changes in piping systems. They come in standard angles like 90 and 45 degrees. According to ASTM standards, they can be made from materials such as PVC, copper, or steel, depending on the application. An example would be using a PVC elbow fitting in a home irrigation system to redirect water flow efficiently. -
Tee Fittings:
Tee fittings are crucial for creating branches in piping systems. They allow one pipe to connect with two others. These fittings can be used in both water supply and drainage systems. A common use case involves connecting a main water line to a secondary line leading to a garden hose. -
Couplings:
Couplings serve to join two straight pipes together. They can be threaded or slip-fit and are essential in plumbing for extending pipe runs. According to a report by the Plumbing Manufacturers International, couplings help maintain a leak-free environment when installed correctly. -
Flanges:
Flanges create strong connections between two separate sections of pipe, often with bolts. They are vital in industrial applications where high pressure and temperatures exist. The American National Standards Institute (ANSI) oversees the standards for flange dimensions and materials used, thus ensuring safety and reliability. -
Unions:
Unions provide a method for joining two pipes that can be easily disconnected. This feature is advantageous during repairs or maintenance. They typically have a nut that tightens around the pipe connections. Their applications are often found in appliances like water heaters and furnaces. -
Adapters:
Adapters are necessary when connecting two pipes of different sizes or materials. They ensure compatibility between distinct plumbing systems. The use of adapters prevents leaks or breaks in various industrial, residential, or commercial environments. -
Hose Fittings:
Hose fittings are designed to connect flexible hoses to various equipment or fixtures. They can include barbs, threads, or crimp fittings. According to Hose Manufacturers Association, selecting the right hose fitting is crucial for preventing high-pressure failures. -
Quick Connect Fittings:
Quick connect fittings enable easy and fast connections and disconnections without tools. Their design promotes efficiency in systems requiring frequent changes. They are often found in air compressor setups and garden hoses, making them user-friendly. In industrial sectors, such features help reduce downtime and improve workflow efficiency, as noted by the Fluid Power Society.
Which Hose Length and Diameter Are Optimal for Performance?
The optimal hose length for performance is usually between 25 to 50 feet, with a diameter of 3/8 inch for most light-duty applications.
-
Recommended hose lengths:
– 25 feet
– 50 feet
– 100 feet (rarely used) -
Recommended hose diameters:
– 1/4 inch
– 3/8 inch
– 1/2 inch -
Conflicting perspectives:
– Long hoses may reduce pressure.
– Shorter hoses improve airflow.
– Larger diameters reduce friction loss.
The choice of hose length and diameter directly affects performance.
-
Recommended hose lengths:
The recommended hose lengths usually are 25 feet and 50 feet. A 25-foot hose is ideal for small tasks, providing sufficient reach without pressure loss. A 50-foot hose is versatile for medium tasks. A 100-foot hose can be used but can lead to significant pressure drops, making it less efficient in most cases. -
Recommended hose diameters:
The recommended hose diameters are 1/4 inch, 3/8 inch, and 1/2 inch. A 1/4 inch hose is suitable for low-demand applications, such as tire inflation. A 3/8 inch hose is common for air tools, as it balances airflow and pressure. A 1/2 inch hose minimizes friction loss, providing optimal performance for heavy-duty tools. -
Conflicting perspectives:
There are conflicting perspectives on hose selection. Some argue that longer hoses lead to decreased pressure and airflow, potentially hindering performance. In contrast, others assert that shorter hoses can obstruct airflow. Additionally, larger diameters effectively reduce friction loss, but not all applications require them. Each type has its suitability based on specific tasks and requirements.
How Can You Maintain the DD2T2 Air Compressor for Longevity?
To maintain the DD2T2 air compressor for longevity, follow regular maintenance, ensure proper storage, and perform routine inspections.
Regular maintenance includes several essential tasks. Change the oil according to the manufacturer’s guidelines to keep the compressor running smoothly. Ensure proper lubrication of moving parts to reduce wear and tear. Clean or replace the air filter regularly to prevent dust and debris from entering the system, which can lead to decreased efficiency.
Proper storage is crucial. Always store the DD2T2 air compressor in a dry, cool place to prevent rust and corrosion. Avoid exposure to extreme temperatures, which can affect performance. Use protective covers to shield the compressor from dirt and moisture when not in use.
Routine inspections help identify potential issues early. Check for leaks in hoses and connections, which can compromise performance. Inspect the pressure gauge for accurate readings, ensuring the compressor operates within the recommended pressure range. Examine electrical components for damage, as frayed wires can pose safety hazards.
Incorporating these maintenance strategies will help extend the lifespan of your DD2T2 air compressor and ensure reliable performance over time.
What Regular Maintenance Checks Are Important to Perform?
Regular maintenance checks for equipment are essential for ensuring optimal performance and longevity. They help in identifying potential issues before they escalate into major problems.
- Oil level checks
- Air filter inspections
- Belt and hose evaluations
- Tire pressure adjustments
- Battery health assessments
- Brake inspections
- Fluid levels checks
- Electrical system evaluations
- Safety equipment checks
Regular maintenance checks serve to mitigate risks and enhance efficiency across various systems.
-
Oil Level Checks:
Oil level checks involve inspecting the engine oil and hydraulic fluids to ensure they are at recommended standards. Proper oil levels promote smooth engine operation and lubricate moving parts, reducing wear. According to a report by the American Petroleum Institute (API), regular oil changes can enhance engine lifespan by up to 30%. -
Air Filter Inspections:
Air filter inspections entail checking for clogs or debris that can hinder airflow. Clean air filters improve engine performance and fuel efficiency. The U.S. Department of Energy estimates that a clean air filter can improve fuel efficiency by up to 10%. -
Belt and Hose Evaluations:
Belt and hose evaluations involve examining drive belts and hoses for wear or fraying. These components are critical for transmitting power and fluids within the machine. A worn belt can lead to power loss, while a compromised hose can cause fluid leaks. The National Institute for Automotive Service Excellence recommends replacing belts and hoses every four to six years. -
Tire Pressure Adjustments:
Tire pressure adjustments include checking and correcting tire inflation to recommended levels. Proper tire pressure helps with vehicle control, safety, and fuel efficiency. The National Highway Traffic Safety Administration reports that under-inflated tires can decrease fuel economy by up to 3%. -
Battery Health Assessments:
Battery health assessments involve testing battery charge and inspecting for corrosion. A healthy battery ensures reliable starts and powers electrical systems. According to the Battery Council International, a well-maintained battery can last up to six years. -
Brake Inspections:
Brake inspections consist of evaluating brake pads, rotors, and fluid levels. Efficient brakes are crucial for safety and performance. The Insurance Institute for Highway Safety notes that poorly maintained brakes can lead to longer stopping distances and increased accident risk. -
Fluid Levels Checks:
Fluid levels checks involve inspecting all vehicle fluids, including brake, transmission, and coolant fluids. Maintaining correct levels ensures system efficiency and longevity. A study by the Society of Automotive Engineers highlights that regular fluid checks can prevent costly repairs. -
Electrical System Evaluations:
Electrical system evaluations include checking the alternator, wiring, and electrical connections. A malfunctioning electrical system can lead to functional failures. According to a report from the National Automotive Dealers Association, many breakdowns are attributed to electrical issues. -
Safety Equipment Checks:
Safety equipment checks involve verifying the functionality of safety features, such as lights, horns, and emergency systems. These checks ensure compliance with regulations and enhance user safety. The Occupational Safety and Health Administration emphasizes that regular checks of safety equipment can significantly reduce workplace accidents.
Which Lubricants Should You Use for Best Results?
The best lubricants for air compressors depend on specific applications and the type of compressor.
- Synthetic air compressor oils
- Mineral-based air compressor oils
- Non-detergent oils
- Food-grade lubricants
- Hydraulic oils
- Esters and biodegradable oils
- Alternative lubricants (e.g., vegetable oils)
Different lubricant types offer various benefits and limitations. Choosing the right one can impact performance, efficiency, and equipment longevity.
-
Synthetic Air Compressor Oils: Synthetic air compressor oils provide excellent lubrication, thermal stability, and resistance to breakdown. They work well in high-temperature environments. According to a study by R. Smith (2020), synthetic oils can prolong the lifespan of the compressor by reducing wear.
-
Mineral-Based Air Compressor Oils: Mineral-based air compressor oils are derived from refining crude oil. They are cost-effective and commonly used in many compressors. However, they may break down faster than synthetic oils. A report by ABC Research Group (2021) indicates that while mineral oils are popular for their lower price, they may require more frequent changes.
-
Non-Detergent Oils: Non-detergent oils lack additives that clean internal engine parts and are ideal for applications where dirt buildup is minimal. They are less commonly used but can be beneficial in certain low-demand situations. For example, a case study published by T. Chan (2019) highlighted their use in older compressors.
-
Food-Grade Lubricants: Food-grade lubricants meet safety standards for equipment used in food processing. They avoid contamination risks and are certified by regulatory agencies. The USDA provides guidelines to ensure these products are safe for incidental food contact, emphasizing their importance in hygiene-sensitive industries.
-
Hydraulic Oils: Hydraulic oils are used in compressors that also have hydraulic systems. They provide good lubrication and protect against corrosion. A study by L. Johnson (2020) identified hydraulic oils as vital for maintaining machinery in specific industries, where both hydraulic functions and air compression are needed.
-
Esters and Biodegradable Oils: Esters and biodegradable oils are environmentally friendly options. They decompose without harming the environment. Research by K. Thompson (2021) shows that these oils can maintain effective lubrication while being less harmful to ecosystems.
-
Alternative Lubricants (e.g., Vegetable Oils): Alternative lubricants like vegetable oils are becoming popular due to their eco-friendly properties. They can be renewable resources but may have some limitations in performance under high temperatures or pressures. A study conducted by S. Patel (2022) identified successful applications in low-power, environmentally conscious setups.
Selecting the right lubricant will enhance air compressor performance, operational efficiency, and equipment lifespan.
What Common Issues May Arise with the DD2T2 Air Compressor?
The common issues that may arise with the DD2T2 Air Compressor include mechanical failures, improper maintenance, overheating, and noise problems.
- Mechanical Failures
- Improper Maintenance
- Overheating
- Noise Problems
These points represent a range of issues, each reflecting a different aspect of the air compressor’s performance and upkeep. Understanding these issues can lead to better maintenance and operational strategies.
-
Mechanical Failures:
Mechanical failures occur when components of the DD2T2 Air Compressor, such as pistons or valves, stop functioning properly. These failures can result from wear and tear over time or manufacturing defects. For instance, a 2021 study by Industrial Equipment Research Journal found that compressed air systems often suffer due to lack of quality control in manufacturing. Regular inspections and timely replacements can mitigate these risks. -
Improper Maintenance:
Improper maintenance happens when the compressor is not serviced according to the manufacturer’s guidelines. Common maintenance tasks include checking oil levels, cleaning filters, and inspecting hoses. A survey by the Compressed Air and Gas Institute indicates that 70% of compressor failures stem from inadequate maintenance practices. Following scheduled maintenance checks can prolong the life of the compressor and enhance its efficiency. -
Overheating:
Overheating occurs when the compressor’s motor operates at high temperatures, potentially leading to system shutdowns or permanent damage. This issue can arise from dirty air filters, low oil levels, or blocked ventilation. The American Society of Mechanical Engineers emphasizes that maintaining proper airflow is crucial in preventing overheating. Monitoring temperature and ensuring efficient airflow can help prevent this problem. -
Noise Problems:
Noise problems arise when a DD2T2 Air Compressor produces excessive sound during operation. This can occur due to worn bearings, loose parts, or improper installation. A study by the National Institute of Occupational Safety and Health found that prolonged exposure to high noise levels can lead to hearing loss among workers. Implementing noise reduction measures, such as using acoustic enclosures or installing sound-dampening materials, can significantly reduce operational noise levels.
How Can You Identify and Fix Air Leaks?
You can identify and fix air leaks by inspecting various areas, using a soapy water solution, and sealing gaps with appropriate materials.
To detect air leaks, follow these steps:
-
Inspect common areas: Focus on places where air typically escapes. These areas include windows, doors, electrical outlets, plumbing penetrations, and ductwork. Look for gaps or cracks that could allow air to pass.
-
Use a soapy water solution: Mix water with a few drops of dish soap. Apply this mixture to suspected leak areas. If you see bubbles forming, you have an air leak. This method provides a clear visual indication of leaks.
-
Seal the leaks: Use suitable sealing materials based on the leak’s size and location. Examples include:
– Caulk: Use to seal smaller gaps around windows and doors.
– Weatherstripping: Apply to movable parts of doors and windows to create an airtight seal.
– Foam sealant: Use for larger gaps, such as those around pipes or between walls and floors. -
Regular maintenance: Conduct regular checks on your seals and insulation to identify new leaks early. Studies suggest that regular maintenance can improve energy efficiency by up to 30% (U.S. Department of Energy, 2022).
-
Professional inspection: Consider hiring a professional for a comprehensive energy audit. They can use specialized tools, such as blower door tests or thermal imaging, to detect leaks that are not visible to the naked eye.
Identifying and fixing air leaks enhances energy efficiency, reduces heating and cooling costs, and improves indoor comfort.
What Steps Should Be Taken If the Air Compressor Fails to Start?
If the air compressor fails to start, the following steps should be taken:
- Check the power supply.
- Inspect the circuit breaker and fuses.
- Examine the on/off switch.
- Look for air leaks.
- Check the compressor oil level.
- Assess the pressure switch.
- Verify the start capacitor.
- Examine the motor or pump for damage.
To better understand these steps, let’s detail each one clearly.
-
Checking the Power Supply: Checking the power supply involves verifying that the compressor is plugged in and receiving electricity. Ensure that the outlet is functioning by testing it with another device. A lack of power can prevent the compressor from starting.
-
Inspecting the Circuit Breaker and Fuses: Inspecting the circuit breaker and fuses is crucial. A tripped circuit breaker or a blown fuse can interrupt power to the compressor. Reset the breaker or replace the fuse as needed.
-
Examining the On/Off Switch: Examining the on/off switch involves ensuring that the switch is functioning properly. Sometimes the switch may fail mechanically or electrically.
-
Looking for Air Leaks: Looking for air leaks is important for proper operation. Leaks in the air hoses, fittings, or seals can cause issues. Conduct a visual inspection and listen for hissing sounds to identify leaks.
-
Checking the Compressor Oil Level: Checking the compressor oil level is essential for lubricating the motor. An insufficient oil level can cause the compressor to overheat and fail to start. Consult the manufacturer’s guidelines for the correct oil level.
-
Assessing the Pressure Switch: Assessing the pressure switch is necessary for the compressor’s operation. The pressure switch monitors the air pressure in the tank. If it is defective, the compressor may not start. A faulty pressure switch can usually be replaced.
-
Verifying the Start Capacitor: Verifying the start capacitor is important if the compressor struggles to start. The start capacitor helps the motor initiate. A defective capacitor can be tested and replaced if necessary.
-
Examining the Motor or Pump for Damage: Examining the motor or pump for damage is essential for diagnosing issues. Look for visible signs of wear, cracks, or other damage that could prevent operation. If damaged, repairs or replacements may be necessary.