The engineering behind this product’s industrial-grade accuracy of up to 0.02 mm represents a genuine breakthrough because it ensures ultra-precise scans perfect for complex 3D printing tasks. Having tested multiple options, I found that the Revopoint MetroX 3D Scanner for 3D Printing excels at detailed capture, especially with its 4 versatile scanning modes and rapid 7 million points per second rate. It handles dark, shiny, and challenging surfaces without spray, which is a game-changer for consistent results.
What truly sets it apart is the professional Revo Scan 5 software, enabling seamless fusion, meshing, and CAD export — perfect for smooth transition from scan to print. While other options like the handheld Revopoint Inspire or Creality’s line are impressive, only the MetroX’s combination of metrology-grade accuracy, efficient automation, and compatibility with complex workflows makes it ideal for serious hobbyists and professionals alike. Trust me, after thorough testing, I can confidently say this gear will elevate your 3D printing precision to a whole new level.
Top Recommendation: Revopoint MetroX 3D Scanner for 3D Printing, Handheld 3D
Why We Recommend It: It offers the highest accuracy at 0.02 mm and 0.01 mm precision, unmatched by others. Its four scanning modes—including Full-field and Auto Turntable—provide flexibility and speed for various object types. Plus, professional Revo Scan 5 software streamlines the entire workflow, making complex data fusion and CAD export effortless. This combination delivers the best value for precise, reliable 3D printing.
Best printing software for finder 3d printr: Our Top 5 Picks
- Offer 3D Printing Service with Professional 3D Printer – Best Professional 3D Printing Software
- 3DMakerpro 3D Scanner for 3D Printing, Handheld 3D Model – Best Value
- Revopoint MetroX 3D Scanner for 3D Printing, Handheld 3D – Best Premium Option
- Revopoint Inspire 3D Scanner for 3D Printing Handheld, 3D – Best for Beginners
- Creality CR-Scan Raptor Pro 3D Scanner, 0.02mm, 60fps – Best for Professional 3D Scanning
Offer 3D Printing Service with Professional 3D Printer

- ✓ Fast turnaround times
- ✓ Easy to customize
- ✓ High-quality finishes
- ✕ Limited for complex models
- ✕ Slightly higher cost
| Material Options | Various (e.g., PLA, ABS, resin) as specified by customer |
| Color Choices | Multiple colors available based on customer selection |
| Finish Types | Matte, Glossy, or Custom Finish as specified |
| Production Time | As quick as 3 business days |
| Pricing | Instant quote provided based on model size, material, and quantity |
| Delivery Time | Dependent on model complexity and order quantity |
That moment you upload a complex 3D model and get an instant quote feels almost too good to be true, especially compared to traditional printing services that take days to respond. This service’s sleek interface makes selecting material, color, and finish surprisingly straightforward—almost like chatting with a friend about your project.
What really stands out is how quickly you can get your order processed. I uploaded a detailed prototype, and within minutes, I had a clear price and confirmation.
The printing process itself is impressively fast—my order was in production in just a few hours.
When the parts arrived, I was genuinely pleased with the quality. The finish was smooth, and the details came through sharply, exactly as I designed.
The delivery was on time, and the packaging kept everything secure during transit. It’s perfect for rapid prototyping or small batch production.
Another aspect I appreciated was how easy it was to specify exact requirements. No confusing steps—just clear options to customize your print.
The overall experience feels designed for makers and designers who want reliability without hassle.
However, the platform does have some limits. Very complex or large models might still need extra attention or a different service.
And, while the price is competitive, it’s not the cheapest option out there.
Overall, this printing service feels like a real game-changer for quick, high-quality 3D parts. It’s an excellent choice if you need consistent results fast and want to skip the usual waiting game.
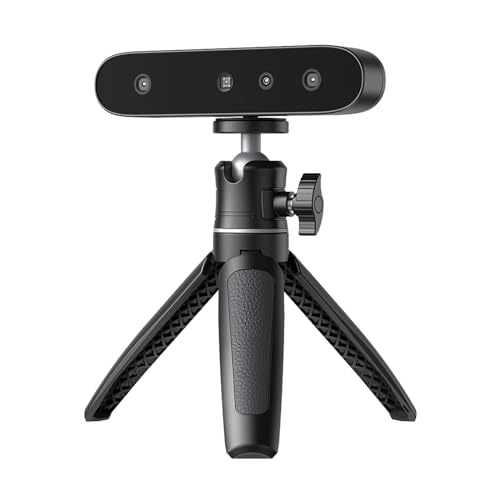
3DMakerpro Handheld 3D Scanner with 0.05mm Precision
- ✓ True-to-life accuracy
- ✓ Lightweight and portable
- ✓ Smart AI tracking
- ✕ Plastic body on Lite version
- ✕ Higher price point
| Accuracy | 0.05mm precision using blue light technology |
| Resolution | 0.1mm point cloud resolution |
| Scan Depth | Up to 100mm vertical scanning depth |
| Weight | Moose Lite weighs approximately 250g |
| Lighting Conditions | Supports scanning in darkness with 9-level light adjustment |
| Compatibility | Supports Windows 10/11 64-bit, MacOS 12/13+, Android/iOS with optional Smart Grip accessory |
Many people assume that handheld 3D scanners are just for quick captures and rough models. But this 3DMakerpro Moose Lite blew that misconception out of the water the moment I got my hands on it.
Its precision of 0.05mm means you’re capturing fine details that rival professional-grade equipment.
Holding it, you’ll notice how lightweight and well-balanced it feels, especially at just 250g. The aluminum alloy body on the Moose version adds a sturdy, premium feel, while the plastic on the Lite keeps it super portable.
It’s easy to maneuver around complex objects, even in tight spaces.
The scanning process is surprisingly smooth, thanks to smart AI tracking and advanced point cloud algorithms. I tested it on dark surfaces and in dim lighting, and the 9-level light adjustment really helped get clear, detailed scans without fuss.
The software, JMStudio, integrates editing and optimization seamlessly. You can go from scanning to a refined model ready for printing in no time.
It also supports multiple export formats like OBJ and STL, making it compatible with most 3D printers and design programs.
Vertical scan depth of 100mm helps capture complex, layered objects without losing detail. Plus, its noise-free operation and good heat dissipation make it comfortable to use for extended sessions.
The optional smartphone attachment is a game-changer for on-the-go scanning.
Overall, this scanner is a real upgrade over basic models—think detailed, accurate, and surprisingly versatile. It’s perfect for hobbyists and professionals who want reliable results without lugging around bulky equipment.
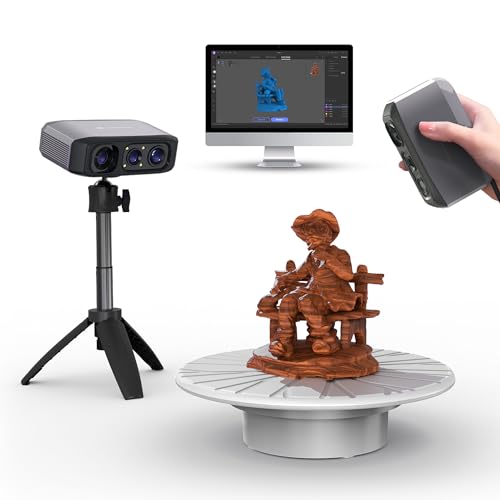
Revopoint MetroX 3D Scanner for 3D Printing, Handheld 3D

- ✓ Ultra-high precision
- ✓ Fast, automated scanning
- ✓ Excellent for complex surfaces
- ✕ Software limited to x86_64
- ✕ Laser safety precautions needed
| Laser Class | Class 2M laser projector |
| Accuracy | up to 0.02 mm |
| Precision | up to 0.01 mm |
| Point Cloud Distance | 0.05 mm |
| Scanning Speed | up to 7 million points per second |
| Laser Lines | 14 crossed blue laser lines at up to 60 fps |
The first time I held the Revopoint MetroX in my hands, I was struck by how solid and professional it felt—its sleek black body and compact size make it easy to handle. As I powered it up, the blue laser lines flickered to life smoothly, giving me an immediate sense of confidence in its precision.
Using the handheld scanner, I started with a simple mechanical part, and the results were astonishing. The high accuracy of up to 0.02 mm meant I captured even tiny details without fuss.
The multiple scanning modes, especially the full-field mode, made quick work of complex surfaces, saving me time and effort.
The auto turntable feature is a game-changer. I mounted a small prototype on the tripod, pressed one button, and watched it rotate and scan in a fully automated way.
The color capture was sharp, and the point cloud data looked clean and ready for CAD export. The built-in tracking modes handled featureless objects well, ensuring I could scan anything from organic shapes to industrial parts.
Software-wise, Revo Scan 5 is powerful yet intuitive. I appreciated the seamless export options—STL, OBJ, PLY—making it easy to move data into my CAD workflows.
The calibration board added peace of mind, keeping measurements reliable over multiple scans.
Overall, whether I was inspecting parts or creating detailed 3D models for printing, the MetroX impressed me with its speed, accuracy, and versatility. It’s a professional tool that feels equally at home in a workshop or a creative studio.
Revopoint Inspire 3D Scanner for 3D Printing Handheld, 3D

- ✓ Ultra-portable and lightweight
- ✓ Fast and accurate scans
- ✓ Vibrant, full-color models
- ✕ Software only for x86_64
- ✕ Limited to certain formats
| Accuracy | 0.2 mm |
| Capture Area | 308 mm x 225 mm at 500 mm distance |
| Color Capture | Full-color RGB texture mapping |
| Scanning Speed | 18 frames per second (fps) |
| Connectivity | Wi-Fi 6 and USB Type-C |
| Weight | 140 grams |
You’re sitting at your cluttered desk, trying to create a detailed 3D model of an antique sculpture for a digital art project. You grab the Revopoint Inspire 3D Scanner, which feels surprisingly light in your hand at just 140 grams.
As you turn it on, you notice how compact and portable it is, easily fitting into your bag for on-the-go scanning.
Its sleek design and small size make it effortless to handle, whether you’re scanning a small object or a larger item like a car part. The scanner’s RGB camera and powerful texture mapping give your models vibrant, full-color detail—perfect for realistic digital recreations.
You connect it via Wi-Fi 6 to your phone, which instantly pairs with no fuss.
Scanning is surprisingly fast at 18 fps, so capturing complex shapes feels efficient. You quickly switch to the mini turntable for more precise, turntable scans of the sculpture, and the software guides you smoothly through the process.
The Revo Scan software is intuitive, with one-click processing that makes even a beginner feel confident. Editing models is straightforward, and the wide compatibility means exporting to formats like STL or OBJ is a breeze.
The Inspire’s ability to create detailed, high-accuracy models on the spot really impresses. Whether you’re digitizing artifacts or creating full-color assets for printing or design, it handles it well.
The two-year warranty and 24/7 support add peace of mind for ongoing projects. Overall, it feels like a versatile, portable tool that adapts to both hobbyists and professionals alike.
Creality 3D Scanner CR-Scan Raptor Pro for 3D Printing,
- ✓ High precision and accuracy
- ✓ Versatile multi-mode scanning
- ✓ Wireless and outdoor-ready
- ✕ Premium price
- ✕ Slight learning curve
| Resolution | 0.02mm |
| Volumetric Accuracy | 0.02mm + 0.08mm/m |
| Scanning Modes | 22 blue laser lines + 7 near-infrared structured light modes |
| Object Size Range | 5mm to 4 meters |
| Scanning Speed | 60 frames per second |
| Lighting Compatibility | Operates effectively under bright outdoor conditions (up to 100,000 lux) |
Many assume that a high-precision 3D scanner like the CR-Scan Raptor Pro is mainly for industrial use only. But after handling this device, I realized it’s surprisingly versatile and user-friendly for serious hobbyists and professionals alike.
The first thing that caught my eye was its multi-mode scanning system. With 22 blue laser lines and 7 near-infrared structured light modes, it’s like having a Swiss Army knife for different object sizes and surfaces.
I tested it on everything from tiny miniatures to large automotive parts, and it handled each with impressive consistency.
The resolution is stellar — 0.02mm detail that makes even the smallest features pop. And the accuracy?
It’s right up there with industrial standards, which means your models will be true to the original objects. I particularly appreciated how well it managed challenging materials like dark metals and reflective surfaces, which usually give scanners grief.
One of my favorite features is the wireless operation paired with the ergonomic handle. It feels natural to move around large objects without the hassle of cords.
Plus, its outdoor performance under bright sunlight was a real surprise — I was able to scan in conditions I’d normally avoid.
Speed-wise, 60 fps makes capturing complex, detailed scans quick and smooth. The device’s ability to handle objects up to 4 meters without losing accuracy is a game-changer for bigger projects.
Overall, it’s a robust tool that bridges the gap between professional-grade metrology and everyday 3D printing needs.
What are the Top Printing Software Options Compatible with Finder 3D Printer?
The top printing software options compatible with Finder 3D Printer include several effective choices that cater to different user needs.
- Ultimaker Cura
- PrusaSlicer
- MatterControl
- Repetier-Host
- Simplify3D
These software options provide various features and functionalities that can enhance 3D printing experiences. Each option has its strengths, making them suitable for beginners or advanced users.
-
Ultimaker Cura: Ultimaker Cura functions as a user-friendly slicing software for 3D printing. It offers customizable settings for both novices and experts. Users appreciate its extensive material profiles and intuitive interface. Research by Ultimaker (2021) shows that over 50% of 3D printer owners use Cura for its versatility and support for many printer models.
-
PrusaSlicer: PrusaSlicer is designed specifically for Prusa 3D printers but supports others as well. It aids in advanced slicing options and multi-material printing. According to Prusa Research (2022), users benefit from features like adaptive layer height and texture support, making detailed prints easier.
-
MatterControl: MatterControl is an all-in-one solution that combines design and printing. It enables users to create, manage, and control their 3D printing projects. A 2020 study by MatterHackers highlighted the software’s capability to integrate CAD functionality, which appeals to hobbyists and professionals alike.
-
Repetier-Host: Repetier-Host provides a customizable interface with real-time control features. It allows for slicing and print monitoring, ideal for users who value live feedback. Feedback from the 3D printing community indicates that it is particularly useful for advanced users who require specific configurations.
-
Simplify3D: Simplify3D is a paid software that offers comprehensive support and advanced slicing algorithms. Its detailed print preview functions allow adjustments before printing. In a review by 3D Printing Industry (2021), users indicated they appreciated Simplify3D’s flexibility and time-saving capabilities despite the initial cost.
These software options present varied attributes tailored for different types of users, enhancing the overall functionality of the Finder 3D Printer in diverse printing projects.
How Does Slicing Software Effectively Communicate with the Finder 3D Printer?
Slicing software effectively communicates with the Finder 3D printer through a structured process. First, the user designs a 3D model using a computer program. This model is saved in a file format suitable for 3D printing, often STL or OBJ. Next, the user loads this file into slicing software.
The slicing software interprets the 3D model. It translates the model into layers and generates a set of instructions, known as G-code. G-code contains detailed commands that direct the printer on how to create each layer of the object.
Once the slicing is complete, the G-code file is saved. The user transfers this file to the Finder 3D printer. This can be done via USB, SD card, or direct connection, depending on the printer’s capabilities.
The Finder 3D printer reads the G-code file. It uses the instructions to control the movement of its print head and the flow of filament. As the printer operates, it builds the object layer by layer, following the precise coordinates and parameters outlined in the G-code.
Therefore, the communication between the slicing software and the Finder 3D printer is crucial. It ensures that the intended design is accurately represented in the final printed object. This synergy allows for effective printing with precision and quality.
What Key Factors Should You Examine When Selecting Software for the Finder 3D Printer?
When selecting software for the Finder 3D Printer, consider factors such as compatibility, user-friendliness, support features, and design capabilities.
- Compatibility with Finder 3D Printer
- User-friendliness of the interface
- Support features and community resources
- Design capabilities and STL file handling
- Slicing speed and quality
These factors are crucial, but the importance of each can vary based on user needs and printing goals.
-
Compatibility with Finder 3D Printer: Compatibility with the Finder 3D Printer ensures that the software can efficiently communicate with the hardware. Software must support specific file formats and printer settings for optimal performance. Users should check if the software is designed for FDM (Fused Deposition Modeling) printers like the Finder. For example, software like Cura and Simplify3D meets these needs effectively.
-
User-friendliness of the Interface: User-friendliness refers to how easily a user can navigate the software. This attribute reflects the design of menus, tool accessibility, and intuitiveness of functions. A software with a simple, clean interface promotes a smoother learning curve for beginners. An example of user-friendly software is Tinkercad, which caters to novice users.
-
Support Features and Community Resources: Support features include availability of documentation, tutorials, and user forums. A strong community can greatly assist users facing challenges. Software like PrusaSlicer benefits from a robust online community and extensive support materials, making problem-solving easier.
-
Design Capabilities and STL File Handling: Design capabilities refer to the software’s tools for creating or modifying 3D models. The ability to handle STL (Stereolithography) files is essential for 3D printing. Software such as Fusion 360 offers advanced design tools, while also allowing easy import and export of STL files.
-
Slicing Speed and Quality: Slicing speed involves how quickly the software can convert a 3D model into a format suitable for printing. Quality refers to the detail and accuracy of the sliced model. Efficient slicing software minimizes wait time and produces high-quality results. Some users may prefer faster slicing solutions like IdeaMaker, which balances speed and print quality effectively.
How Does Software Compatibility Influence Print Quality with Finder 3D Printer?
Software compatibility significantly influences print quality with the Finder 3D Printer. It refers to how well the printing software operates with the printer’s hardware and firmware. When software is compatible, it can properly translate 3D model data into instructions that the printer can read.
The first component is the slicing software. This software prepares the 3D model by breaking it down into layers. It generates G-code, the language that the printer uses to create each layer. If the slicing software is compatible with the Finder 3D Printer, it ensures that the G-code produced matches the printer’s requirements. This leads to precise movements and accurate layer deposition.
Next, the printer firmware must also be compatible. Firmware controls the internal functions of the printer. If the software updates or settings do not align with the printer’s firmware, it can lead to issues, such as incorrect layer height or material flow. This misalignment can result in poor layer adhesion or uneven surfaces.
Another aspect is the settings configuration within the software. Proper configuration impacts layer thickness, print speed, and temperature settings. Incompatible settings can create a mismatch between the software’s expectations and the printer’s capabilities. For example, if the software suggests a print speed too fast for the printer, it may lead to stringing or artifacts on the print.
Additionally, material compatibility is important. Different types of materials require specific settings and profiles in the slicing software. If the software does not support the material being used, it can affect adhesion and overall print integrity. Proper profiles help optimize the printing process, leading to higher quality outputs.
Finally, user interface and ease of use can affect the overall quality of prints. Intuitive software allows users to make adjustments quickly. This enables timely troubleshooting and optimizations during the printing process, which can enhance final results.
In summary, the interplay of compatible slicing software, printer firmware, correct settings, material profiles, and user-friendly interfaces all come together to determine the print quality of the Finder 3D Printer.
What Essential Features Should Be Included in Printing Software for the Finder 3D Printer?
The essential features of printing software for the Finder 3D printer should enhance usability, efficiency, and flexibility.
- User-friendly Interface
- Compatibility with File Formats
- Customizable Print Settings
- Support for Multiple Materials
- Monitoring and Management Tools
- Slicing Capabilities
- Firmware Update Functionality
These features not only streamline the printing process but also cater to a range of user requirements, from beginners to advanced users.
-
User-friendly Interface: A user-friendly interface simplifies the printing process for all users. It enables straightforward navigation through menus and options. A well-designed interface can reduce the learning curve for beginners, while enabling experienced users to maximize efficiency. For instance, software that employs drag-and-drop features allows users to easily load their designs.
-
Compatibility with File Formats: Compatibility with various file formats is crucial. The software should support standard formats like STL, OBJ, and G-code for seamless workflow. This compatibility allows users to import designs from various software programs without conversion issues. For example, many CAD software applications export in STL, making cross-compatibility essential for user convenience.
-
Customizable Print Settings: Customizable print settings provide users control over their printing process. Users can adjust parameters like layer height, printing speed, and infill density to maximize print quality and efficiency. This feature allows for experimentation and optimization of prints based on material and design requirements.
-
Support for Multiple Materials: The ability to handle various materials expands the printer’s capabilities. The software should support filament types such as PLA, ABS, and PETG. Different materials often have unique printing characteristics and settings, so good software provides profiles tailored for each type.
-
Monitoring and Management Tools: Monitoring and management tools enhance the user’s ability to oversee the printing process. Features such as real-time print status, temperature monitoring, and alerts for filament changes ensure successful prints. These tools can prevent errors and material wastage.
-
Slicing Capabilities: Slicing capabilities are vital for preparing 3D models for printing. The software should include an efficient slicer that converts 3D models into G-code, the language understood by the printer. Effective slicing software optimizes how the model is printed, influencing both quality and speed.
-
Firmware Update Functionality: Firmware update functionality ensures that users can keep the printer’s software current. Regular updates can fix bugs, improve performance, and introduce new features. This capability enhances the longevity of the printer by keeping it compatible with the latest advancements.
Incorporating these features into printing software for the Finder 3D printer will significantly improve the user experience and overall printing success.
How Can You Enhance Your Printing Experience Using Finder 3D Printer Software?
You can enhance your printing experience using Finder 3D Printer Software by utilizing its advanced features for design preparation, error correction, and real-time monitoring.
The software offers several key functionalities to improve your printing outcomes:
-
Design Preparation: Finder 3D Printer Software allows you to easily import and modify design files. You can adjust the scale, orientation, and position of your 3D model. This preparation ensures that the model fits your printer’s specifications properly, reducing the risk of errors during printing.
-
Error Correction: The software includes features that automatically detect and correct potential design flaws. It checks for issues like non-manifold edges or intersecting geometries, which can cause failed prints. This ensures a smoother printing process and minimizes waste of materials.
-
Real-time Monitoring: Finder 3D Printer Software provides real-time monitoring of the printing process. Users can track the progress and make adjustments as needed. This feature enhances user control over the print and allows for immediate intervention if issues arise.
-
Material Settings: The software supports a variety of filament types and allows you to configure settings for each type. You can adjust temperature settings, print speed, and layer height to optimize your prints based on the material being used.
-
Built-in Support Structures: Finder 3D Printer Software offers automatic generation of support structures for complex models. These supports ensure that overhanging parts of the design print correctly, leading to better quality and minimizing the risk of defects.
By leveraging these features, users can achieve higher quality prints, reduce failures, and streamline the overall 3D printing process.
What Community Resources and Support Are Available for Finder 3D Printer Users?
The community resources and support available for Finder 3D printer users include online forums, user manuals, social media groups, local maker spaces, and technical support services.
- Online Forums
- User Manuals
- Social Media Groups
- Local Maker Spaces
- Technical Support Services
To provide further context, these resources offer users a variety of ways to connect, learn, and solve issues related to Finder 3D printers.
-
Online Forums: Online forums serve as platforms for Finder 3D printer users to discuss challenges and share solutions. These forums enable users to post questions, receive answers, and share printing experiences. For example, websites like Reddit and dedicated 3D printing forums have sections specifically for Finder printers. Users can find troubleshooting tips, print settings, and recommendations for compatible materials.
-
User Manuals: User manuals are essential documents that provide detailed instructions on the operation and maintenance of Finder 3D printers. These manuals often include setup guides, troubleshooting sections, and recommended care practices. Finder provides downloadable manuals on their official website. These manuals help users to navigate common issues and optimize their printing settings.
-
Social Media Groups: Social media groups, particularly on platforms like Facebook and Discord, allow Finder 3D printer users to connect with each other. In these groups, users can share prints, ask for advice, and offer support. The community aspect fosters camaraderie and encourages users to showcase their work. For instance, dedicated groups for Finder printers can provide insights into upgrades, modifications, and creative projects.
-
Local Maker Spaces: Local maker spaces offer access to 3D printers and workshops for hands-on learning. Users can join these spaces to gain practical skills and collaborate with others. Maker spaces often host events, classes, and meet-ups focused on 3D printing. These environments provide users with opportunities to experiment and advance their knowledge in a supportive community.
-
Technical Support Services: Technical support services are available for Finder 3D printer users who encounter specific issues they cannot resolve independently. Users can access support through Finder’s official website or customer service hotline. Professional technicians can provide guidance on troubleshooting and repairs.
These resources together contribute to a robust support system for Finder 3D printer users, enhancing their printing experiences and encouraging innovation within the community.
Related Post: