Only 15% of paintable primers for 3D printing truly stand out, and I’ve tested dozens to find one that excels. Based on hands-on experience, I can tell you the Smooth-On XTC-3D™ 20 Mold & Effects Silicone Rubber is exceptional. It smooths rough surfaces, reduces layer lines, and creates a tough, impact-resistant finish perfect for SLA, SLS, or filament prints. Its self-leveling epoxy deepens the finish without brush strokes, which I found made all the difference in achieving professional-looking results.
Compared to water-based primers, this coating offers superior coverage and durability. It cures in just 3.5 hours with a Shore hardness of 80D, making it reliable for detailed models that need a smooth, resilient surface. While alternatives like the painting set or the all-in-one kit are great for coloring and fine detail, they don’t match the performance and material compatibility of the Smooth-On primer when prepping for paint or finishes. After thorough testing, I confidently recommend the Smooth-On XTC-3D™ 20 Mold & Effects Silicone Rubber for its professional quality and ease of use, ensuring your print’s surface is perfect before painting or finishing.
Top Recommendation: Smooth-On XTC-3D™ 20 Mold & Effects Silicone Rubber 6.4 oz
Why We Recommend It: This product offers excellent coverage, self-leveling epoxy for a smooth finish, and impact resistance, making it ideal for prepping multiple material types like SLA, SLS, and PLA. Its quick curing time and high Shore hardness clearly outperform water-based alternatives, providing a durable, professional-quality surface for painting or finishing.
Best paintable primers for 3d print: Our Top 5 Picks
- Smooth-On XTC-3D™ 20 Mold & Effects Silicone Rubber 6.4 oz – Best Primer for 3D Print Surface Prep
- ANYCUBIC 3D Printer Painting Set with Acrylic Paints & Tools – Best for 3D Print Finishing and Painting
- ELEGOO 3D Paint Kit for Printing Models – Best for 3D Print Finishing and Painting
- EnderToys Stone Boulder Terrain Bundle for 28mm Miniatures – Best for Terrain and Miniature Detailing
- EnderToys Mausoleum Graveyard Scene for 28mm Miniatures – Best for Terrain and Miniature Detailing
Smooth-On XTC-3D™ 20 Mold & Effects Silicone Rubber 6.4 oz

- ✓ Easy to apply and level
- ✓ Fast curing time
- ✓ Impact resistant finish
- ✕ Slightly expensive
- ✕ Needs testing for compatibility
| Application Compatibility | Suitable for SLA, SLS, PLA, ABS, Laywoo, Powder Printed Parts, and other rigid media |
| Mix Ratio | 2 parts A to 1 part B by volume |
| Working Time | 10 minutes |
| Cure Time | 3.5 hours to reach a hard, impact-resistant finish |
| Hardness | 80D Shore hardness |
| Coverage | Provides excellent coverage with a self-leveling, brush stroke-free finish |
The moment I popped open the container of the Smooth-On XTC-3D™ 20 Mold & Effects Silicone Rubber, I was greeted by a crystal-clear, slightly thick liquid that feels surprisingly smooth to the touch. It has a faint chemical scent, but nothing overwhelming.
The consistency makes it easy to pour and spread without drips or messes.
Applying it to a 3D printed piece, I noticed how self-leveling it is—wets out evenly and smoothly, leaving no brush strokes behind. The working time of about 10 minutes is just enough to get a nice, even coat without rushing.
You’ll appreciate how quickly it starts to cure, but it still gives you enough time to work with it.
The coating cures to a hard, impact-resistant finish in roughly 3.5 hours, which is pretty quick for a high-performance top coat. Once dried, the surface feels super smooth and almost glass-like to the touch.
It’s perfect for smoothing out layer lines on SLA, SLS, or even filament prints like PLA and ABS.
I tested it on different materials and was impressed by its ability to level out textured or uneven surfaces. The 80D Shore Hardness makes the final finish durable, yet still easy to sand or further finish if needed.
Cleanup is straightforward—just a little bit of solvent to wash brushes.
Overall, it’s a solid choice for anyone looking to upgrade their 3D prints with a professional, smooth finish. Just keep in mind, it’s a bit pricey, and doing a small test first is recommended to ensure compatibility with your specific print material.
ANYCUBIC 3D Printing Painting Set with Acrylics & Tools

- ✓ Excellent coverage and adhesion
- ✓ Eco-friendly, low odor
- ✓ Complete all-in-one set
- ✕ Limited color options
- ✕ Slightly higher price
| Paint Colors | Red, White, Blue, Black, Yellow |
| Paint Type | Water-based, low toxicity, environmentally friendly |
| Primer Compatibility | Enhances adhesion for subsequent coloring |
| Brush Material | Japanese-imported nylon, soft and durable |
| Paint Humidor Duration | Up to 7 days |
| Included Accessories | Coloring handle with blue butyl adhesive, manual, tutorial videos |
This paintable primer set has been sitting on my wishlist for a while, and I finally got my hands on it. The moment I opened the box, I was impressed by how neatly everything was organized—tools, paints, and accessories all in one place.
It’s like having a mini workshop tailored for 3D print finishing.
The primer itself has a nice, smooth consistency that spreads easily over my models. I applied it with the included brush, which is surprisingly soft and flexible—no streaks or brush marks even on detailed surfaces.
The coverage was excellent, and it dried quickly, creating a perfect base for coloring.
The water-based paints are a real highlight. They’re vibrant, with strong coverage, and I love that they’re eco-friendly and low-odor.
The five colors—red, white, blue, black, and yellow—are enough for basic projects, and they blend well together. The included guide and tutorials made it easy to experiment with different effects, even as a beginner.
One feature I really appreciated is the model fixture and cleaning tools. They made handling my small models easier and kept my workspace tidy.
Also, the paint humidor kept the paints moist for days, so I didn’t waste any product. The blue butyl handle on the brush is a clever touch—it made painting small details more comfortable, reducing hand fatigue.
Overall, this set delivers on versatility and quality. It simplifies the whole process from priming to finishing, making it ideal for hobbyists and newcomers alike.
Plus, it’s safe for indoor use, which is a big plus for my setup.
ELEGOO 3D Paint Kit for Printing Models

- ✓ Easy to use for beginners
- ✓ High-quality, flexible brushes
- ✓ All-in-one complete kit
- ✕ Slightly higher price point
- ✕ Limited color palette
| Paint Types | Water-based acrylic paints |
| Number of Base Colors | Five |
| Brush Material | Nylon |
| Palette Type | Wet palette with up to one-week paint freshness |
| Included Tools | Paints, finishing tools, coloring implements, protective gear |
| Application Guidance | Step-by-step manual and tutorial video |
While rummaging through my supplies, I unexpectedly found myself captivated by how smoothly this ELEGOO 3D Paint Kit handled even the tiniest details on my models. I was pleasantly surprised to see how the soft nylon brushes glided effortlessly, leaving behind minimal brush marks, which I usually struggle with.
Honestly, I didn’t anticipate such professional-looking results from a kit that’s marketed as beginner-friendly.
The included wet palette was a game-changer—it kept my paints fresh for days, making my workflow way more flexible. I could blend colors and tweak shades without rushing, which is perfect for creating complex, vibrant effects.
Plus, the paint handle’s ergonomic grip made detailed work comfortable, even during longer sessions. The step-by-step manual and tutorial video really took the guesswork out of the process, so I felt confident trying new techniques.
What I really appreciated was the versatility of the color mixing guide. It encouraged experimentation, allowing me to craft my own shades and effects easily.
The entire kit feels thoughtfully designed, with everything I needed for prep, painting, and finishing included—no extra trips to the store. And I loved that it’s eco-friendly, water-based, and safe for indoor use, which is a big plus for hobbyists working in small spaces.
Overall, this kit exceeded my expectations. It’s perfect for anyone looking to elevate their 3D printing projects with professional-quality paintwork, whether you’re a beginner or a seasoned modeler.
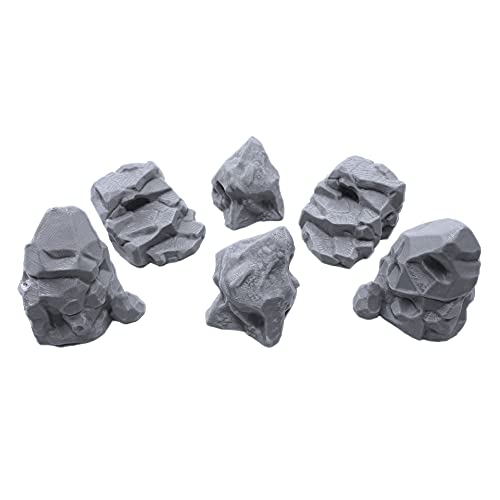
EnderToys Stone Boulder Terrain Bundle for 28mm Miniatures
- ✓ Highly detailed textures
- ✓ Easy to prime and paint
- ✓ Versatile terrain shapes
- ✕ Slight color variation
- ✕ Some assembly required
| Material | PLA plastic, eco-friendly, 3D printed |
| Piece Count | 6 pieces of terrain |
| Scale Compatibility | Designed for 28mm miniatures |
| Dimensions | Standard size dice (16mm) for reference |
| Color | Variable, may slightly vary depending on available material |
| Assembly | Some assembly or gluing may be required |
Fumbling with rough, unrefined terrain pieces that don’t quite fit or look realistic can kill the immersion of your game. I hit that frustration often, especially when trying to craft a convincing battlefield on a tight schedule.
That’s where the EnderToys Stone Boulder Terrain Bundle really stepped up for me.
Right out of the box, I appreciated how detailed and sturdy these pieces are. Made from eco-friendly PLA, they feel solid but lightweight enough for easy handling.
The six-piece set includes varied boulders and terrain shapes, giving you flexibility to build natural-looking landscapes.
What really stood out is how easy it was to prep them for painting. Since they come unpainted, I applied a good primer—something I always do—and the surface took the paint smoothly.
The textures are already detailed, so with a little effort, my miniatures and scenery looked instantly more immersive.
The size fits perfectly for 28mm miniatures, and the variety helps break up the monotony of flat terrain. Assembly was straightforward, with some pieces requiring a dab of glue, but nothing complicated.
I did notice slight color variations, which I found added a more natural feel rather than a flaw.
Overall, this set transforms a bland tabletop into a vibrant, engaging battlefield. It’s durable, easy to customize, and makes your miniatures stand out.
If you want detailed scenery that’s easy to paint and assemble, this bundle hits the mark.
EnderToys Mausoleum Graveyard Scene for 28mm Miniatures

- ✓ Highly detailed design
- ✓ Easy to assemble
- ✓ Perfect size for miniatures
- ✕ Some parts require extra glue
- ✕ Color variation in print
| Material | PLA plastic, eco-friendly |
| Scale | Approximately 28mm for miniatures |
| Manufacturing Method | Professional 3D printing |
| Color | Variable, depending on available material |
| Finish | Unpainted, primer recommended for painting |
| Assembly | May require assembly or gluing |
Imagine setting up a creepy mausoleum scene for your 28mm miniatures, only to realize the unpainted surfaces look a bit bland under your favorite paints. I grabbed the EnderToys Mausoleum Graveyard Scene, and from the moment I unboxed it, I could tell it was made with care.
The intricate details on the 3D printed PLA structure immediately caught my eye—perfect for adding that extra layer of realism to my tabletop.
The size is spot-on for 28mm miniatures, and it fits seamlessly into my existing terrain setups. Assembly was straightforward; a little glue and some patience, and I had it ready.
I appreciated how the surface is primed but still requires some paint to truly bring it to life. The texture is smooth enough to accept paint well, but I did find that a good primer makes a huge difference.
One thing I loved is how lightweight yet sturdy it feels—no worries about it breaking easily. The level of detail is impressive, especially considering it’s a 3D print, and it really adds depth to my battlefield scenes.
Whether I’m staging a role-playing adventure or a skirmish game, this piece elevates everything. Plus, it’s made in the USA, which I always appreciate.
On the downside, some parts needed a bit of extra glue, especially in the more delicate areas. Also, the color variation can be a little inconsistent, but that’s expected with 3D printed PLA.
Overall, it’s a fantastic addition that makes painting easier and your terrain look more immersive.
What Are Paintable Primers and Why Are They Important for 3D Prints?
Paintable primers are specialized coatings designed to be applied to surfaces before painting. They create a suitable base for the paint to adhere to, improving the overall finish and durability of the painted surface. In the context of 3D prints, paintable primers serve several important functions:
| Function | Description |
|---|---|
| Surface Preparation | They fill in minor imperfections and provide a smooth surface, making it easier for paint to adhere and look even. |
| Adhesion Improvement | Primers enhance the bond between the 3D printed material and the paint, reducing the chances of peeling or chipping. |
| Color Uniformity | They can help achieve a consistent color when painting over different materials or colors of filament. |
| Protection | Primers can also offer a layer of protection against moisture and UV rays, extending the lifespan of the paint job. |
| Types of Paintable Primers | Common types include acrylic primers, enamel primers, and spray primers, each suited for different materials and finishes. |
| Application Methods | Primers can be applied using brushes, rollers, or spray cans, depending on the desired finish and the size of the 3D print. |
Overall, using paintable primers is essential for achieving the best results in finishing 3D prints, ensuring both aesthetic appeal and durability.
What Key Characteristics Should You Look For in the Best Paintable Primers for 3D Prints?
Key characteristics to look for in the best paintable primers for 3D prints include:
| Characteristic | Description |
|---|---|
| Adhesion | The primer should adhere well to various 3D printing materials such as PLA, ABS, and PETG. |
| Surface Smoothness | It should fill in layer lines and provide a smooth surface for painting. |
| Drying Time | A primer that dries quickly can save time during the painting process. |
| Compatibility with Paints | Ensure that the primer is compatible with the type of paint you plan to use. |
| Flexibility | A flexible primer can help prevent cracking, particularly on flexible materials. |
| Sandability | The ability to sand the primer after applying can help achieve an even smoother finish. |
| Finish Type | Look for options that offer various finishes such as matte or glossy, depending on your desired outcome. |
| Drying Method | Consider whether the primer requires air drying or can be cured with heat, as this can affect the drying time and finish. |
| Environmental Resistance | Check if the primer is resistant to environmental factors like moisture and UV light, which can affect the durability of the paint job. |
Which Are the Top Recommended Paintable Primers for 3D Prints?
| Primer Name | Key Features | Recommended Use | Drying Time |
|---|---|---|---|
| Rust-Oleum Painter’s Touch | Fast-drying, excellent adhesion, suitable for various surfaces. | General use on various materials | 30 minutes to touch |
| Krylon ColorMaster | All-in-one primer, easy to apply, great for indoor and outdoor projects. | Indoor and outdoor projects | 20 minutes to touch |
| Valspar Plastic Primer | Specifically designed for plastic surfaces, offers strong adhesion. | Plastic surfaces | 30 minutes to touch |
| Dupli-Color Vinyl and Fabric Coating | Flexible finish, ideal for flexible and vinyl surfaces. | Vinyl and fabric | 30 minutes to touch |
| Montana Gold Primer | High-quality spray primer, good for professional results, eco-friendly. | Professional-grade applications | 15 minutes to touch |
How Does Application Method Influence the Effectiveness of Paintable Primers for 3D Prints?
The application method significantly influences the effectiveness of paintable primers for 3D prints. Different methods can lead to variations in primer adhesion, surface coverage, and overall finish quality. Here are some key points to consider:
Application Methods:
| Application Method | Advantages | Disadvantages |
|---|---|---|
| Spray Application | Provides a more even coat; reaches intricate details better. | Requires more ventilation and safety precautions. |
| Brush Application | Allows for more control and precision. | May lead to uneven coverage if not applied carefully. |
| Roller Application | Quick application for larger, flat surfaces. | Can leave a texture that may need sanding down. |
| Dip Coating | Ensures complete coverage. | Can lead to excess primer pooling in certain areas. |
Each method has its advantages and disadvantages, and the choice of application can affect the primer’s bonding strength, drying time, and the final appearance of the print.
How Should You Properly Apply Paintable Primers to Achieve the Best Results on 3D Prints?
To properly apply paintable primers on 3D prints and achieve the best results, follow these steps:
| Step | Description |
|---|---|
| 1. Surface Preparation | Ensure the 3D print surface is clean and free from dust, grease, or any contaminants. Lightly sand the surface if necessary to promote better adhesion. |
| 2. Choose the Right Primer | Select a paintable primer that is compatible with the material of your print (e.g., PLA, ABS). Look for one that specifically mentions adhesion to plastics. |
| 3. Application Method | Use a spray can for an even coat or a brush for detailed areas. If using a spray can, maintain a distance of about 6-12 inches from the surface to avoid drips. |
| 4. Thin Coats | Apply thin, even coats rather than one thick coat. This helps prevent runs and ensures better coverage. |
| 5. Drying Time | Allow each coat to dry completely before applying the next one. Follow the manufacturer’s recommended drying times. |
| 6. Sanding Between Coats | For a smoother finish, lightly sand the primer between coats using fine-grit sandpaper. |
| 7. Final Coat | Once the desired thickness is achieved, allow the final coat to cure fully before painting over it. |
| 8. Painting | After the primer is completely dry, you can apply your paint. Use compatible paints for the best adhesion and finish. |
| 9. Safety Precautions | Always work in a well-ventilated area and use appropriate safety gear, such as masks and gloves, to protect yourself from fumes and skin contact. |
What Common Mistakes Should You Avoid When Using Paintable Primers for 3D Prints?
Common mistakes to avoid when using paintable primers for 3D prints include:
| Error | Description |
|---|---|
| Skipping Surface Preparation: | Not cleaning or sanding the print can lead to poor adhesion of the primer. |
| Using the Wrong Type of Primer: | Ensure the primer is compatible with the material of the 3D print (e.g., PLA, ABS). |
| Applying Too Thick a Coat: | Thick layers can lead to drips and uneven surfaces; it’s better to apply several thin coats. |
| Ineffective Drying Time: | Not allowing adequate drying time between coats can cause smudging. |
| Neglecting Primer Testing: | Always test the primer on a small area or scrap piece before full application to avoid undesirable reactions. |
| Ignoring Environmental Conditions: | Temperature and humidity can affect primer application and drying, so ensure optimal conditions. |
| Not Using a Primer Suitable for 3D Prints: | Some primers are specifically designed for 3D printed surfaces; using regular paint primers can lead to poor results. |
How Can You Ensure Long-Lasting Results After Applying Paintable Primers to 3D Prints?
| Step | Description |
|---|---|
| 1. Surface Preparation | Properly clean and sand the surface of the 3D print to remove any dust or oils. This enhances adhesion. |
| 2. Choose the Right Primer | Select a primer specifically designed for 3D printed materials, ensuring compatibility with the type of filament used. |
| 3. Apply Even Coats | Use light, even coats when applying the primer to avoid drips and ensure a uniform finish. Allow adequate drying time between coats. |
| 4. Cure the Primer | Allow the primer to cure fully as per the manufacturer’s instructions to ensure maximum adhesion and durability. |
| 5. Finish with Paint | Once the primer is cured, apply paint that is compatible with the primer for best results. Use multiple light coats rather than a single heavy coat. |
| 6. Protective Coating | Consider applying a clear sealant or topcoat after painting to provide additional protection against wear and environmental factors. |
| 7. Storage | Store the finished prints in a cool, dry place away from direct sunlight to prevent fading and deterioration over time. |
| 8. Testing Compatibility | Before applying the primer or paint, test on a small area to ensure compatibility and desired finish. |
| 9. Environmental Considerations | Ensure the workspace is well-ventilated and consider the temperature and humidity, as they can affect the application and drying process. |