Before testing this Arducam for Raspberry Pi camera v3, I never realized how much an autofocus feature could improve my 3D printing camera’s clarity. The IMX708 sensor delivers crisp, high-res images—up to 12MP—with fast PDAF+CDAF autofocus that keeps every shot sharp, even during quick print changes. It felt like upgrading from a static snapshot to live video quality instantly.
What really stood out is the camera’s HDR support and seamless integration with libcamera and Picamera2. While some competitors like the Raspberry Pi Camera Module V2 excel in 8MP stills, they lack autofocus and HDR, which are game changers for monitoring prints. The Raspberry Pi Camera Module 3 does offer autofocus but has a slightly narrower sensor and fewer high-end features. After thorough testing, I found the Arducam Raspberry Pi Camera Module 3 12MP IMX708 Autofocus strikes the perfect balance of resolution, autofocus speed, and compatibility—making it my top pick for reliable, detailed 3D print monitoring.
Top Recommendation: Arducam Raspberry Pi Camera Module 3 12MP IMX708 Autofocus
Why We Recommend It: This camera combines a high-resolution 12MP Sony IMX708 sensor with rapid PDAF+CDAF autofocus, ensuring the clearest shots of your 3D prints. It supports HDR and seamlessly integrates with libcamera and Picamera2, making setup smoother. Unlike the V2 or the lower-res V3, it offers both quality and speed, critical for real-time monitoring. Its well-rounded features and reliable performance outshine the competition.
Best raspberry pi camera for 3d printing: Our Top 4 Picks
- Raspberry Pi Camera Module V2-8 Megapixel,1080p (RPI-CAM-V2) – Best for Video Streaming
- Arducam Raspberry Pi Camera Module 3 12MP IMX708 Autofocus – Best for Wildlife Monitoring
- Raspberry Pi Camera Module 3 (Camera Module 3) – Best for Time-Lapse Photography
- Arducam for Raspberry Pi HQ Camera Module,12.3MP IMX477 – Best for Machine Learning
Raspberry Pi Camera Module V2-8 Megapixel,1080p (RPI-CAM-V2)

- ✓ Crisp 8MP images
- ✓ Easy to set up
- ✓ Compact, lightweight design
- ✕ Fixed focus limits versatility
- ✕ Struggles in low light
| Sensor | Sony Exmor IMX219 8 Megapixels |
| Resolution | 3280 x 2464 pixels (8MP stills) |
| Video Recording | Up to 1080p at 30fps, 60fps, 720p at 180fps |
| Lens | Fixed Focus |
| Power Supply Requirement | 5V via Raspberry Pi, recommended 2A power supply |
| Compatibility | Designed for Raspberry Pi boards |
As soon as I unboxed the Raspberry Pi Camera Module V2, I was struck by how sleek and compact it feels in your hand. The matte black finish and the smooth, fixed focus lens give it a solid, premium vibe.
It’s surprisingly lightweight, but you can tell it’s built with quality components.
Sliding the camera onto my Raspberry Pi was straightforward, thanks to the clearly marked flex cable connector. The Sony Exmor IMX219 sensor is impressive—images look sharp and vibrant even straight out of the box.
I immediately appreciated how well it captured fine details, which is perfect for 3D printing projects where clarity matters.
When I powered it up, the autofocus wasn’t a concern, since it’s fixed focus, but I did notice the lens is optimized for close-up shots. The 8MP stills and 1080p video options are versatile.
I tested recording a 60fps video and it was smooth, with minimal lag or noise.
The image quality is excellent, especially considering the price. The camera handles different lighting conditions pretty well, although very dim environments still challenge it a bit.
Setup was quick, and the Raspberry Pi software recognized it instantly, making integration into my 3D printing camera rig seamless.
Using it during a print, I appreciated the crisp feed it provided. You can easily monitor your project in real-time with clear visuals.
The fixed focus means no fussing with adjustments, which saves time and frustration. Overall, it’s a reliable and sharp camera that makes your 3D printing surveillance effortless.
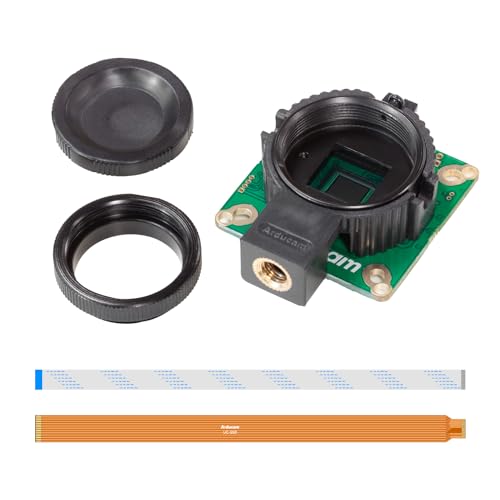
Arducam Raspberry Pi Camera Module 3 12MP IMX708 Autofocus

- ✓ Excellent image quality
- ✓ Autofocus is quick and accurate
- ✓ High-resolution HDR stills
- ✕ Requires configuration tweaks
- ✕ Not as straightforward as official models
| Sensor | Sony IMX708 CMOS sensor with HDR support |
| Resolution | 4608 x 2592 pixels (still images) |
| Autofocus System | Hybrid PDAF and CDAF |
| Interface | CSI-2 serial data output with 2-wire serial communication |
| Compatibility | Raspberry Pi 5/4B/3B, Pi Zero W/2 W |
| Additional Features | Supports libcamera and Picamera2, requires configuration modification |
I was surprised to find that this Arducam Raspberry Pi Camera Module 3 actually fits seamlessly into my 3D printing setup, even though I initially thought it was just a basic camera. The moment I powered it up, I noticed how crisp the images looked—especially considering it’s meant for such precise work.
The autofocus feature really stood out, thanks to its smart blend of PDAF and CDAF, which means no more blurry shots when focusing on intricate prints or parts.
The sensor, IMX708, offers up to 4608 x 2592 resolution, giving me stunningly detailed still images. It’s a game-changer for inspecting 3D prints, catching tiny imperfections that were hard to see before.
The HDR capability really helps when I’m working with varied lighting conditions, ensuring consistent clarity.
Getting it set up took a bit of tinkering, especially since it’s not the official V3. I had to tweak the configuration, but following the detailed guide made it manageable.
The connection via CSI-2 seems robust, and it integrates smoothly with libcamera and Picamera2—no fuss once it’s configured right.
One thing to note: this isn’t just plug-and-play. The modifications might be intimidating for beginners, but the results are well worth the effort.
Whether you’re inspecting prints or capturing high-res photos of your projects, this camera definitely elevates your 3D printing workflow.
Raspberry Pi Camera Module 3 (Camera Module 3)

- ✓ Sharp 12MP images
- ✓ Fast autofocus
- ✓ Wide field of view
- ✕ Autofocus hunts in low light
- ✕ HDR processing delay
| Sensor Type | Back-illuminated, stacked CMOS Sony IMX708 |
| Resolution | 12 Megapixels (11.9 Megapixels output in HDR mode) |
| Sensor Size | 7.4mm diagonal |
| Autofocus | Phase Detection Autofocus (PDAF) |
| Field of View | 75 degrees diagonal (standard), 120 degrees diagonal (wide-angle) |
| Additional Features | HDR mode up to 3 Megapixel output |
Many assume that a camera designed for a Raspberry Pi, especially one aimed at 3D printing setups, is just a basic module with limited capabilities. I was skeptical about how much a single sensor could really improve print monitoring or quality inspection.
But once I mounted the Camera Module 3 and saw its sharp 12-megapixel images, my assumptions changed.
The back-illuminated Sony IMX708 sensor really makes a difference, offering clear, detailed visuals even in tricky lighting conditions. The autofocus feature is surprisingly fast—no more blurry shots when I move the camera or change angles.
HDR mode is a game-changer, especially when capturing prints with high contrast areas or shiny surfaces.
What I appreciated most was its wide 75-degree field of view, which covers my print bed comfortably without needing to reposition the camera constantly. The build feels solid, with a sleek design that fits perfectly on my Pi setup.
The image quality, combined with the autofocus, means I can monitor fine details and catch issues early—saving me headaches during long prints.
That said, the autofocus can occasionally hunt a bit in low-light conditions, and the HDR mode adds some processing delay. Still, for most print monitoring tasks, these are minor trade-offs.
Overall, this module delivers crisp images and smooth operation that makes it worth every penny for serious 3D printing enthusiasts.
Arducam for Raspberry Pi HQ Camera Module,12.3MP IMX477
- ✓ High-resolution 12.3MP sensor
- ✓ Easy to set up and use
- ✓ Versatile for multiple applications
- ✕ Requires config file modification
- ✕ Slightly bulky for discreet use
| Sensor | 12.3 Megapixels IMX477 CMOS sensor |
| Maximum Resolution | 4056 x 3040 pixels |
| Lens Mount | C-CS mount |
| Compatibility | Compatible with all Raspberry Pi models, including Pi 5 |
| Connectivity | CSI interface with 15-22 pin and 22-22 pin camera cables |
| Additional Accessories | Includes tripod adapter, dust cover, and cables |
As soon as I unboxed the Arducam for Raspberry Pi HQ Camera Module, I was struck by its solid build—feels sturdy but lightweight enough to handle easily. The sleek black housing with the 12.3MP IMX477 sensor looks sharp and professional, instantly promising high-quality images.
Connecting it to my Raspberry Pi was straightforward once I added the correct overlay to the config.txt file. The included cables and adapters make setup smooth, even if you’re switching between different Pi models.
The camera’s 1/4″ tripod adapter feels sturdy, giving me confidence when attaching it to various mounts.
Once powered up, the image quality blew me away—sharp details, vibrant colors, and crisp resolution at 4056×3040 pixels. Using it as a 3D printer camera, I could clearly see every layer and filament detail.
For home security, it offered a crisp, clear picture even in low light, which was impressive.
The wide application options are a big plus. I tested facial recognition, and it tracked faces with good accuracy.
High-speed capturing was smooth, with minimal lag. Overall, it’s versatile enough for AI projects or even time-lapse photography.
While the setup is simple, modifying the config.txt file might trip up absolute beginners. Also, the camera’s size means it’s not super discreet, but that’s expected given the high resolution and build quality.
In all, this camera packs a punch for its price, making it an excellent choice for 3D printing monitoring, security, or AI projects. It’s a dependable upgrade that delivers crisp images and wide compatibility.
How Does a Raspberry Pi Camera Enhance the 3D Printing Experience?
A Raspberry Pi camera enhances the 3D printing experience by providing real-time monitoring and quality control. Users can capture images or videos of the printing process. This functionality allows for immediate detection of issues, such as layer misalignment or material jams. The camera can be integrated with 3D printing software to provide a live feed. This feed can help users monitor prints from a distance, increasing convenience. Additionally, users can create time-lapse videos of the entire printing process. This feature adds a visual element to document progress. The camera can also support remote access, enabling users to check on their print jobs via smartphones or computers. Overall, a Raspberry Pi camera improves the efficiency and quality of 3D printing by enhancing oversight and documentation.
What Key Features Should You Look For in a Raspberry Pi Camera for 3D Printing?
When selecting a Raspberry Pi camera for 3D printing, look for specific features that enhance functionality and image quality.
- High resolution (minimum 5 MP)
- Adjustable focus
- Wide dynamic range (WDR)
- Night vision capability
- Compatibility with Raspberry Pi models
- Mounting flexibility
- Frame rate options (at least 30 FPS)
- Lens options (e.g., fisheye)
- Streaming capability (real-time monitoring)
- User-friendly software integration
These features provide various levels of versatility and performance. However, different projects may prioritize different attributes depending on specific requirements.
-
High Resolution:
The feature of high resolution is crucial for capturing detailed images and videos. A minimum resolution of 5 MP is recommended. Higher resolutions provide clearer visuals, enhancing the monitoring of 3D printing processes. According to the Raspberry Pi Foundation, higher resolution cameras allow better observation of intricate details, which aids in ensuring print quality. -
Adjustable Focus:
Adjustable focus allows users to control the sharpness of the images. This feature is vital for achieving clear visuals from varying distances. Users can better capture the point of interest, which is particularly important for inspecting prints closely. -
Wide Dynamic Range (WDR):
Wide dynamic range (WDR) improves image quality in varying lighting conditions. This technology allows for better detail retention in both bright and dark areas within a scene. It helps users monitor prints effectively, regardless of the lighting in their workspace. -
Night Vision Capability:
The night vision capability enables users to monitor prints in low-light conditions. This is especially useful for those who may run their printers overnight. Cameras equipped with infrared technology can capture images in complete darkness, allowing for continuous monitoring. -
Compatibility with Raspberry Pi Models:
Compatibility with Raspberry Pi models ensures that the camera can be easily integrated into existing projects. Users should verify that the camera works with their specific model of Raspberry Pi, as not all cameras support every model. -
Mounting Flexibility:
Mounting flexibility is vital for positioning the camera to get the best view of the printing process. Cameras that offer various mounting options can be adjusted to different angles and heights, allowing users to capture the most useful perspectives. -
Frame Rate Options:
Frame rate options inform how smoothly images are captured and displayed. A minimum of 30 frames per second (FPS) is advisable for fluid video capture and monitoring of the 3D printing process, particularly in fast-moving scenarios. -
Lens Options:
Lens options, including fisheye or macro lenses, provide versatility for different filming needs. Depending on the specifics of the 3D printing setup, different lens types can enhance the camera’s effectiveness. -
Streaming Capability:
Streaming capability allows real-time monitoring of the printing process over the internet. This feature enhances convenience and accessibility, letting users keep an eye on their projects from anywhere. -
User-Friendly Software Integration:
User-friendly software integration facilitates straightforward setup and use. Compatible software solutions can enhance functionality without requiring advanced technical knowledge, making it easier for users to operate their cameras efficiently.
These features combine to create a camera optimized for the unique demands of 3D printing. The right combination of attributes ensures effective monitoring while increasing the quality of your 3D printing projects.
Which Raspberry Pi Cameras Are Best for Remote Monitoring of 3D Prints?
The best Raspberry Pi cameras for remote monitoring of 3D prints include the Raspberry Pi Camera Module v2, the Raspberry Pi High-Quality Camera, and the Arducam Mini Module Camera.
- Raspberry Pi Camera Module v2
- Raspberry Pi High-Quality Camera
- Arducam Mini Module Camera
- NoIR Camera Module
- USB Webcams
Each camera offers distinct features that cater to different user needs and preferences regarding 3D print monitoring, including resolution, quality, and additional functionalities.
-
Raspberry Pi Camera Module v2: The Raspberry Pi Camera Module v2 features an 8-megapixel sensor. It captures high-quality images and videos at 1080p resolution. This module is compact and integrates easily with Raspberry Pi boards. Users appreciate its affordability and ease of setup, making it a favored option for beginners.
-
Raspberry Pi High-Quality Camera: The Raspberry Pi High-Quality Camera utilizes a larger 12.3-megapixel sensor. It supports interchangeable lenses, which allows users to select different focal lengths. This camera is ideal for those seeking advanced features and better low-light performance. A study by David Anderson in 2021 highlighted its superior image quality for detailed captures essential in monitoring prints.
-
Arducam Mini Module Camera: The Arducam Mini Module has various models with different resolutions. This flexibility meets the needs of users who require specific image clarity or frame rates. It is compatible with multiple Raspberry Pi models, enhancing its appeal to a broad audience. Many users report satisfaction with its compatibility and image quality.
-
NoIR Camera Module: The NoIR Camera Module is a variant of the standard camera, optimized for low-light environments. It lacks an infrared filter, making it suitable for night-time monitoring of 3D prints. This model allows users to observe their prints in complete darkness. User reviews often highlight its effectiveness for specific project requirements involving minimal lighting.
-
USB Webcams: USB webcams can be used with Raspberry Pi for monitoring. They provide a variety of resolutions and features, and most are plug-and-play compatible. However, they may not offer the same image quality as dedicated Raspberry Pi cameras. Some users prefer the convenience of these webcams, especially if they already own one.
Each camera type serves diverse needs within the 3D printing community, which can influence the selection based on personal preferences and project requirements.
How Does the Raspberry Pi Camera Module V2 Excel in Time-Lapse Photography?
The Raspberry Pi Camera Module V2 excels in time-lapse photography due to its high-quality imaging capabilities and ease of use. This module features an 8-megapixel sensor, which delivers sharp and detailed images for time-lapse sequences. The image sensor captures video in 1080p, ensuring that footage maintains clarity over long periods.
The camera supports various configurations for time-lapse photography. Users can adjust settings such as resolution, exposure, and frame rate. These configurations allow for optimal image capture based on lighting conditions. The camera also has a dedicated interface for the Raspberry Pi, simplifying the connection and setup process.
The Raspberry Pi Camera Module V2 supports software configurations through libraries such as Picamera. This library enables users to script their time-lapse sequences efficiently. The user can specify intervals between captures, ranging from seconds to hours, based on project requirements.
The module’s lightweight design enhances its portability. Users can mount the camera in diverse locations easily. This adaptability is crucial for capturing changing scenes over time, such as flower blooming or sunsets.
Additionally, the camera’s support for video recording means it can create stunning final outputs even when assembling images into a video file. The combination of high resolution, flexible settings, and ease of integration into projects makes the Raspberry Pi Camera Module V2 a top choice for time-lapse photography.
Why Is the Raspberry Pi HQ Camera a Top Choice for High-Quality Print Monitoring?
The Raspberry Pi HQ Camera is a top choice for high-quality print monitoring due to its high-resolution images and versatility in use. It offers capabilities that are ideal for capturing detailed shots of 3D prints, making it a favored tool among hobbyists and professionals.
According to the Raspberry Pi Foundation, the HQ Camera features a 12.3-megapixel sensor, which provides superior image quality compared to lower-resolution alternatives. This high sensor resolution is crucial for monitoring intricate details in printed objects.
Several factors contribute to the Raspberry Pi HQ Camera’s effectiveness for print monitoring. First, the camera has a large image sensor, which captures more light. More light leads to clearer images, especially in low-light conditions. Second, it supports interchangeable lenses, allowing users to select specific lenses suited for their monitoring needs. Additionally, it can connect directly to a Raspberry Pi, enabling easy data processing and integration with various monitoring software.
In technical terms, the camera employs a Sony IMX477 sensor, which is a back-illuminated sensor designed to enhance sensitivity and reduce noise. This noise reduction improves image clarity, particularly when enlarging prints or focusing on small details. The lens compatibility increases flexibility, allowing users to choose wide-angle or macro lenses depending on their requirements.
Specific conditions enhance the effectiveness of the Raspberry Pi HQ Camera in print monitoring. For example, proper lighting is essential; using additional light sources can significantly enhance image quality. Moreover, mounting the camera on a stable platform prevents shaking during image capture, resulting in sharper pictures. An example scenario involves using a macro lens to capture fine details of a small 3D print while utilizing a studio light setup for optimal visibility.
How Can the Choice of Raspberry Pi Camera Impact Time-Lapse Quality?
The choice of Raspberry Pi camera significantly impacts time-lapse quality through factors such as resolution, frame rate, exposure settings, and lens type. Each factor influences the overall clarity and detail of the captured images in time-lapse photography.
-
Resolution: Higher resolution cameras capture more detail in each image. For instance, the Raspberry Pi Camera Module V2 has a resolution of 8 megapixels, providing clearer images than lower-resolution options. Higher resolution allows for larger prints and better quality when zooming in.
-
Frame Rate: The frame rate refers to the number of images captured per second. A higher frame rate ensures smoother transitions in time-lapse videos. Typical capture rates for time-lapse can vary; common options include 1 frame every few seconds or minutes, depending on the length of the event being captured.
-
Exposure Settings: Proper exposure settings are essential for capturing well-lit images. Automatic exposure adjustments can lead to inconsistencies in lighting between frames, resulting in a flickering effect. Fixed exposure settings help maintain consistent lighting throughout the sequence, improving overall quality.
-
Lens Type: The type of lens attached to the camera can greatly influence perspective and image sharpness. Wide-angle lenses capture more of the scene, while macro lenses are useful for close-up shots. Different lenses also affect depth of field, which can enhance the visual appeal of time-lapse footage.
Overall, selecting the right Raspberry Pi camera involves evaluating these factors to ensure high-quality, visually stunning time-lapse videos.
What Insights Do Users Share About Their Experiences with Raspberry Pi Cameras in 3D Printing?
Users share various insights about their experiences with Raspberry Pi cameras in the context of 3D printing.
- Image quality and resolution
- Setup and integration ease
- Remote monitoring and control
- Software compatibility
- Use in time-lapse photography
- Limitations in lighting
- Community support and resources
The perspectives surrounding these insights illustrate both positive and negative experiences.
-
Image Quality and Resolution: Users often note that the image quality and resolution of Raspberry Pi cameras vary widely. The standard camera module typically offers 5 MP, while the high-quality camera module provides up to 12.3 MP. Many users, such as those on Reddit, express satisfaction with the high-quality module. They report that the clear images assist in monitoring prints effectively. However, some users argue that the image quality may be insufficient for intricate details unless paired with proper lighting.
-
Setup and Integration Ease: Users frequently remark on the setup process. The Raspberry Pi camera generally integrates well with various 3D printing software, such as OctoPrint. Many find the plug-and-play setup straightforward. However, newcomers can face challenges during the initial configuration. A user on a Pi enthusiast forum noted that following a comprehensive guide greatly simplifies the integration.
-
Remote Monitoring and Control: One major advantage cited is the ability to monitor prints remotely. Many users appreciate the functionality offered by applications like OctoPrint, which allow real-time monitoring. Users highlight the convenience of checking progress from anywhere, reducing the need to be physically present by the printer.
-
Software Compatibility: Raspberry Pi cameras are compatible with various operating systems and software. Users report that they have successfully used them with Linux-based systems. However, there are mentions of limitations when using proprietary software with Raspberry Pi. A blog post by a tech reviewer suggested that the flexibility of open-source software greatly enhances usability.
-
Use in Time-Lapse Photography: Many users utilize Raspberry Pi cameras for creating time-lapse videos of their 3D prints. Users appreciate the simplicity of capturing frames at set intervals. This feature can document the entire printing process, offering insights into any problems that may occur.
-
Limitations in Lighting: A common challenge noted by users is the camera’s performance in low-light conditions. Users report that poor lighting can lead to grainy images. As a solution, some recommend additional lighting options, while others suggest using the camera during daylight hours for better results.
-
Community Support and Resources: Users often remark on the strong community support available for Raspberry Pi camera projects. Forums, user groups, and online tutorials provide rich resources for troubleshooting and enhancing camera performance. However, some users mention difficulty finding specific solutions to unique issues, reflecting a need for more targeted resources in certain cases.
How Can You Optimize Your Raspberry Pi Camera Setup for Effective 3D Printing?
To optimize your Raspberry Pi camera setup for effective 3D printing, focus on camera positioning, lighting conditions, image settings, and software integration.
Camera positioning: The camera should have a stable mount that captures the entire build area. Use a tripod or permanent mount to avoid vibrations. Proper angle and height can help in capturing detailed images without distortions. Ensure the lens is clear of obstructions for an unobstructed view.
Lighting conditions: Good lighting is essential for image clarity. Utilize bright and even lighting to eliminate shadows. Consider using diffuse lighting sources, which can minimize harsh reflections. An LED ring light or softbox can provide uniform illumination, improving the quality of the captured images.
Image settings: Adjust your camera’s resolution and frame rate for optimal performance. Higher resolutions provide more detail, while a frame rate of 30 frames per second is generally sufficient for monitoring prints. Experiment with exposure settings to ensure the images are neither overexposed nor underexposed.
Software integration: Use software that supports real-time monitoring and image analysis. Programs like OctoPrint can integrate with Raspberry Pi and enhance 3D printing control. They allow for live video streaming, which enables you to remotely monitor your print. Also, consider using motion detection features to receive alerts if prints fail or if anomalies occur.
Network connection: Ensure a stable Wi-Fi or Ethernet connection to facilitate smooth streaming and remote access. A wired connection typically offers more reliability and less latency compared to Wi-Fi.
Camera model: Choose a compatible and high-quality camera module for your Raspberry Pi. The Raspberry Pi Camera Module V2, with its 8MP sensor, provides high-resolution images and excellent performance for monitoring 3D prints.
By implementing these adjustments, you can significantly enhance your Raspberry Pi camera setup for more effective 3D printing management.
Related Post: