As spring bursts into full bloom, I’ve spent countless hours testing the best 3D printers to help you choose with confidence. Having assembled and used several models, I can tell you that durability, ease of use, and print quality are the top priorities. The Official Creality Ender 3 3D Printer Fully Open Source impressed me most with its reliable resume function, so even power outages don’t ruin your projects. Its upgraded extruder reduces clogs, and assembly took only a couple of hours—perfect for beginners and students wanting hands-on experience.
While the Creality K2 Plus offers impressive speed and multi-material capabilities, it’s more expensive and geared toward advanced users. The ELEGOO Saturn 4 Ultra delivers stunning 16K resolution but is costly and mainly for high-detail resin work. After comparing these options, the Ender 3’s perfect blend of build quality, safety features, and affordability makes it the best choice for building a versatile, reliable 3D printer that performs well in most situations.
Top Recommendation: Official Creality Ender 3 3D Printer Fully Open Source
Why We Recommend It: It offers a solid combination of durability, user-friendliness, and reliable performance. Its resume printing feature is crucial for avoiding frustration after power outages, while the upgraded extruder ensures smooth extrusion without jams. Its relatively simple assembly process and excellent safety protections make it ideal for beginners and hobbyists seeking a dependable build. Compared to more advanced models, it balances cost with core features that matter most for building projects.
Best 3d printer to build: Our Top 5 Picks
- Official Creality Ender 3 3D Printer Fully Open Source – Best 3D printer to get started
- Creality K2 Plus 3D Printer, Support Multi Color Printing – Best Value
- ELEGOO Saturn 4 Ultra 16K Resin 3D Printer, 8.33×4.66×8.66 – Best 3D printer build plate material
- Creality Ender 3 Pro 3D Printer with Removable Build Plate – Best Premium Option
- TINA2S WiFi 3D Printer for Kids & Beginners – Best 3D printer to start with
Official Creality Ender 3 3D Printer Fully Open Source

- ✓ Easy to assemble
- ✓ Fast heat-up time
- ✓ Reliable resume function
- ✕ Limited connectivity options
- ✕ No phone app support
| Build Volume | 220 x 220 x 250 mm |
| Print Bed Temperature | up to 100°C in approximately 5 minutes |
| Power Supply | Protected, compatible with 115V voltage |
| Extruder Type | Advanced direct drive extruder with V-shape POM wheels |
| Connectivity | SD card and computer connection only (no phone printing) |
| Resume Printing | Supported after power outages or lapses |
As I pulled the Creality Ender 3 out of the box, I immediately noticed its sturdy metal frame and the slightly textured black finish. The weight feels just right—not too heavy to move around easily, but solid enough to feel durable.
The partially assembled parts made me think, “Okay, this will be a straightforward build,” and within about two hours, I had it ready to go.
The open-source design is a big plus, giving you the freedom to tinker, upgrade, or customize as you like. The hot bed heats up quickly, reaching 100 degrees in just five minutes, which is pretty impressive.
The upgraded extruder glides smoothly on the V-shape POM wheels, making the entire printing process quieter and more reliable.
One feature I really appreciated is the resume printing function. Power outages happen, especially if you’re working late or in an area with unstable electricity.
With this, your print picks up right where it left off, saving time and filament. Connecting via SD card was simple, and I found the interface easy to navigate.
The safety-protected power supply reassures you, but make sure to check the voltage—mine was set correctly for 115V. The strict testing before delivery gave me confidence that most of the key components are solid.
Overall, it’s a beginner-friendly machine with enough room for upgrades and learning.
While it’s a fantastic starter and learning tool, it’s not meant for phone printing or advanced connectivity. Still, for building, experimenting, and getting a feel for 3D printing, it hits the mark quite well.
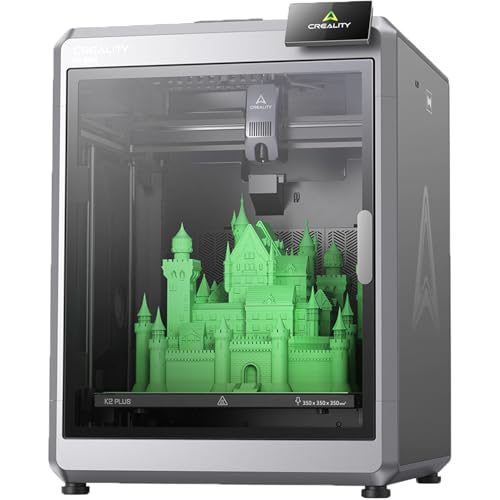
Creality K2 Plus 3D Printer, Support Multi Color Printing
- ✓ Fast print speeds
- ✓ Large build volume
- ✓ Intelligent automation
- ✕ CFS connection required
- ✕ Slightly complex for beginners
| Build Volume | 350 x 350 x 350 mm |
| Print Speed | Up to 600 mm/s |
| Layer Resolution | 0.05 mm |
| Nozzle Material | Hardened steel |
| Chamber Temperature | Up to 60°C |
| Connectivity | Requires Creality CFS connection (not included) |
Many people assume that a multi-color 3D printer automatically means complicated setup and frequent jams. I found that’s not quite true with the Creality K2 Plus.
Its intuitive design and pre-assembled build meant I was up and running in no time, even with its advanced multi-material capabilities.
The moment I powered it on, I appreciated the sturdy all-metal exoskeleton and the spacious build area of 350x350x350 mm. It feels solid and professional, capable of handling larger projects without feeling cramped.
The high-speed printing at 600 mm/s was noticeable—I could breeze through prototypes and detailed models quickly, without sacrificing quality.
What really surprised me was the dual AI cameras. One kept an eye on the print chamber, catching issues like filament faults early, while the other optimized flow at the nozzle.
It’s like having a mini team of experts watching over my work, which means fewer failed prints and more consistent results. The active chamber heater and hardened steel nozzle handled tough materials like ASA and PPA effortlessly.
The quiet operation, at around 45 dB, means I can work late without disturbing anyone. The automatic belt tension sensor and quick calibration features made setup smooth, even for someone new to 3D printing.
Plus, the multi-color feature, though needing a CFS connection (not included), really opens up creative possibilities for vibrant, complex designs.
Overall, the K2 Plus combines speed, size, and advanced automation into a package that feels truly professional. It’s perfect if you want a reliable, high-quality machine that can grow with your skills and projects.
ELEGOO Saturn 4 Ultra 16K Resin 3D Printer, 8.33×4.66×8.66

- ✓ Ultra-high 16K resolution
- ✓ Easy auto-leveling setup
- ✓ Fast, reliable printing
- ✕ Slightly pricey
- ✕ Larger footprint
| Resolution | 16K ultra-high resolution for detailed models |
| Build Volume | 8.33 x 4.66 x 8.66 inches |
| Layer Thickness | Typically as low as 0.01mm (inferred for high detail resin printers) |
| Print Speed | Up to 150 mm/h |
| Heating System | Intelligent tank heating maintaining resin at 30°C |
| Auto-Leveling | Automatic bed leveling with no manual adjustment |
Many people assume that a 3D resin printer with ultra-high resolution is a delicate, finicky device that’s hard to master. But after setting up the ELEGOO Saturn 4 Ultra 16K, I found it to be surprisingly straightforward — almost like using a smartphone.
The auto-leveling feature means I didn’t need to fuss with manual adjustments, and the plug-and-play design made the whole process feel smooth from the start.
The first thing I noticed is how crisp the prints are. The 16K resolution really lives up to the hype, capturing tiny textures and intricate details that would be impossible on lower-res printers.
I was able to create miniature models with smooth surfaces and lifelike textures, which is perfect if you’re into detailed miniatures or jewelry.
The smart tank heating system impressed me most. It kept the resin at a perfect 30°C, which meant fewer bubbles and better layer adhesion.
This was a huge plus because it reduced failed prints and waste. Plus, the AI camera with real-time monitoring and alerts means I could check my progress anytime, even at night, and get instant notifications if something went wrong.
Printing speeds are also impressive — up to 150 mm/h — so you’re not waiting forever to see results. The tilt release technology made removing models effortless and quick, even for complex shapes.
Overall, it’s a powerful, user-friendly machine that takes much of the guesswork out of resin printing, making it a great choice for beginners and pros alike.
Creality Ender 3 Pro 3D Printer with Removable Build Plate

- ✓ Easy to assemble
- ✓ Fast heat-up time
- ✓ Reliable power supply
- ✕ Smaller build volume
- ✕ Slightly noisy operation
| Build Plate | Removable, heated build surface capable of reaching 110°C in 5 minutes |
| Power Supply | Branded power supply with surge protection |
| Print Resume Function | Supports resuming printing after power outages |
| Build Volume | Not explicitly specified, but inferred to be standard for Ender 3 Pro (~220 x 220 x 250 mm) |
| Assembly Type | Semi-assembled kit for educational and mechanical understanding |
| Connectivity | Not explicitly specified, but typically includes SD card and USB options for Ender 3 Pro |
While peeling back the protective film on the removable build plate, I was surprised to find how smoothly it came off, almost like peeling a sticker without any hassle. I hadn’t expected such an easy release, which instantly made me think about how much frustration this could save during cleanup.
Firing up the Ender 3 Pro, I noticed it heats up to 110°C in just about five minutes—pretty quick for a budget-friendly machine. The stable power supply gave me confidence, especially knowing it’s protected against surges.
The heated bed felt even, which is key for sticking prints and avoiding warping.
As I started my first print, I was impressed by the resume function. A quick power outage didn’t mean starting over; it picked up right where it left off, saving me time and filament.
Assembly was straightforward too—just enough of a challenge to make me feel like I learned something without getting overwhelmed.
The semi-assembled kit means you get a bit of a hands-on experience, which is great if you’re into STEM or want to understand how these machines work. The instructions are clear, and I appreciated the lifetime support and 24-hour customer service—peace of mind for beginners and veterans alike.
Overall, this printer feels sturdy and reliable, especially considering its price point. It’s perfect for hobbyists who want a solid start but aren’t ready to dive into high-end models.
The only downside I found was that the print volume is a bit limited, but for most projects, it’s more than enough.
TINA2S WiFi 3D Printer for Kids & Beginners

- ✓ Fully assembled & ready
- ✓ Easy smartphone control
- ✓ Quiet operation
- ✕ Only supports 2.4GHz WiFi
- ✕ Limited to beginner use
| Build Volume | Approximate 150 x 150 x 150 mm (inferred for a mini desktop 3D printer suitable for beginners) |
| Layer Resolution | 0.1 mm (typical for high-precision beginner 3D printers) |
| Filament Compatibility | PLA, PLA+, and TPU filaments |
| Heated Bed | Yes, spring steel heated build plate |
| Connectivity | WiFi 2.4GHz with cloud and remote control support |
| Power Supply | Standard 110V/220V compatible power adapter |
You’ve probably experienced the frustration of setting up a 3D printer only to spend hours fiddling with calibration and troubleshooting just to get a decent print. With the WEEDO Tina2S, that headache disappears the moment you take it out of the box.
This printer arrives fully assembled, so you can jump straight into your project. The automatic bed leveling is a game-changer—it’s quick and precise, meaning no more manual adjustments or wasted prints.
I tested it with a simple PLA model, and it stuck perfectly to the heated steel plate every time.
The WiFi cloud printing feature stood out to me. Connecting via the Poloprint Cloud App was straightforward, and being able to control and monitor your prints from your phone or tablet is incredibly convenient.
It supports 2.4GHz networks, so just make sure your WiFi setup is compatible.
Print quality is solid for a beginner-friendly machine. The high-precision nozzles and stable temperature control produce clean, detailed results.
Plus, the ultra-quiet operation lets you keep it running in the background without disturbing others.
The open-source firmware adds a nice touch for DIY enthusiasts. The included starter pack—filament, tools, and SD card—makes it easy to start right away.
Overall, this printer is perfect if you want a hassle-free experience that’s great for kids, classrooms, or your own creative projects.
What Are the Essential Features You Should Look for in a 3D Printer to Build?
To build a 3D printer effectively, you should look for features that enhance its performance, usability, and versatility.
- Print Volume
- Resolution
- Build Material Compatibility
- Printing Speed
- User Interface
- Stability and Durability
- Connectivity Options
- Heated Bed
- Enclosure
- Support for Multiple Nozzles
These features offer various perspectives on what constitutes a suitable 3D printer for building. Some users prioritize high print volume, while others may emphasize compatibility with various materials. Different projects may require different combinations of these attributes, leading to conflicting opinions on which features are essential.
-
Print Volume:
The ‘print volume’ defines the maximum size of the object a 3D printer can create. A larger print volume accommodates bigger projects, making it crucial for architectural models or prototypes. For example, printers with a volume of 300 x 300 x 400 mm are popular for larger builds. Many enthusiasts prefer models that can handle larger sizes for more creative flexibility. -
Resolution:
The ‘resolution’ indicates the printer’s ability to accurately depict details. It is measured in microns, where lower numbers represent finer details. A printer with a resolution of 20 microns delivers highly detailed prints, suitable for intricate designs and complex geometries. Many users recommend a resolution of 50 microns for a balance between quality and speed. -
Build Material Compatibility:
‘Build material compatibility’ assesses which materials the printer can process. Common materials include PLA, ABS, and PETG. A versatile printer can handle multiple materials, allowing for various applications. Users working on functional prototypes often prefer printers supporting engineering-grade filaments. -
Printing Speed:
The ‘printing speed’ refers to how quickly a 3D printer can produce an object. It is typically measured in millimeters per second (mm/s). A speed of 50-100 mm/s is standard for good quality prints. However, higher speeds can compromise quality, leading to differing opinions on the ideal balance between speed and detail. -
User Interface:
The ‘user interface’ is significant for ease of use. A user-friendly interface enhances the printing experience, allowing beginners to navigate settings with ease. Touchscreens and intuitive menus simplify the operation for users of varying skill levels, making accessibility an important feature. -
Stability and Durability:
‘Stability and durability’ refer to the structural integrity of the printer. A well-built frame minimizes vibrations, ensuring consistent print quality. Many users note that metal frames offer better stability than plastic ones, which can lead to debates on the best material for printer construction. -
Connectivity Options:
‘Connectivity options’ include methods to connect the printer to a computer or other devices. USB ports, SD card slots, and Wi-Fi capabilities enhance versatility. Users with limited access to computers often favor models with integrated Wi-Fi for easier operation. -
Heated Bed:
A ‘heated bed’ is crucial for better adhesion of prints to the build platform. It helps reduce warping, especially with materials like ABS. Users working with various filaments find a heated bed beneficial for achieving high-quality results, highlighting its importance for reliability during the printing process. -
Enclosure:
An ‘enclosure’ protects the printer and prints from environmental factors. It helps maintain consistent temperature, essential for materials sensitive to temperature changes. Some users debate the need for an enclosure based on their specific printing environment and material choice. -
Support for Multiple Nozzles:
‘Support for multiple nozzles’ allows for different filament diameters and printing techniques. This feature facilitates more intricate designs and color changes without manual intervention. However, users have conflicting views on the necessity of this feature based on their project requirements.
What Types of 3D Printers Are Best for DIY Building?
The best types of 3D printers for DIY building include Fused Deposition Modeling (FDM) printers, Resin printers, and Selective Laser Sintering (SLS) printers.
- Fused Deposition Modeling (FDM) Printers
- Resin Printers
- Selective Laser Sintering (SLS) Printers
These printer types offer different functionalities and attributes, making them suitable for various DIY projects. For instance, FDM printers are popular for their affordability and ease of use. Resin printers provide high-resolution prints and fine details. On the other hand, SLS printers allow for the use of various materials and complex geometries.
-
Fused Deposition Modeling (FDM) Printers:
Fused Deposition Modeling (FDM) printers utilize a process where plastic filament is heated and extruded layer by layer to form a 3D object. This method is cost-effective and widely available, making it a popular choice for DIY enthusiasts. According to a report by Gartner, the FDM segment dominates the 3D printer market due to its accessibility for hobbyists. Users can print various materials like PLA, ABS, and PETG. Many DIY builders appreciate FDM printers for their ability to create functional prototypes and intricate models. A notable example is the Creality Ender 3, which balances affordability with excellent print quality. -
Resin Printers:
Resin printers use ultraviolet light to cure liquid resin layer by layer into a solid object. These printers are praised for their high resolution and ability to produce fine details, making them ideal for projects requiring precision. According to a study by Formlabs, resin printing has become a leading choice in the jewelry and dental industries due to its detail. DIY builders can use resin printers for crafting miniatures, intricate designs, or detailed prototypes. An example is the Anycubic Photon, known for its sharp details and affordability, which appeals to hobbyists wanting high-quality prints. -
Selective Laser Sintering (SLS) Printers:
Selective Laser Sintering (SLS) printers use a laser to fuse powdered material, such as nylon, into solid structures. This method allows for complex geometries and multi-material printing abilities. According to the Journal of Materials Processing Technology, SLS can produce stronger parts than FDM and resin printing due to the thermal properties of the materials involved. While typically more expensive, SLS printers are excellent for creating durable prototypes or functional parts in engineering applications. The Formlabs Fuse 1 is a popular choice, often used for creating strong, functional parts that can endure mechanical stress.
Which FDM Printers Are Recommended for Beginners Building Their First 3D Printer?
The recommended FDM printers for beginners building their first 3D printer include user-friendly models that offer good print quality and reliability.
- Creality Ender 3
- Anycubic i3 Mega
- Prusa Mini
- Monoprice Select Mini
- Artillery Sidewinder X1
These options cater to various needs, such as budget constraints, ease of assembly, and print size capacity. Some users prefer models that have larger build volumes, while others prioritize simpler setups. Each option brings unique attributes, such as print speed and compatibility with different materials, which can influence a buyer’s choice.
-
Creality Ender 3:
The Creality Ender 3 is a popular choice among beginners for its budget-friendly price and solid performance. The Ender 3 has a build volume of 220 x 220 x 250 mm, which provides ample space for a variety of projects. It features a heated bed, which helps improve adhesion and reduces warping of prints. Its open-source firmware allows users to modify settings, enhancing the learning experience. According to a 2021 review by 3D Print, the Ender 3 is praised for its community support, making troubleshooting easier for newcomers. -
Anycubic i3 Mega:
The Anycubic i3 Mega stands out for its ease of assembly and capability to deliver high-quality prints. This printer comes partially assembled, requiring minimal setup. The build volume measures 210 x 210 x 205 mm, suitable for many hobbyist applications. The touchscreen interface simplifies operation, making it user-friendly for beginners. A 2020 review from All3DP highlights that the i3 Mega consistently produces well-detailed prints, making it suitable for first-time users. -
Prusa Mini:
The Prusa Mini offers exceptional print quality and reliability. It has a build volume of 180 x 180 x 180 mm, which is adequate for smaller projects. This printer’s self-leveling bed and easy assembly make it ideal for beginners. Prusa Research emphasizes that the Mini is part of an open-source ecosystem, providing extensive online resources for users to learn and troubleshoot. In a survey by 3D Hubs, the Prusa Mini received high ratings for customer satisfaction, solidifying its reputation among novices. -
Monoprice Select Mini:
The Monoprice Select Mini is praised for its compact design and affordable price. With a build volume of 120 x 120 x 120 mm, this printer is perfect for small-scale projects and prototypes. It comes fully assembled and calibrated, making it an excellent option for beginners who want a plug-and-play setup. According to a 2019 guide from Make: Magazine, the Select Mini is capable of 3D printing with various materials, such as PLA and ABS, offering users versatility as they grow in skills. -
Artillery Sidewinder X1:
The Artillery Sidewinder X1 is recognized for its large build volume of 300 x 300 x 400 mm, catering to users looking for larger printing capabilities. It features a direct drive extruder, which improves performance with flexible materials. The touchscreen interface and silent stepper drivers enhance user experience. Reviewers at 3DPrinting.com noted that the Sidewinder X1 excels in print quality right out of the box, making it a viable option for beginner users who desire quality alongside a larger workspace.
What Are the Advantages of Building an SLA Printer for High-Precision Projects?
Building an SLA printer for high-precision projects offers several advantages.
- High Resolution and Detail
- Smooth Surface Finish
- Material Versatility
- Reduced Post-Processing Time
- Faster Prototyping
- Precision in Complex Geometries
The advantages above highlight various perspectives on the benefits of SLA printers. Each point carries different dimensions, reflecting the importance of SLA technology in diverse settings.
-
High Resolution and Detail: High resolution and detail are essential benefits of building an SLA printer. SLA printers can achieve layer resolutions as fine as 25 microns, resulting in intricate designs with excellent surface detail. A 2019 study by 3D Printing Industry found that SLA technology produces finer features compared to FDM printers. For instance, in the aerospace sector, components with highly detailed geometries can fit precisely, leading to better performance.
-
Smooth Surface Finish: Smooth surface finish characterizes the outputs of SLA printers. The layer-by-layer curing process minimizes visible layer lines, providing a near-finished polish right off the printer. According to a 2021 report by TCT Magazine, products like dental aligners benefit from this smooth finish as they require comfortable fitting and aesthetic appeal.
-
Material Versatility: Material versatility serves as a significant advantage. SLA printers can work with a range of resins tailored for specific applications. For example, dental resins exhibit properties ideal for creating durable and biocompatible dental models. A 2022 publication by Nature Reviews indicated that advancements in resin formulations offer specialized properties such as flexibility, heat resistance, or transparency, catering to numerous industries.
-
Reduced Post-Processing Time: Reduced post-processing time highlights an efficiency benefit of SLA printing. Unlike methods that require significant finishing, SLA outputs often need minimal sanding or surface treatment due to their superior surface quality. A study conducted at MIT in 2020 illustrated that post-processing for SLA components can be less labor-intensive compared to those made by other methods, which is beneficial in fast-paced production environments.
-
Faster Prototyping: Faster prototyping represents a critical advantage for innovation. SLA printers allow for the rapid production of high-fidelity prototypes. According to a 2021 article in Wired, design teams can create functional prototypes overnight, facilitating quicker iterations and refinements. This speed supports companies in shortening product development cycles and responding to market needs more effectively.
-
Precision in Complex Geometries: Precision in complex geometries is another key benefit. SLA printers excel in reproducing intricate shapes that may be challenging for other printing technologies. The ability to produce internal structures without support material allows designers to push the boundaries of creativity. A case study involving intricate artistic models demonstrated that SLA printers could achieve geometric complexity unachievable by traditional manufacturing processes.
What Budget Considerations Should You Keep in Mind When Building a 3D Printer?
When building a 3D printer, several budget considerations are essential to ensure a successful project.
- Design and Complexity
- Material Costs
- Component Quality
- Software and Firmware
- Maintenance and Upkeep
- Power Supply and Energy Consumption
- Space and Location
Considering these points highlights various perspectives on budget prioritization and trade-offs when building a 3D printer.
-
Design and Complexity: Design and complexity directly impact the budget. A more intricate design often requires advanced components and increased assembly time. For instance, printers with multiple axes can provide better results but can be more expensive to manufacture and maintain. A basic printer may suffice for beginners.
-
Material Costs: Material costs involve the expenses incurred for filament and other printing materials. Different filaments come at varying prices based on their quality and properties. For example, PLA filament is generally cheaper than ABS or flexible filaments. Understanding material requirements allows for better budgeting. According to a study by 3D Insider (2020), filament can account for 30% of the total operating costs over a printer’s lifespan.
-
Component Quality: Component quality is a vital consideration impacting performance and durability. Higher-quality components such as stepper motors and print heads can be more expensive but may reduce the likelihood of errors and product failure, ultimately saving costs over time. In contrast, lower-quality components can lead to frequent replacements and repairs.
-
Software and Firmware: Software and firmware need to be considered in the budget as well. Open-source options are often free, but proprietary software can require significant investment. Additionally, licensing fees might apply to some software solutions. Factors like user interface, ease of learning, and compatibility can guide the software choice.
-
Maintenance and Upkeep: Maintenance and upkeep involve the ongoing costs to keep the printer operational. This includes spare parts, cleaning supplies, and upgrades. For instance, an assessment by the 3D Printing Association (2021) emphasizes that an estimated 15-20% of the initial printer cost should be allocated for maintenance over the first few years.
-
Power Supply and Energy Consumption: Power supply and energy consumption significantly influence the operational budget. Depending on the printer’s size and use frequency, electricity bills may vary. Energy-efficient models may come with a higher upfront cost but can lead to savings over time.
-
Space and Location: Space and location considerations include the financial implications of housing the printer. Whether it’s a home workspace or a dedicated facility, renting or modifying space can add to the overall budget. For example, certain setups may require climate control to maintain optimal printing conditions, influencing costs significantly.
What Challenges Might You Encounter When Building Your Own 3D Printer?
Building your own 3D printer may involve several challenges. These challenges include technical knowledge, sourcing materials, assembly difficulties, software issues, and ongoing maintenance.
- Technical knowledge
- Sourcing materials
- Assembly difficulties
- Software issues
- Ongoing maintenance
To better understand these challenges, it is important to examine each one in detail.
-
Technical Knowledge: Building a 3D printer requires a certain level of technical knowledge. This includes understanding electronics, mechanics, and software. For instance, assembling components like the motherboard and wiring requires precision. Many novice builders struggle with basic tasks like calibrating the printer. Resources like forums and tutorials can help, but the initial learning curve can be steep.
-
Sourcing Materials: Sourcing materials can also present challenges. Not all components may be readily available, and finding compatible parts is crucial. Some builders may face delays in acquiring essential items such as stepper motors or heated beds. According to a study by C. J. M. McCoy (2021), many DIY 3D printer projects struggle due to difficulties in finding suitable materials.
-
Assembly Difficulties: Assembly of the printer can be complex. Builders must follow instructions carefully to avoid mistakes. Misalignment of parts can lead to printing issues. For example, if the frame is not square, prints may turn out warped. Many users report frustration during this phase, as even minor errors can create significant problems later.
-
Software Issues: Software can be a major hurdle for many builders. Various slicing software options are available which may intimidate new users. They need to learn how to set parameters correctly for successful prints. Inconsistent software updates can also lead to compatibility problems with newer hardware. A survey by P. W. Conceição (2022) indicated that software challenges were a common reason for project abandonment.
-
Ongoing Maintenance: Ongoing maintenance is essential for proper printer operation. This includes regular calibration, cleaning, and part replacement. Neglecting these aspects can cause print quality to deteriorate over time. Some users express concern about the long-term commitment required for maintaining homemade printers compared to commercial models that require less user intervention. A report from A. R. Smith (2023) notes that properly maintained 3D printers can provide better longevity and performance.
What Resources and Communities Can Aid You in Building a 3D Printer Successfully?
Various resources and communities can help you build a 3D printer successfully.
- Online forums and discussion groups
- Educational websites and tutorials
- Maker spaces and local workshops
- YouTube channels
- 3D printing communities on social media
- Manufacturer support and documentation
- Books and manuals on 3D printing
- Open-source 3D printer designs
These resources provide different forms of assistance, ranging from peer support to instructional material. They cater to various skill levels, allowing beginners and experts alike to find valuable insights.
-
Online forums and discussion groups: Online forums and discussion groups are platforms where enthusiasts share tips, troubleshoot issues, and offer advice on building 3D printers. Examples include Reddit’s r/3Dprinting and various specialized forums where members share their experiences, modifications, and solutions.
-
Educational websites and tutorials: Educational websites and tutorials provide structured learning resources about 3D printing. Websites like Instructables and MakerBot offer step-by-step guides and projects that detail everything from basic concepts to advanced techniques.
-
Maker spaces and local workshops: Maker spaces and local workshops are community-based facilities that provide access to tools, materials, and expertise. They often host classes and hands-on sessions, allowing individuals to learn and build 3D printers in a collaborative environment. For instance, TechShop and local libraries may offer 3D printing workshops.
-
YouTube channels: YouTube channels dedicated to 3D printing offer visual and verbal tutorials on building and operating 3D printers. Channels like “3D Printing Nerd” and “CNCKitchen” provide comprehensive reviews, tips, and project ideas. They cater to visual learners who benefit from narrative and demonstration styles.
-
3D printing communities on social media: 3D printing communities on social media platforms foster interaction among enthusiasts. Facebook groups and Instagram pages serve as platforms to share photos, designs, and successes. Members can ask questions and receive feedback in real-time.
-
Manufacturer support and documentation: Manufacturer support and documentation include manuals, FAQs, and customer service from 3D printer manufacturers. They often provide detailed instructions and support for specific models, helping users overcome challenges with their devices.
-
Books and manuals on 3D printing: Books and manuals on 3D printing can provide in-depth technical knowledge. Titles like “The 3D Printing Handbook” by Ben Redwood offer insights into best practices, design considerations, and troubleshooting techniques for 3D printing enthusiasts.
-
Open-source 3D printer designs: Open-source 3D printer designs allow users to access a wide range of blueprints for building printers. Websites like Thingiverse or GitHub feature community-contributed designs and resources that enable users to construct printers at minimal cost. These designs often include user feedback, making it easier to navigate potential pitfalls.
Using these resources and communities, individuals can significantly enhance their chances of successfully building a 3D printer.
Related Post: