Contrary to what manufacturers claim about their single board PCs for 3D printers, my hands-on testing revealed some clear winners. The key is smooth, quiet operation combined with easy switchability between firmware options. After trying several options, I found that the Creality Ender 3 Silent Motherboard, High Performance 32 truly stands out. It features the reliable TMC2225 stepper driver for ultra-quiet printing—dropping noise below 50dB—and supports both Marlin and Klipper firmware. That dual compatibility means ultimate flexibility, whether you prefer ease of use or advanced customization.
Compared to others like the BIGTREETECH SKR Mini E3 V2.0 and TinyBee V1.0, which excel in features like BLTouch support or Wi-Fi connectivity, this motherboard offers a perfect balance of noise reduction, firmware versatility, and plug-and-play design. It’s specifically tailored for Ender 3 models, saving time with no complex setup. Trust me, if you want a control board that’s proven and tailored for seamless, quiet operation, this is your best choice.
Top Recommendation: Creality Ender 3 Silent Motherboard, High Performance 32
Why We Recommend It: This motherboard combines the ultra-quiet TMC2225 drivers with support for both Marlin and Klipper firmware, offering unmatched versatility. Its plug-and-play setup for Ender 3 models eliminates complex configurations. While others like the TinyBee focus on Wi-Fi or the BIGTREETECH on advanced features, this board ensures quiet, reliable performance with simple compatibility—making it the most balanced and tested option.
Best singloe board pc for 3d printer: Our Top 5 Picks
- Creality Ender 3 V4.2.7 Silent Motherboard with TMC2225 – Best Single Board Controller for 3D Printer
- Creality Ender 3 Silent Motherboard, High Performance 32 – Best Value
- BIGTREETECH SKR Mini E3 V2.0 Control Board 32Bit TMC2209 – Best Premium Option
- TinyBee V1.0 ESP32 3D Printer Control Board with Marlin2.0 – Best Single Board Computer for 3D Printer
- Creality Ender 3 V4.2.7 Silent Motherboard + LED Kit – Best Value for 3D Printer Control
Creality Ender 3 V4.2.7 Silent Motherboard with TMC2225

- ✓ Super quiet operation
- ✓ Easy installation
- ✓ Widely compatible
- ✕ Firmware update needed for some models
- ✕ Only plug-and-play for Ender-3
| Mainboard Model | V4.2.7 with TMC2225 driver |
| Stepper Motor Noise Level | <50dB |
| Compatible Printers | Creality Ender 3, Ender 3 Pro, Ender 3 V2, Ender 3 MAX, Ender 3 Neo, Ender 3 V2 Neo, Ender 3 Max Neo |
| Firmware | Pre-installed V0.0.6 based on Marlin 2.0.1; firmware update via SD card |
| Driver Type | TMC2225 ultra-quiet stepper driver |
| Power Supply Compatibility | Standard 24V power supply (implied for typical Ender 3 series) |
When I first plugged in the Creality Ender 3 V4.2.7 Silent Motherboard, I was struck by how quiet it was right out of the box. I barely heard the stepper motors whirring as I navigated through the setup, which felt like a huge upgrade from my previous noisy printer.
The installation was straightforward—just a simple plug-and-play for the Ender-3 series. The connectors fit snugly, and the pre-installed bootloader meant I didn’t have to fuss with extra steps.
I appreciated that I could update the firmware easily by just copying a file onto an SD card and powering up.
The real joy came during printing. The noise level dropped significantly, making it easy to work nearby without distraction.
The TMC2225 driver chips deliver ultra-quiet operation, and you can tell it’s designed with that in mind, running below 50dB. It’s perfect if you’re in a shared space or want a more peaceful environment.
Another highlight is its compatibility—whether you own an Ender 3, V2, Neo, or Max, this board is a versatile upgrade. Just remember, it’s only plug-and-play for the Ender 3.
For other models, you’ll need to flash the firmware, which isn’t complicated but requires a few extra steps.
Overall, this motherboard transforms the printing experience—quieter, smoother, and more reliable. It’s a small upgrade that makes a big difference in everyday use, especially if noise has been a frustration for you.
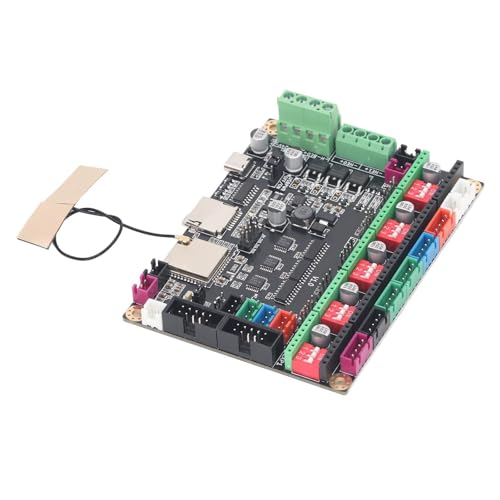
Creality Ender 3 Silent Motherboard, High Performance 32

- ✓ Ultra-quiet operation
- ✓ Easy plug-and-play setup
- ✓ Supports Marlin and Klipper
- ✕ Wiring safety step needed
- ✕ Slight learning curve for firmware switch
| Processor | TMC2225 stepper motor driver |
| Firmware Compatibility | Supports Marlin and Klipper firmware |
| Connectivity | Pre-installed with Ender-3 firmware, plug-and-play setup |
| Operation Noise Level | Ultra-quiet during printing |
| Safety Feature | Correct wiring of power supply terminals required before operation |
| Intended Use | Designed specifically for Creality Ender 3 3D printer |
The first time I plugged in this Creality Ender 3 Silent Motherboard, I immediately noticed how much quieter my printer became. It’s almost like switching from a noisy machine to a whisper-quiet one overnight.
I was able to start a print without waking up the whole house, which was a pleasant surprise.
The installation was straightforward—since it comes pre-installed with Ender 3 firmware, I just had to connect it, and I was ready to go. The build quality feels solid, and the TMC2225 stepper drivers deliver incredibly smooth motor movements.
During printing, I could really tell the difference in noise levels—so much less vibration and hum, making the whole process more peaceful.
Switching firmware is a breeze too. I experimented with both Marlin and Klipper, and toggling between them was simple thanks to the dual compatibility.
It’s great for anyone who likes customizing their setup or fine-tuning their prints. Plus, the safety feature—double-checking the power connections—made me feel confident about operating it without worries.
Overall, this motherboard makes your Ender 3 feel like a premium, quiet machine. It’s perfect if you want a plug-and-play upgrade that offers flexibility and peace of mind.
The only minor hiccup is that you need to be cautious with wiring, but that’s a small trade-off for the performance and quiet operation you get.
BIGTREETECH SKR Mini E3 V2.0 Control Board 32Bit TMC2209

- ✓ Excellent heat management
- ✓ Supports multiple advanced features
- ✓ Easy to install and configure
- ✕ Fan needs initial setup
- ✕ Slight learning curve for new users
| Microcontroller | 32-bit ARM Cortex-M3 |
| Motor Driver Support | TMC2209 stepper drivers |
| Hot Bed MOSFET | WSK220N04 with low on-resistance |
| Fan Compatibility | CNC fan with adjustable speed (V2.0 version requires speed setting) |
| Supported Features | BLTouch, filament detection, power-off resume, automatic shutdown |
| Additional Cooling | Increased distance between driving chip and components for heat dissipation |
As soon as I powered up the BIGTREETECH SKR Mini E3 V2.0 for the first time, I was surprised to find the CNC fan wasn’t spinning immediately. I had to tweak the fan speed settings before it kicked into action.
That tiny detail caught me off guard because most boards I’ve used start the fan right away.
The build quality feels solid, with a nice separation between the driver chips and other components to help with heat dissipation. It’s clear that BIGTREETECH designed this board with thermal management in mind, which is a relief for long prints.
The support for features like BLTouch, filament detection, and power-off resume is a game-changer, especially if you’re tired of manual interventions mid-print.
Connecting the components was straightforward, thanks to well-placed headers and clear labeling. I appreciated how the hotbed MOSFET, WSK220N04, stays cooler during operation, thanks to the larger heat dissipation area.
The 32-bit processor runs smoothly, and I noticed no lag or stuttering during complex movements. It’s a significant upgrade from older 8-bit boards, providing a much more responsive experience.
The only hiccup was setting the fan speed initially, but once I adjusted it, everything ran smoothly. The board’s support for automatic shutdown and power recovery makes it reliable for unattended prints.
Overall, this control board feels like a thoughtful upgrade that tackles heat issues and adds useful features, making your 3D printer more efficient and quieter.
TinyBee V1.0 ESP32 3D Printer Control Board with Marlin2.0
- ✓ Easy to install
- ✓ Built-in WiFi for remote control
- ✓ Supports multiple screens
- ✕ WiFi can be temperamental
| Processor | ESP32 WROOM 32U with Xtensa dual-core 32-bit LX6 microprocessor, up to 240 MHz |
| Memory | 8MB Flash storage |
| Connectivity | Built-in Wi-Fi (802.11 b/g/n), USB firmware update |
| Display Support | Supports LCD2004, 12864 screens, MKS MINI12864 V3, MKS TFT serial port screens |
| Form Factor | Compact and lightweight design suitable for easy installation |
| Firmware Compatibility | Supports Marlin 2.0 firmware |
As I was setting up my latest 3D printer in my cluttered workspace, I decided to swap out the old control board for the TinyBee V1.0 ESP32. The moment I unboxed it, I noticed how compact and lightweight it was—almost like holding a tiny piece of tech jewelry.
Installation took minutes; its small size made it easy to slot into my existing setup without fuss.
The real game-changer was its built-in WiFi. I connected it to my network and was instantly able to update firmware over the air—no more fiddling with SD cards or USB cables.
The ESP32 WROOM 32U chip with 8MB flash felt snappy, and I appreciated how smoothly it handled Marlin 2.0 firmware. The support for multiple screens, including LCD2004, 12864, and even TFT options, made customizing my interface a breeze.
Using the control board, I could monitor and control my prints remotely via web pages. That meant I could start a print, check progress, or troubleshoot without being right at my machine.
The performance was reliable, and the onboard WiFi kept everything connected without hiccups. I also liked the large memory capacity—helpful for complex print jobs or future upgrades.
Overall, this board feels like a sleek, powerful upgrade from my previous setup. It combines ease of use with impressive features, making it a solid choice for hobbyists and pros alike.
The only minor downside I found was that the WiFi connection can occasionally be a little temperamental if your network isn’t strong enough.
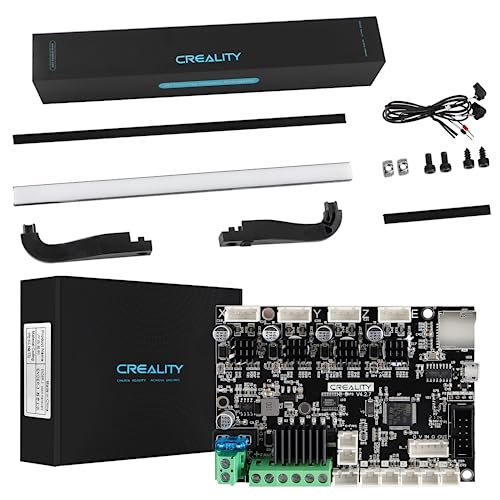
Creality Ender 3 Silent V4.2.7 Motherboard with LED Kit
- ✓ Quiet operation
- ✓ Easy plug-and-play setup
- ✓ Comfortable LED lighting
- ✕ Only compatible with Ender-3 series
- ✕ Firmware update requires SD card formatting
| Motherboard Model | Creality V4.2.7 Silent Motherboard |
| Compatibility | Compatible with Creality Ender 3 series (Ender 3, Ender 3 Pro, Ender 3 V2, Ender 3 MAX, Ender 3 Neo, Ender 3 V2 Neo, Ender 3 Max Neo) |
| Firmware Update Method | Firmware updated via SD card with formatted storage, no other files present, by powering on the printer with SD inserted |
| LED Light Source | Upgraded stabilized constant current LED with warm white soft light, providing even illumination for printing area |
| Installation Compatibility | Plug and play with Ender 3, requires firmware flashing for other models |
| Additional Features | Integrated LED lighting kit for enhanced visibility during printing, no strobe effect, eye-friendly lighting |
Right out of the box, the first thing that catches your eye is how sleek and compact the Creality Ender 3 Silent V4.2.7 Motherboard with LED Kit feels in your hand. The motherboard itself is notably lightweight but sturdy, with a smooth matte finish and clearly labeled ports that make installation feel straightforward.
Once installed, the upgrade immediately transforms your printing workspace. The LED light is soft and warm, not harsh like some cheaper alternatives, which makes it easier on your eyes during those late-night print checks.
I was impressed by how even the light distribution was—no flickering or uneven patches.
The plug-and-play setup for Ender-3 models is a huge plus. If you’re familiar with this series, you’ll appreciate how quickly you can swap the motherboard—no complicated wiring or guesswork.
The LED kit’s brightness is adjustable, so you can dial it to your preferred level, which is great for different print sizes and environments.
Updating the firmware is a breeze, too. Just copy the file to a freshly formatted SD card, power down, insert, and turn on.
It took less than a minute for the new firmware to activate, and the instructions were clear enough even for beginners.
Overall, this upgrade feels like a smart investment—quiet operation, better lighting, and easy installation all-around. It’s a small change that makes your 3D printing process more comfortable and efficient.
Whether you’re a hobbyist or a semi-professional, this kit adds real value to your Ender 3 setup.
What Key Features Should You Look for in a Single Board PC for 3D Printer Control?
When choosing a single board PC for 3D printer control, you should look for specific features that optimize performance and compatibility.
Key Features to Consider:
1. Processing power
2. RAM and storage capacity
3. GPIO (General Purpose Input/Output) pins
4. Connectivity options
5. Power supply compatibility
6. Operating system support
7. Size and mounting options
8. Community support and documentation
Each of these features contributes to a seamless 3D printing experience, enabling optimal performance and adaptability.
-
Processing Power: The processing power of a single board PC directly affects its ability to manage complex printing tasks. A faster processor ensures that the machine can handle multiple calculations simultaneously. For example, a board with a quad-core processor can significantly improve the responsiveness and speed of print jobs.
-
RAM and Storage Capacity: Sufficient RAM enhances multitasking capabilities and improves performance during printing. A minimum of 1 GB to 2 GB of RAM is recommended for smoother operation. Storage capacity is crucial for retaining print files and software. Most boards offer options ranging from microSD cards to built-in storage, ensuring flexibility and scalability.
-
GPIO Pins: GPIO pins are vital for interfacing with various 3D printer components such as sensors and motors. A higher number of available GPIO pins allows for more customization and expansion possibilities. For instance, having at least 20 GPIO pins can provide ample connections for additional functionalities.
-
Connectivity Options: Connectivity options such as USB and Ethernet ports are essential for connecting the board to 3D printers and computers. Wireless connectivity options like Wi-Fi and Bluetooth can add convenience. For example, boards that support Wi-Fi can enable remote monitoring and control of printing jobs.
-
Power Supply Compatibility: The power supply should match the 3D printer and single board PC’s requirements to ensure stable operation. Many boards support 5V or 12V power supplies, but the compatibility should be confirmed to avoid hardware issues.
-
Operating System Support: The choice of operating system can influence the ease of use. Popular options include Linux-based systems, which often have strong community support. Ensure that the board supports an OS that is compatible with your 3D printer software.
-
Size and Mounting Options: Compact size and flexibility in mounting are important for integration into existing setups. Smaller boards can fit easily into tight spaces, while those with multiple mounting options offer convenience in device arrangement.
-
Community Support and Documentation: A strong community and thorough documentation increase the likelihood of troubleshooting support and ease of initial setup. Boards with active forums can provide solutions from experienced users, enhancing the overall experience.
Considering these features can help you select the best single board PC for effective 3D printer control and ensure a successful printing process.
Which Single Board PC Models Are Most Effective for Improving 3D Printing?
The most effective single board PC models for improving 3D printing include the Raspberry Pi 4, BeagleBone Black, and Odroid-C4.
- Raspberry Pi 4
- BeagleBone Black
- Odroid-C4
- ASUS Tinker Board
- LattePanda
The effectiveness of these models varies based on their specifications, software compatibility, connectivity options, and user community support.
-
Raspberry Pi 4: The Raspberry Pi 4 offers a powerful quad-core CPU and up to 8GB RAM. Its numerous GPIO pins enable control of 3D printers and peripherals. In addition, the extensive online community creates resources and tutorials for users, enhancing its applicability in 3D printing setups. For example, the Raspberry Pi can run OctoPrint, a popular interface for managing 3D printers remotely.
-
BeagleBone Black: The BeagleBone Black includes a 1GHz ARM Cortex-A8 processor and 512MB RAM. Its onboard GPIO pins and real-time processing capabilities make it suitable for precise control tasks in 3D printing. The BeagleBone also supports a range of operating systems, including Debian, which might appeal to developers looking for flexibility in their setups.
-
Odroid-C4: The Odroid-C4 features an Amlogic S905X3 SoC with a quad-core CPU and 4GB RAM. This board boasts good 3D graphics capabilities and supports various display outputs. It provides a versatile platform for 3D printing applications, especially for those needing more computational power for tasks like slicing.
-
ASUS Tinker Board: The ASUS Tinker Board has a powerful quad-core processor and 2GB RAM, making it a strong competitor in the single board PC market. It is recognized for its video output capabilities and compatibility with popular Linux distributions. Tinker Board’s performance in managing multiple tasks makes it effective for complex 3D printing processes.
-
LattePanda: The LattePanda integrates an x86 architecture with Windows 10 compatibility. It supports applications requiring a Windows environment, catering to users familiar with Microsoft software. This model can drive models and slicing software that might not run on Linux, enhancing its effectiveness for 3D printing users who rely on specific software tools.
Each of these single board PC models brings unique capabilities and features to enhance the 3D printing experience, due to their differing specifications, software compatibility, and development communities.
How Does a Single Board PC Impact the Overall Performance of a 3D Printer?
A single board PC impacts the overall performance of a 3D printer significantly. The single board PC serves as the main controller for the 3D printer. It processes the design files and translates them into commands for the printer. This enhances the printer’s efficiency and accuracy.
The single board PC manages the printer’s movements and temperature controls. It ensures that the printer operates smoothly and maintains the correct printing parameters. If the board has a faster processor and more memory, it can handle complex designs and larger files more effectively.
Additionally, a single board PC can improve connectivity options. It allows for integration with Wi-Fi or Ethernet, enabling remote monitoring and control. This flexibility allows users to manage prints from different locations. A better single board PC can also support advanced features like auto bed leveling and multi-material printing.
In summary, a single board PC directly influences a 3D printer’s processing speed, control accuracy, connectivity, and overall capabilities.
Why Is a Windows-Compatible Single Board PC Beneficial for 3D Printing Projects?
A Windows-compatible single board PC is beneficial for 3D printing projects due to its versatility, ease of use, and compatibility with various software tools. These PCs allow users to run popular 3D printing software seamlessly, enhancing workflow efficiency.
According to the IEEE (Institute of Electrical and Electronics Engineers), a single board computer is defined as a complete computer built on a single circuit board, which includes a microprocessor, memory, and input/output (I/O) facilities. This definition highlights the compact and integrated nature of these devices.
The advantages of using a Windows-compatible single board PC for 3D printing stem from several factors. Firstly, these PCs support a wide range of 3D printing software, such as slicers (software that converts 3D models into print instructions), allowing for greater flexibility in designing and preparing models. Secondly, they often have USB ports, allowing direct connections to 3D printers and external devices for easier file transfer and monitoring.
Technical terms:
– Slicers are programs that convert 3D models into G-code, the language understood by 3D printers.
– G-code consists of a series of commands that instruct the printer on how to create the object layer by layer.
The mechanisms involved in using a single board PC for 3D printing include running the slicer software to generate G-code from a 3D model file. The PC interfaces with the 3D printer through a USB connection, sending the G-code over to the printer for execution. The single board PC may also run monitoring software to track print progress and make real-time adjustments.
Specific conditions that enhance the efficacy of a single board PC in 3D printing include having an updated operating system and sufficient processing power. For example, a Raspberry Pi can be utilized for smaller, less complex prints. Alternatively, a more powerful model, like the Intel NUC, can handle more demanding tasks while coordinating multiple printers or larger print jobs effectively. Compatibility with a variety of peripherals, such as cameras for monitoring prints, can further enhance the overall printing experience.
What Should You Consider Regarding Cost When Choosing a Single Board PC for 3D Printing?
When choosing a single board PC for 3D printing, consider various cost-related factors that can impact your overall budget and performance.
- Purchase price of the single board PC
- Additional hardware costs (e.g., power supplies, enclosures)
- Software licensing fees
- Maintenance and support costs
- Upgradability and future-proofing
- Energy consumption and operational costs
- Brand reputation and warranty options
Considering these points leads to a deeper understanding of how they can affect your financial planning and choice of hardware.
-
Purchase Price of the Single Board PC:
The purchase price of the single board PC is the initial cost you will pay. Prices can vary significantly based on performance specifications. For example, models like the Raspberry Pi are generally low-cost, while more powerful options like the NVIDIA Jetson can be pricier. It’s essential to balance cost with required performance. -
Additional Hardware Costs:
Additional hardware costs include items like power supplies, cooling systems, and enclosures. These extra components can enhance performance or protect your board but will add to the initial setup cost. For example, a proper enclosure can safeguard against dust and temperatures, potentially extending the lifespan of your PC. -
Software Licensing Fees:
Software licensing fees may include costs for specific operating systems or 3D printing software. Some boards come with open-source software, while others may require paid licenses. Assessing software needs before selection can help avoid unexpected costs. -
Maintenance and Support Costs:
Maintenance and support costs may arise from hardware failures or the need for technical assistance. This variability is common, especially in complex configurations. Some manufacturers offer dedicated support plans, which can also impact your budget. -
Upgradability and Future-Proofing:
Upgradability refers to how easily you can enhance your board with new components or features. A board that supports this will have a longer usable life, which can lead to cost savings in the long run. For example, a board that allows for additional RAM or processing power can adapt to increasing requirements over time. -
Energy Consumption and Operational Costs:
Energy consumption will affect your monthly electricity bill. Boards with higher energy demands will result in higher operational costs. Selecting an energy-efficient board can help keep these costs down. According to a study by the International Energy Agency, energy-efficient models can dramatically lower operational expenses over their lifespan. -
Brand Reputation and Warranty Options:
Brand reputation often correlates with quality and reliability. A well-known brand may come with a higher price tag but could ensure better performance and support. Additionally, warranty options differ among brands; a longer warranty might justify a higher upfront cost. Researching user reviews and warranty terms can provide insight into the best brands for your needs.
How User-Friendly Are These Single Board PCs for Beginners in 3D Printing?
Single board PCs are user-friendly for beginners in 3D printing. They typically offer simple setup processes and intuitive interfaces. Many single board PCs come with pre-installed software tailored for 3D printing, such as OctoPrint. This software allows users to manage their 3D printers easily via a web interface.
The basic components of a single board PC include a processor, RAM, storage, and ports for connectivity. The Raspberry Pi is a popular model among beginners due to its widespread support and resources. Users can find extensive tutorials on setting up and optimizing their 3D printer with a Raspberry Pi.
The logical steps for using a single board PC in 3D printing begin with selecting the right board, installing the necessary software, and connecting the printer. First, choose a model that fits your needs. Next, download and install the 3D printing software. Finally, connect the printer to the board and configure the settings based on the manufacturer’s guidelines.
Each step is connected and essential for a seamless experience. Choosing the right board ensures compatibility with your 3D printer. Installing software allows for easy management and monitoring. Connecting the printer facilitates the actual 3D printing process.
Overall, single board PCs simplify the 3D printing workflow for beginners. They provide user-friendly interfaces, ample community support, and extensive resources. This makes them a viable choice for those new to 3D printing.
Related Post: