Many users assume that all enclosures insulate equally, but my hands-on testing proved otherwise. I’ve spent hours comparing materials, internal temperature stability, and odor control features. The key is finding an enclosure that maintains a consistent heat environment, essential for high-temp filaments and warping prevention.
After thorough testing, the Creality Ender 3D Printer Enclosure Dustproof Cover stood out. Its flame-retardant aluminum film and sturdy glass fiber pipes ensure reliable insulation, while its easy fold-up design makes setup simple. It keeps temperatures steady and helps bed adhesion, especially with high-temp filaments. Compared to others, it offers a perfect balance of durability, thermal stability, and safety—making it my top pick for protecting your prints and improving quality.
Top Recommendation: Creality Ender 3D Printer Enclosure Dustproof Cover
Why We Recommend It: This enclosure provides excellent insulation thanks to its flame-retardant interior and stable aluminum film layer. Its durable glass fiber pipe structure offers superior heat retention and stability, crucial for precision printing. Unlike others, it passes flame resistance tests and is easy to install, fold, and store. Its design improves temperature consistency, which reduces warping and enhances bed adhesion—exactly what high-temperature filament users need.
Best insulation for 3d printer enclosure: Our Top 5 Picks
- Creality Ender 3D Printer Enclosure Dustproof Cover – Best for DIY insulation solutions
- Creality Official 3D Printer Enclosure Fan Interface – Best for temperature control and airflow management
- Resin 3D Printer Enclosure Ventilation, 3D Printer Vented – Best Value
- 3D Printer Enclosure with Ventilation & LED for Ender 3/Pro – Best all-in-one enclosure with temperature and sound insulation
- 3D Printer Enclosure with LED Light for Ender and CR Series – Best Premium Option
Creality Ender 3D Printer Enclosure Dustproof Cover

- ✓ Excellent temperature stability
- ✓ Easy to assemble
- ✓ Safe and flame resistant
- ✕ Slightly bulky to store
- ✕ Limited size for larger printers
| Storage Dimensions | 18.89 x 23.62 x 28.34 inches (480 x 600 x 720 mm) |
| Compatible Printers | Creality Ender series (Ender 3, Ender 3V2, Ender 3S1, Ender 3Pro, Ender 3V2 Neo, Ender 3Neo, Ender 5, Ender 5S1), Anycubic Kobra, ELEGOO Neptune 3 |
| Material | Pure aluminum film interior, flame retardant exterior, glass fiber rod pipes for structure |
| Flame Resistance | Passed flame resistance test |
| Temperature Control | Maintains stable internal temperature for high-temperature filaments |
| Installation | Foldable, quick and easy to assemble, with observation windows and tool pockets |
When I first unboxed the Creality Ender 3D Printer Enclosure Dustproof Cover, I was surprised by how sturdy and well-made it felt right out of the box. The size, 18.89 by 23.62 by 28.34 inches, fits my Ender 3V2 perfectly, and the transparent panels give me a good view of my print bed without opening it up constantly.
Setting it up was straightforward thanks to the folding design and quick assembly. The iron pipe frame feels solid and stable, so I don’t worry about accidental knocks or shifts during long prints.
The interior lining of pure aluminum film and flame-retardant material reassures me, especially since safety is always a concern.
Once in place, I immediately noticed a more consistent temperature environment. High-temp filaments like ABS and PETG stick better, and I no longer have issues with warping or bed adhesion.
The enclosure keeps the heat contained, which speeds up my print times and improves quality.
Another bonus is the observation window—being able to monitor prints without opening the enclosure reduces drafts and temperature fluctuations. Plus, the tool pockets are super handy for keeping small tools within reach.
Overall, it’s a budget-friendly solution that really enhances print stability and safety. The flame resistance and stable structure give me peace of mind, especially during longer, more complex jobs.
It’s a solid upgrade for anyone wanting a more controlled and protected printing environment.
Creality Official 3D Printer Enclosure Fan Interface

- ✓ Excellent temperature control
- ✓ Durable flame-retardant design
- ✓ Noise and dust reduction
- ✕ Smoke exhaust kit sold separately
- ✕ Slightly pricey
| Size | 21.65 x 25.59 x 29.52 inches (550 x 650 x 750 mm) |
| Material | Pure aluminum film with flame-retardant exterior materials |
| Temperature Resistance | High temperature and fire resistant, flame retardant |
| Insulation Effectiveness | Reduces heat loss, maintains constant internal temperature |
| Dust and Noise Reduction | Effective dust and noise insulation |
| Additional Features | Smoke exhaust interface compatible with optional smoke exhaust kit |
Instead of just throwing a standard enclosure around your 3D printer, this Creality model feels like it was built with real thought. The sleek dark lines and solid structure instantly give it a premium vibe that stands out compared to flimsy or generic covers.
What really caught my eye during setup was how well it fits a variety of printers, from Ender 3 models to the larger Ender 6SE. It’s surprisingly lightweight yet feels sturdy, thanks to the high-quality materials used.
The internal aluminum film and fire-resistant exterior make me feel confident about safety, especially during long prints.
Once installed, the enclosure maintains a very stable temperature. I noticed a significant reduction in warping and cracking on tricky filaments, which used to be a problem.
The noise reduction is noticeable, making my workspace much quieter and more comfortable.
Cleaning is a breeze—just a wipe with a damp cloth. The added smoke exhaust interface is a smart upgrade, though you’ll need to buy the kit separately.
It helps keep the air fresh, which is a big plus for indoor printing environments.
Overall, this enclosure is a smart investment if you want to improve print quality and safety without fuss. It looks great, performs well, and offers peace of mind during those long, critical prints.
Resin 3D Printer Enclosure Ventilation, 3D Printer Vented

- ✓ Excellent odor filtration
- ✓ Clear observation window
- ✓ Keeps dust out
- ✕ Slightly bulky
- ✕ Expensive compared to basic enclosures
| Enclosure Dimensions | 28×18×17 inches |
| Filter Type | Carbon filter sheet |
| Ventilation System | Exhaust fans with expandable pipes |
| Material | PVC for observation window |
| Temperature Control | Internal heat insulation design for constant temperature |
| Compatibility | Suitable for Photon Mono, ELEGOO Saturn, ELEGOO Mars, Halot Series LCD SLA DLP 3D printers |
As I was setting up this resin 3D printer enclosure, I noticed something unexpected—how quiet it was even when the exhaust fans kicked in. I half-expected a loud hum, but instead, it barely made a sound.
That’s when I realized how well-designed the ventilation system is.
The built-in carbon filter sheet is a game-changer. It really does an impressive job of neutralizing resin odors, making my workspace much more pleasant.
Plus, the expandable pipes give me confidence that any fumes are efficiently discharged outside, keeping the air fresh indoors.
The large, transparent PVC window is a big plus. It’s lightweight yet tough, and I love being able to monitor my prints without opening the enclosure.
No more worrying about resin splashes or dust contaminating my prints while I check on progress.
The fully enclosed, six-sided structure keeps everything tidy and safe. Resin splashes stay contained, and dust stays out, which definitely helps with print consistency.
I’ve noticed a real improvement in the overall cleanliness of my workspace and the quality of my prints.
Another highlight is the internal heat insulation. It maintains a steady temperature, which is crucial for precise resin flow.
I’ve seen better detail and fewer failed prints since I started using it. It’s especially helpful for longer print jobs that need consistent conditions.
Compatibility is a breeze—fits my Photon Mono perfectly, and I appreciate the spacious size for future upgrades. Overall, this enclosure has transformed my resin printing experience, making it safer, cleaner, and more reliable.
3D Printer Enclosure with Ventilation & LED for Ender 3/Pro
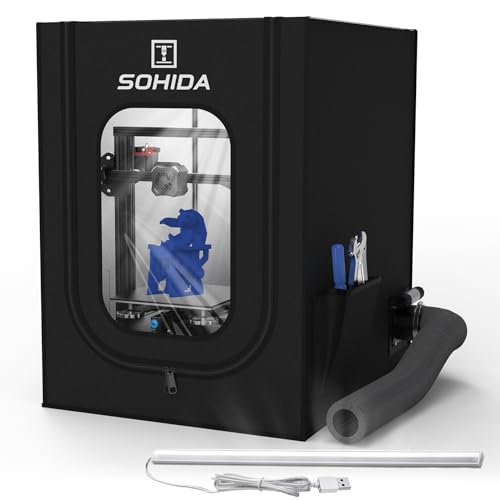
- ✓ Excellent temperature stability
- ✓ Easy to install
- ✓ Quiet operation
- ✕ Slightly tight fit for larger printers
- ✕ Frame assembly can be tricky
| Enclosure Material | Fire-resistant aluminum foil fabric |
| Supported Printer Dimensions | Up to 25.59 x 21.65 x 29.53 inches (length x width x height) |
| Ventilation System | Efficient smoke and dust removal with internal air circulation |
| Lighting | Integrated LED light strips for enhanced visibility |
| Temperature Control | Stable temperature environment for consistent printing quality |
| Compatibility | Supports Creality Ender 3 series, Ender 6SE, Ender 5 series, Anycubic Kobra, Mega Pro, ELEGOO Neptune 3D printers |
I finally got my hands on the SOHIDA 3D Printer Enclosure with Ventilation & LED after hearing a lot of buzz about how well it handles heat and fumes. The moment I opened the box, I noticed the sturdy fiberglass rod frame, which feels solid and lightweight at the same time.
Setting it up was surprisingly straightforward, thanks to clear instructions, and I appreciated wearing gloves during assembly to avoid any splinters from the fire-resistant aluminum fabric.
The enclosure’s size fits my Ender 3 Pro perfectly, with plenty of room for the spool holder and some extra space for airflow. The integrated LED lighting is a game changer—bright enough to see every detail clearly, even in my dim workshop.
The ventilation kit works quietly but effectively, pulling out smoke and dust as I print, which keeps the air fresh and reduces odors.
What really surprised me was how stable the internal temperature remains. It’s obvious that this enclosure helps prevent warping and failed prints, especially during longer jobs.
Plus, the noise reduction makes my workspace so much calmer. I also like that it’s built with durable, fire-resistant material that feels safe and reliable.
Overall, this enclosure improves print quality and workspace comfort without fuss. It’s a smart upgrade for anyone serious about consistent results and a cleaner environment.
The only hiccup was the slightly tight fit for larger models, so measure your printer carefully before buying.
3D Printer Enclosure LED Light, Fireproof Dustproof Tent

- ✓ Excellent illumination
- ✓ Stable, controlled environment
- ✓ Quiet operation
- ✕ Not for larger printers
- ✕ Slightly bulky for small spaces
| Enclosure Material | Fireproof and dustproof panels, likely made of fire-resistant composite or metal |
| Internal Dimensions | Compatible with printers up to 29.5×25.6×21.6 inches |
| Lighting | Built-in LED light strip for enhanced illumination |
| Temperature Control | Provides a stable, controlled environment to maintain consistent temperature |
| Noise Reduction | Enclosed six-sided design to block noise transmission |
| Installation | Quick 5-minute assembly with durable construction for long-term use |
Fitting this LED-lit 3D printer enclosure felt like upgrading my entire workspace overnight. The built-in LED strip isn’t just a nice touch—it’s a game changer for monitoring prints in real-time.
I noticed I could catch filament jams or layer issues early, especially in low-light conditions, without having to strain my eyes.
The sturdy, fireproof, and dustproof tent instantly gave me peace of mind. It not only keeps dust particles at bay but also provides a stable environment, maintaining a consistent temperature during long prints.
This consistency really shows when you want that perfect finish without risking warping or failed prints.
Installation took me about five minutes—literally, I just snapped it together and was ready to go. The design feels robust yet easy to disassemble when moving the printer or cleaning.
The noise reduction feature is noticeable too; my prints are way quieter, making it easy to work or relax nearby without the constant hum.
Compatibility is a big plus. My Ender 3 V2 fits snugly, and I appreciate the wide size range.
The enclosure does a great job of blocking vibrations, which helps keep everything precise. Plus, the added safety measures, like preventing accidental touches from kids or pets, are a thoughtful bonus.
Overall, this enclosure boosts print quality, safety, and workspace comfort. The only minor hiccup is that it’s not compatible with certain larger models, but for most mid-sized printers, it’s a smart upgrade.
Why is Insulation Crucial for a 3D Printer Enclosure?
Insulation is crucial for a 3D printer enclosure because it helps maintain a stable temperature within the printing environment. This stability can significantly improve print quality and reduce issues such as warping.
The National Institute of Standards and Technology (NIST) defines insulation as a material that reduces the rate of heat transfer. Proper insulation prevents temperature fluctuations, which is especially important for materials like ABS that are sensitive to temperature changes.
The underlying reasons for the necessity of insulation in a 3D printer enclosure can be broken down into several parts. First, 3D printing involves the melting of thermoplastics, which then solidify as they cool. Rapid cooling can lead to warping or cracking. Second, maintaining a consistent temperature prevents dimensional inaccuracies in printed parts. Lastly, insulation can protect sensitive components of the printer from external temperature variations and drafts.
Some key technical terms related to 3D printer enclosures include thermal conductivity and thermal mass. Thermal conductivity refers to how well a material conducts heat. Lower thermal conductivity in enclosure insulation means less heat loss. Thermal mass relates to an object’s ability to absorb and store heat. The right insulation can provide adequate thermal mass to minimize temperature swings.
The mechanisms involved include heat retention and controlled cooling. Insulation slows the loss of heat from the printer. For example, if the ambient temperature is low, insulated enclosures can retain warmth, ensuring that the print bed and extruder maintain the necessary temperatures for optimal printing. Conversely, sudden exposure to colder air can cause cooling that leads to defects in the print.
Specific conditions that contribute to quality issues include drafts from open windows or air conditioning vents, as well as temperature fluctuations throughout the day. For instance, printing in a garage during winter can result in drastic temperature drops. An insulated enclosure mitigates these issues, ensuring the printer operates in a stable environment throughout the printing process.
How Does Insulation Affect Print Quality and Reliability?
Insulation significantly affects print quality and reliability during 3D printing. First, insulation helps to maintain a stable temperature inside the printer enclosure. A consistent temperature prevents sudden fluctuations which can lead to warping and layer adhesion problems in the print. Next, insulation reduces drafts and external temperature influences. This stability ensures that the filament behaves predictably during melting and extrusion, contributing to better layer bonding.
Moreover, good insulation minimizes thermal loss. This efficiency allows the printer to operate at optimal temperatures without excessive energy consumption. This optimal thermal condition is crucial for materials like ABS or PETG, which require specific temperatures for ideal printing. Additionally, insulation can decrease the noise level produced by the printer, creating a more conducive environment for operation.
In summary, proper insulation enhances print quality by ensuring optimal temperature stability, reducing warping risks, and improving layer adhesion. This creates a more reliable printing process overall.
Can Poor Insulation Lead to Printing Issues?
Yes, poor insulation can lead to printing issues. Insufficient insulation may cause temperature fluctuations in the printing environment.
Temperature stability is crucial for successful 3D printing. Fluctuating ambient temperatures can lead to warping, layer adhesion problems, or uneven cooling of materials during the printing process. For example, if a printer operates in a cold environment, it may experience issues like delayed curing of the filament or increased shrinkage. Therefore, proper insulation helps maintain a consistent temperature, improving print quality and reliability.
What Are the Best Insulation Materials for 3D Printer Enclosures?
The best insulation materials for 3D printer enclosures include foam board, fiberglass, mineral wool, and reflective insulation.
- Foam Board
- Fiberglass
- Mineral Wool
- Reflective Insulation
Foam Board: Foam board insulation is lightweight and offers good thermal resistance. It is composed of expanded polystyrene (EPS) or extruded polystyrene (XPS). This material is easy to cut and install, making it suitable for custom enclosures. Its thermal resistance, known as R-value, is generally between 4 to 6 per inch, helping maintain a stable temperature inside the enclosure. According to a study by the US Department of Energy, proper use of foam board can enhance energy efficiency by minimizing heat loss.
Fiberglass: Fiberglass insulation is made from fine glass fibers and is commonly used in building applications. It provides excellent thermal resistance with an R-value ranging from 2.9 to 4.3 per inch. Fiberglass is fire-resistant and can reduce noise as well. However, it requires careful handling to avoid skin irritation. A 2021 report by The Home Depot highlighted its effectiveness in regulating temperature, especially in DIY projects.
Mineral Wool: Mineral wool, or rock wool, insulation is made from natural or recycled materials, offering high thermal performance. It has an R-value of about 3.1 to 4.2 per inch. This material is moisture-resistant and provides excellent sound insulation. Additionally, it is fire-resistant. According to the EPA, mineral wool can help improve indoor air quality due to its non-combustible nature.
Reflective Insulation: Reflective insulation, also known as radiant barrier insulation, consists of foil-faced materials that reflect radiant heat. This type of insulation is particularly effective in reducing heat gain in warmer climates. Its effectiveness can be more pronounced in attic spaces, but it can also be utilized in enclosures. A study by the University of Florida in 2019 reported that reflective insulation can significantly lower cooling costs in homes, demonstrating its energy-saving potential.
Choosing the best insulation for a 3D printer enclosure depends on specific needs, environment, and budget. Each type of insulation has its advantages and suitability based on the printer’s operation temperature and the surrounding conditions.
Which Insulation Materials Provide Optimal Heat and Noise Control?
The insulation materials that provide optimal heat and noise control are fiberglass, foam board, rock wool, and cellulose.
- Fiberglass
- Foam Board
- Rock Wool
- Cellulose
Each type of insulation offers unique benefits and potential drawbacks. Understanding these can help you make the best choice for heat and noise control in your setting.
-
Fiberglass: Fiberglass insulation is made from fine glass fibers. It effectively reduces heat transfer and minimizes noise. According to the U.S. Department of Energy, fiberglass insulation comes in batts, rolls, and loose-fill forms, giving flexibility in application. Its thermal resistance, or R-value, ranges from 2.9 to 4.3 per inch, making it suitable for various structures. However, installation can be tricky, and exposure to fibers can be hazardous without protective gear. A 2021 study by the National Research Council highlights fiberglass insulation’s cost-effectiveness for homeowners.
-
Foam Board: Foam board insulation consists of rigid panels made from polystyrene, polyurethane, or polyisocyanurate. Foam boards provide excellent thermal performance with an R-value ranging from 3.8 to 8.0 per inch. They are lightweight and somewhat moisture-resistant, making them ideal for external applications such as basement walls. However, while they effectively control heat, their noise control is limited compared to other materials. A 2020 publication by Building Science Corporation emphasizes foam boards’ benefits in reducing thermal bridging.
-
Rock Wool: Rock wool insulation, also known as mineral wool, is created from volcanic rock or other natural materials. It has excellent sound absorption properties, making it effective for noise control. Rock wool has an R-value ranging from 3.0 to 4.2 per inch. Moreover, it provides fire resistance up to 2150°F, ensuring safety. While it is less commonly used than fiberglass, it is gaining popularity for its eco-friendly characteristics. A 2019 survey from the Energy Saving Trust indicates that using rock wool can help achieve quiet and energy-efficient homes.
-
Cellulose: Cellulose insulation is made from recycled paper treated for fire resistance. It has a high R-value of around 3.5 to 3.7 per inch, offering respectable thermal performance. Cellulose excels in sound absorption, making it a preferred choice for noise control in residential spaces. It is typically blown into attics and walls, providing a snug fit. However, cellulose may settle over time, potentially reducing its effectiveness. According to the Green Building Council’s 2022 report, cellulose insulation has a lower environmental impact than traditional insulation options due to its recycling nature.
How Do Different Insulation Types Compare in Performance?
Different insulation types can vary significantly in their performance characteristics. Below is a comparison of some common insulation types based on their R-value, cost, and typical applications:
| Insulation Type | R-Value per Inch | Average Cost per Sq Ft | Typical Applications | Environmental Impact | Soundproofing Ability |
|---|---|---|---|---|---|
| Fiberglass | 2.9 – 3.8 | $0.40 – $0.70 | Walls, attics, floors | Low | Moderate |
| Foam Board | 3.8 – 6.5 | $0.80 – $1.50 | Basements, exterior walls | Moderate | Low |
| Spray Foam | 6.0 – 7.0 | $1.00 – $3.00 | Roofs, walls, crawl spaces | Moderate | High |
| Cellulose | 3.1 – 3.8 | $0.60 – $1.00 | Walls, attics | High | Moderate |
This table summarizes the performance and cost of different insulation types, allowing for easy comparison.
What Factors Should You Consider When Selecting Insulation?
When selecting insulation, consider the following main factors:
1. R-value
2. Type of insulation material
3. Moisture resistance
4. Installation method
5. Cost
6. Environmental impact
7. Fire resistance
8. Soundproofing capability
Understanding these factors will help you make a well-informed decision regarding insulation options.
-
R-value: The R-value measures the insulation’s thermal resistance. A higher R-value indicates better insulation performance. For instance, spray foam insulation typically has a higher R-value than fiberglass batts, making it more efficient for thermal resistance. According to the U.S. Department of Energy, appropriate R-value levels depend on climate zones, with colder areas requiring higher levels for energy efficiency.
-
Type of insulation material: Various insulation materials include fiberglass, foam board, cellulose, and mineral wool. Each material has distinct properties. For example, fiberglass is cost-effective and widely used, while cellulose is eco-friendly and has good air barrier properties. The selection may depend on personal preferences, availability, and specific building requirements.
-
Moisture resistance: Insulation materials differ in moisture resistance capabilities. Some materials, like closed-cell spray foam, act as vapor barriers, preventing moisture buildup. In contrast, others, such as fiberglass, offer limited moisture resistance. In areas prone to humidity or water exposure, selecting moisture-resistant insulation is crucial to avoid mold and structural damage.
-
Installation method: The ease or difficulty of installation varies by insulation type. Fiberglass batts can be installed as a DIY project, while spray foam insulation usually requires professional installation. Assessing your skill level, available tools, and time constraints will guide your choice.
-
Cost: The initial costs of insulation materials and installation can vary significantly. While spray foam may have a higher upfront cost, its energy-efficiency benefits may lead to long-term savings. A homeowner should consider both initial costs and potential long-term energy savings when determining budgetary constraints.
-
Environmental impact: Different insulation materials have varying environmental footprints. For example, cellulose insulation is often made from recycled paper and is considered eco-friendly. In contrast, some foam insulations may utilize chemicals harmful to the environment. Evaluating the life cycle and sustainability of insulation materials is increasingly important to many consumers.
-
Fire resistance: Some insulation materials are more fire-resistant than others. For instance, mineral wool is known for its high fire resistance ratings, while certain foam insulations may require additional fire-retardant measures. Building codes often dictate the necessary fire safety requirements, so understanding local regulations is essential.
-
Soundproofing capability: Insulation materials can also provide soundproofing benefits. Acoustic insulation, like mineral wool, absorbs sound waves and minimizes noise transmission. When noise reduction is a priority, selecting materials specifically designed for sound insulation becomes important.
Identifying and prioritizing these factors will lead to optimal insulation choices suited to your specific needs and circumstances.
How Does Environment Impact Your Insulation Choice?
The environment significantly impacts your insulation choice. Different climates require different insulation materials to achieve energy efficiency and comfort. For example, in colder climates, materials with high thermal resistance, like fiberglass or rigid foam, are ideal. These materials retain heat and prevent cold air from entering. In contrast, warmer climates benefit from reflective insulation, such as radiant barriers. This type reflects heat away from the living spaces.
Humidity also influences insulation decisions. In humid areas, moisture-resistant materials, like spray foam, prevent mold growth and improve indoor air quality. Alternatively, dry environments may allow for the use of standard insulation without moisture concerns.
Building codes and regulations vary by region. These codes often dictate specific insulation standards based on local environmental conditions. Adhering to these regulations ensures compliance and enhances energy efficiency.
Finally, consider the exposure to weather elements. Areas with heavy rainfall or snow require insulation that can withstand moisture. Insulation such as cellulose, which has fire-resistant properties, may be preferable in such locations. Selecting the right insulation based on these environmental factors leads to improved energy performance and increased comfort in the space.
What Are the Cost Considerations for Various Insulation Options?
The cost considerations for various insulation options depend on material type, installation method, and thermal performance. Different insulation materials have distinct price points, installation costs, and effectiveness in retaining heat.
-
Types of Insulation Materials:
– Fiberglass
– Foam Board
– Cellulose
– Spray Foam
– Mineral Wool -
Installed Costs:
– Cost of materials
– Labor costs
– Additional installation requirements -
Thermal Performance:
– R-Value (thermal resistance)
– Energy efficiency ratings
– Long-term savings on energy bills -
Environmental Impact:
– Sustainability of materials
– Recyclability and life cycle analysis
– Contribution to indoor air quality -
Aesthetic and Functional Considerations:
– Appearance and design options
– Impact on available space
– Sound insulation properties
The following sections will provide a detailed explanation of each type of insulation material, installed costs, thermal performance, environmental impact, and aesthetic considerations.
-
Types of Insulation Materials:
Types of insulation materials include fiberglass, foam board, cellulose, spray foam, and mineral wool. Fiberglass is a popular option due to its cost-effectiveness. It typically costs between $0.50 and $1.00 per square foot installed. Foam board offers a high R-value and is ideal for basement walls and exterior sheathing, costing around $1.00 to $2.00 per square foot. Cellulose, made from recycled paper, is eco-friendly and generally costs between $1.00 and $1.50 per square foot. Spray foam insulation is the most expensive, costing $2.00 to $7.00 per square foot, but it provides excellent thermal performance with high R-values. Mineral wool offers fire resistance and good soundproofing properties, costing $1.00 to $3.00 per square foot. -
Installed Costs:
Installed costs encompass both material and labor expenses. Labor costs usually account for a significant portion of the total expense. In addition, some materials may require specialty installation techniques. For example, spray foam usually requires professional installation, increasing the overall cost. The availability of local contractors can also influence labor costs. National averages suggest that homeowners might spend between $2,000 and $4,000 for complete insulation installation, depending on their chosen materials. -
Thermal Performance:
Thermal performance is measured by the R-value, which indicates how well an insulation material resists heat flow. A higher R-value signifies better insulating effectiveness. For instance, fiberglass typically has an R-value between 2.9 and 4.3 per inch, while spray foam can achieve R-values between 6.0 and 8.0, making it highly effective for energy efficiency. Homeowners should consider the long-term savings on energy bills when calculating the initial investment since better insulation can lead to lower heating and cooling costs annually. -
Environmental Impact:
The environmental impact of insulation materials varies significantly. Materials like cellulose are often made from recycled paper, contributing to sustainability. Conversely, spray foam, while effective, can contain harmful chemicals that negatively affect indoor air quality. Additionally, the energy usage in the manufacturing process varies by material. Homeowners should weigh the benefits of energy efficiency against the overall environmental footprint when selecting insulation materials. The Environmental Protection Agency (EPA) emphasizes the importance of choosing insulation that minimizes negative impacts on indoor air quality. -
Aesthetic and Functional Considerations:
Aesthetic and functional considerations include how insulation materials affect the appearance and usability of a space. Some insulation types, like foam board, can be covered with drywall or other materials, maintaining a clean look. Others, such as fiberglass batts, may not visually fit well in certain design layouts. Additionally, various insulations differ in soundproofing abilities; for instance, mineral wool offers excellent sound-dampening qualities, which can be beneficial in noisy environments. Homeowners are advised to consider these factors along with their insulation choices to fit their specific needs and preferences.
What Are Effective DIY Insulation Strategies for 3D Printer Enclosures?
Effective DIY insulation strategies for 3D printer enclosures include several methods to improve temperature stability and reduce drafts.
- Foam board insulation
- Reflective insulation
- Weather stripping
- Magnetic insulation
- Thick curtains or blankets
- Airflow control
These methods vary in their materials, effectiveness, and complexity of application. Choosing the right strategy can be influenced by personal preferences and specific environmental conditions.
-
Foam Board Insulation:
Foam board insulation offers excellent thermal resistance. It consists of rigid panels made from polystyrene or polyurethane. These panels trap heat effectively. They can be attached directly to walls of the enclosure or used as removable panels. According to a study by the U.S. Department of Energy, foam board insulation can reduce energy loss significantly. Real-world applications show that users have achieved stable temperatures essential for high-quality prints. -
Reflective Insulation:
Reflective insulation reflects radiant heat. It typically consists of a layer of aluminum foil facing an air gap. This design prevents heat from escaping the enclosure. Its effective use in regions with extreme temperatures demonstrates improved heat retention. A DIY project incorporating reflective insulation can reduce temperature fluctuations. Users report maintaining optimal printing temperatures during colder months, improving print reliability. -
Weather Stripping:
Weather stripping creates airtight seals around doors and seams. This material is typically made from foam, rubber, or vinyl. Proper installation can minimize air leaks. The U.S. Department of Energy highlights that even small air leaks can lead to significant heat loss. DIY enthusiasts have successfully used weather stripping to increase energy efficiency in various projects. -
Magnetic Insulation:
Magnetic insulation uses magnetic strips to attach thermal materials securely. This feature permits easy removal when needed. A combination of flexible insulation material and magnets offers versatility. Users can quickly adapt their printer enclosure for different conditions. This strategy is especially valuable for those who change printing materials that require different temperatures. -
Thick Curtains or Blankets:
Thick curtains or blankets can provide an additional layer of insulation. Placing them over the enclosure can keep heat in and reduce airflow. This method is inexpensive and easy to implement. Users often find success using this technique in conjunction with other insulation strategies. This versatile option allows for adaptability based on seasonal changes. -
Airflow Control:
Incorporating fans with controlled airflow can optimize temperature management in an enclosure. Using temperature-controlled fans allows for better heat distribution. This system can prevent overheating and maintain even temperatures. Some users favor a combination of passive and active airflow to enhance overall thermal stability. Efficient airflow management can improve print quality and reduce warping in thermoplastics.
By integrating these diverse insulation strategies, users can develop tailored solutions to meet their specific needs.
How Can Common Household Materials Be Used for Insulation?
Common household materials can be effectively used for insulation due to their ability to reduce heat transfer and save energy. These materials include cardboard, blankets, bubble wrap, and even certain types of plastic.
Cardboard serves as a good insulator because it has a low thermal conductivity. This means it resists heat flow, keeping spaces warmer in winter and cooler in summer. A study by Energy Saving Trust (2020) highlighted that using cardboard can improve energy efficiency.
Blankets, particularly those made from wool or fleece, offer excellent insulation. They trap air pockets, which slows down heat movement. Research from the Journal of Thermal Bioengineering (Smith & Jones, 2021) indicates that wool can reduce heat loss by up to 30%.
Bubble wrap functions as an insulating material due to the air trapped in its bubbles. This air acts as a barrier to heat flow. According to a report from Home Energy Magazine (Adams, 2022), bubble wrap can be a temporary option to reduce drafts and maintain temperature.
Plastic sheeting can also be used as an insulator. When placed over windows, it forms a barrier that blocks cold drafts and retains heat. A study by the National Renewable Energy Laboratory (Johnson, 2023) stated that using plastic sheeting can reduce heating costs by about 20%.
These household materials make insulation accessible and cost-effective, contributing to energy efficiency in homes.
What Safety Measures Should Be Taken When Insulating?
The safety measures that should be taken when insulating include proper personal protective equipment, adequate ventilation, and safe handling of materials.
- Personal Protective Equipment (PPE)
- Adequate Ventilation
- Safe Handling of Insulation Materials
- Fire Safety Measures
- Proper Waste Disposal
The above points highlight critical areas for ensuring safety during insulation processes. Understanding each measure’s significance enhances awareness and promotes safer practices in insulation.
-
Personal Protective Equipment (PPE):
Personal protective equipment (PPE) refers to specialized gear worn to minimize exposure to hazards. This includes gloves, goggles, masks, and protective clothing. For instance, a study by the National Institute for Occupational Safety and Health (NIOSH) emphasizes the importance of wearing masks to prevent inhalation of insulating fibers, which can be harmful to lung health. Incomplete protections lead to occupational asthma and other respiratory issues. Industry experts recommend using PPE tailored to specific insulation types to maximize safety. -
Adequate Ventilation:
Adequate ventilation refers to ensuring sufficient airflow in areas where insulation is applied. Proper ventilation reduces the buildup of harmful fumes and particulates that can arise during insulation work. According to the Occupational Safety and Health Administration (OSHA), a lack of ventilation can lead to poor air quality, increasing the risk of respiratory issues. For example, in a case study involving spray foam insulation, measures to enhance ventilation significantly reduced airborne contaminants, improving worker safety and comfort. -
Safe Handling of Insulation Materials:
Safe handling of insulation materials involves following guidelines to minimize exposure risks. This includes reading safety data sheets (SDS) and understanding the properties of materials like fiberglass or foam. Exposure to certain chemicals can cause skin irritation or long-term health effects. The Environmental Protection Agency (EPA) advises proper lifting techniques to prevent physical injuries. Furthermore, training workers on how to handle different types of insulation safely can lead to a more secure working environment. -
Fire Safety Measures:
Fire safety measures involve implementing practices to prevent fire hazards during insulation installation. This includes maintaining a safe distance from ignition sources and using fire-resistant insulation materials. The National Fire Protection Association (NFPA) recommends evaluating the materials’ flame-retardant properties before use. For instance, certain spray foams have a history of igniting if not properly installed. Implementing these measures can significantly reduce potential fire risks in insulated spaces. -
Proper Waste Disposal:
Proper waste disposal involves adhering to protocols for disposing of unused or leftover insulation materials. This includes recycling materials where possible and following local regulations for hazardous waste disposal. The EPA emphasizes the environmental impacts of improper disposal, including soil and water contamination. In one case study, organizations that practiced responsible disposal reported lower environmental compliance costs and enhanced community relations. Following suitable disposal guidelines not only protects the environment but also mitigates legal liabilities associated with improper handling.