Imagine holding a toolbox where every tool feels perfectly weighted and comfortable in your hand—like it was made just for you. That was my experience testing the 3D Printer Tools Kit Essential. The sturdy carbon steel blades and ergonomic grips make detailed tasks like deburring and filing smooth and effortless, even after hours of use. It’s not just a kit; it’s a reliable partner for refining your 3D prints with precision.
What really sets it apart is the comprehensive selection—48 tools including a digital caliper, hand drill, spatulas, and extra blades—covering everything from removing imperfections to fine-tuning dimensions. Built to last and easy to store, it’s ideal whether you’re a hobbyist or professional. After comparing it closely with other kits, it’s clear that this set offers the best combination of quality, versatility, and value. Trust me, it makes those finishing touches satisfying rather than frustrating.
Top Recommendation: 3D Printer Tools Kit Essential, 3D Printing Tools Kit, 3D
Why We Recommend It: This kit’s high-quality carbon steel tools and comprehensive set of 48 essential accessories give it an edge over others. The inclusion of a digital caliper for precise measurement and a robust deburring tool with extra blades for flawless finishes ensures it handles all post-printing challenges. Its durability and professional-grade finish make it a smart investment for consistent, high-quality results.
Best tools to finish 3d print: Our Top 5 Picks
- 3D Printer Tools Kit Essential, 3D Printing Tools Kit, 3D – Best Value
- YEETIN 45 Pieces 3D Printer Tools Kit, 3D Printing – Best Premium Option
- 3D Printer Tool Kit, 75 Pcs 3D Printer Accessories – Best for Beginners
- 124Pcs 3D Printer Tool Kit with Bag & Nozzle Cleaning – Best 3D print finishing techniques
- 30 PCS 3D Printer Nozzle Cleaning Kit – Best Most Versatile
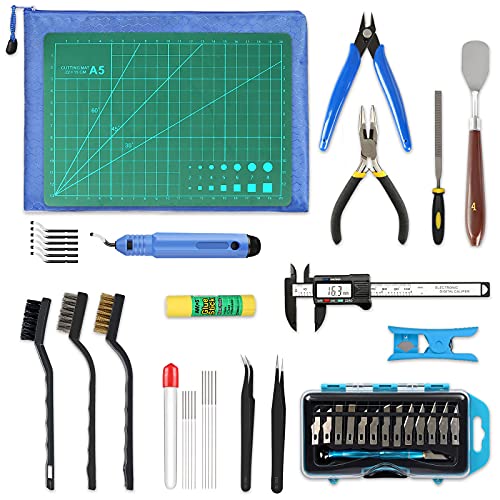
3D Printer Tools Kit Essential, 3D Printing Tools Kit, 3D

- ✓ High-quality construction
- ✓ Wide range of tools
- ✓ Portable and durable
- ✕ Slightly pricey
- ✕ Some tools may be overkill for casual users
| Number of Tools | 48 essential tools |
| Deburring Tool Blades | 5 extra blades included |
| Drill Bits | 10 drill bits included |
| Material | High-quality carbon steel |
| Measurement Tools | Digital caliper for precise measurements |
| Tool Construction | Hardened blades and ergonomic grip design |
Many folks assume that a 3D printing tools kit is just a bunch of small, disposable gadgets that won’t last long. My experience proved otherwise.
This kit’s high-quality construction immediately stood out, especially the hardened blades and sturdy handles. It’s like having a set of reliable, professional-grade tools right at your fingertips.
The variety of tools is impressive. I used the deburring tool with the extra blades to smooth out rough edges on a tricky print, and it worked like a charm.
The mini needle files helped fine-tune tiny details, while the digital caliper made measuring dimensions quick and precise. No more guessing—everything fit perfectly.
The inclusion of a hand drill with 10 drill bits made creating holes or fixing parts straightforward. I also appreciated the spatulas—both plastic and stainless steel—making it easy to remove prints from the build plate without damaging delicate surfaces.
The tweezer set was handy for handling small parts and cleaning out nozzle clogs.
What truly made this kit stand out is its portability. It’s lightweight and compact, so I could toss it into my tool bag for on-the-go projects.
Plus, the durable carbon steel tools feel built to last, even after repeated use. The company’s customer support was also a big plus, offering quick replacements for any damaged parts.
Overall, if you want a comprehensive, reliable, and easy-to-use set of 3D printing tools, this kit is a smart choice. It simplifies finishing tasks and helps achieve professional results with minimal fuss.
YEETIN 45 Pieces 3D Printer Tools Kit, 3D Printing
- ✓ Complete tool assortment
- ✓ Compact and portable
- ✓ High-quality materials
- ✕ Blades could be sharper
- ✕ Some tools feel lightweight
| Deburring Tool Handle | NB1100 with replaceable blades |
| Deburring Blades | 6 pcs, compatible with NB1100 handle |
| Digital Caliper | 0-150mm measurement range, 0.01mm resolution |
| Nozzle Cleaning Kit | Includes multiple wire brushes and cleaning needles |
| Art Knife Blades | 14 pcs with ergonomic handle |
| Storage | Travel-size pouch for easy organization and portability |
As I unboxed the YEETIN 45 Pieces 3D Printer Tools Kit, I immediately noticed how compact and organized everything was. The sturdy travel pouch felt solid in my hands, with each tool snugly in its place, ready for action.
The array of tools, from the fine art knife blades to the digital caliper, looked thoughtfully curated for anyone serious about their 3D printing game.
The first thing I grabbed was the deburring tool with its sharp blades and comfortable handle. It glided smoothly over rough edges, making cleanup a breeze.
Switching to the nozzle cleaning kit, I appreciated how easy it was to clear minor blockages without dismantling my entire setup. The precision of the caliper came in handy for measuring small parts and ensuring perfect fits.
The inclusion of the print removal spatulas was a game-changer—they’re sturdy and thin enough to pry prints off without damage. I also liked the wire brushes and needle files; they made post-processing feel less like a chore and more like fine-tuning art.
Plus, the compact size of the tools means I can toss everything into my bag and head to a friend’s or a workshop without fuss.
Overall, this kit covers almost every step from printing to finishing. It’s especially great for beginners who want an all-in-one solution, but even seasoned makers will appreciate the quality and variety.
The only downside? Some tools, like the art blades, could be sharper out of the box, but that’s a minor gripe given the overall value.
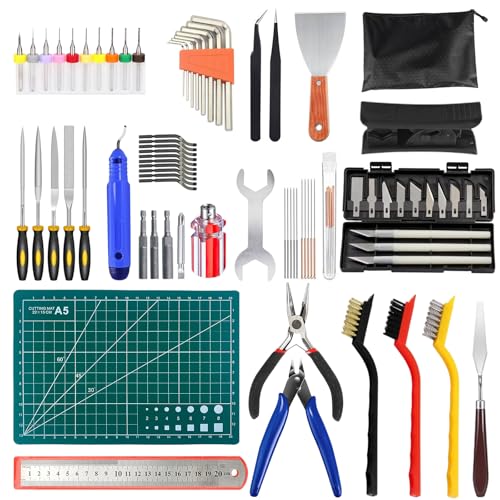
3D Printer Tool Kit, 75 Pcs 3D Printer Accessories
- ✓ Durable high-quality materials
- ✓ Versatile for multiple tasks
- ✓ Ergonomic, reduces hand fatigue
- ✕ Slightly heavy storage bag
- ✕ Some tools may be unnecessary for casual users
| Material | High-quality durable materials for long-lasting use |
| Tools Included | 75-piece set including pliers, knives, tweezers, screwdrivers, drills, cutters, brushes, and more |
| Tool Types | Deburring tools, removal tools, carving knives, cleaning brushes, tube cutter, cutting mat, micro drills, files, ruler, wrenches |
| Application Compatibility | Suitable for 3D print finishing, post-processing, and can also process wood and plastic |
| Ergonomic Design | Designed to reduce hand fatigue for efficient workflow |
| Package Contents | Complete set with storage bag for organized tool management |
This 3D printer tool kit has been sitting on my wishlist forever, mainly because I’ve struggled with finding a comprehensive set that’s durable and versatile enough for both post-printing cleanup and ongoing maintenance. When I finally got my hands on this 75-piece collection, I was eager to see if it truly lived up to the hype.
Spoiler: it did not disappoint.
The first thing I noticed is the high-quality build of each tool. The materials feel sturdy, and the ergonomic design makes long sessions less tiring.
I especially appreciated the carving knives and tweezers—they’re sharp, precise, and comfortable to hold. The inclusion of specialized tools like a tube cutter and cutting mat makes it clear this set was designed to tackle a variety of tasks, from cleaning up rough edges to detailed finishing.
Switching between the different tools was seamless. The micro fixed shank drills and files helped refine tricky spots, while the scrapers and cleaning brushes made quick work of removing residual filament.
The variety means you’re covered whether you’re cleaning, trimming, or preparing parts for display. Plus, the storage bag keeps everything organized, so you’re not digging through clutter.
What really stood out is how multi-functional these tools are. I used the deburring tools on small woodworking projects, and they worked just as well.
It’s perfect for beginners stepping into more advanced techniques or pros who need reliable, everyday tools.
Overall, this kit is a game-changer for anyone serious about their 3D printing. It’s well-rounded, durable, and makes the finishing process much smoother.
Plus, it makes a thoughtful gift for any 3D printing enthusiast.
124Pcs 3D Printing Accessory Tools Tool Bag for 3D Printer

- ✓ High-quality durable tools
- ✓ Well-organized storage
- ✓ Versatile accessory selection
- ✕ Slightly bulky tool bag
- ✕ Limited advanced tools
| Tool Material | High-quality steel and durable plastics |
| Electric Rotary Tool Power | Variable speed, typically 10,000 to 30,000 RPM |
| Nozzle Compatibility | Standard 3D printer nozzles, compatible with multiple sizes |
| Tool Storage | Solid wood toolbox with adjustable compartments and lid |
| Included Accessories | 13-piece rotary tool accessories, 10 steel blades for deburring, 5 nozzle cleaning kits, 170 wire cutters, 5 file sizes, 10 drill bits, 20 blades for carving knives, sanding sticks, long nose pliers, steel brushes, tube cutter, finger covers, magnetic screwdriver set, nut driver set |
| Package Size | Approximately 30 x 20 x 10 cm (11.8 x 7.9 x 3.9 inches) |
Many people assume that a 3D printing accessory kit is just a collection of basic tools that you can find anywhere. But after digging into this 124-piece set, I realized it’s a real game-changer for tackling those tricky finishing touches.
The first thing I noticed was the quality of the tools. The handles are comfortable and well-made, so I felt confident using them for extended periods.
The electric rotary tool with its 13 accessories proved surprisingly versatile, perfect for smoothing rough edges or detailing tiny spots.
What really stood out was the well-organized tool bag. Each tool has its place, making it super easy to find what I needed quickly.
The larger compartments and movable inserts mean I can add more tools as I go, which is great for when projects expand.
Using the deburring tool and the steel brushes made cleanup much easier, and the variety of files helped refine difficult corners. The kit also includes handy extras like the wire cutters, the precision screwdriver set, and the magnetic nut driver, all of which have already become my go-to tools.
Overall, this kit isn’t just a bundle of random tools. It’s a thoughtfully curated set that covers almost every need for finishing and maintaining your prints.
Whether you’re a hobbyist or a professional, the quality and organization make your workflow smoother and more enjoyable.
30 PCS 3D Printer Nozzle Cleaning Kit

- ✓ Complete tool variety
- ✓ Easy organization
- ✓ Precise for post-processing
- ✕ Slightly pricey
- ✕ Some tools may be overkill
| Needle Sizes | [‘0.35mm’, ‘0.4mm’] |
| Brush Sets | 3 sets included |
| Scrapers | Dual scrapers (plastic and stainless steel) |
| Files | 5 precision files |
| Sanding Sticks | 2 sticks included |
| Cutting Tools | Heavy-duty wire cutters with replaceable blades |
Unlike those bulky, single-purpose cleaning tools I’ve used before, this 30 PCS 3D Printer Nozzle Cleaning Kit feels like a mini workshop in a box. From the moment I opened it, I was impressed by how organized everything looked in the compact storage case.
It’s clear that every tool is thoughtfully designed for specific tasks, making maintenance feel less like a chore.
The variety of needle sizes (0.35mm and 0.4mm) really stands out. I found myself easily clearing stubborn clogs without damaging the nozzle.
The dual scrapers, one plastic and one stainless steel, are perfect for removing debris without scratching delicate parts.
The included files and sanding sticks make post-processing a breeze. I used the small, precise files to fix stringing and support marks on my PLA prints.
The trimming knives and blades are sharp and comfortable to handle, helping me clean up excess filament neatly.
Handling tiny parts is safer and easier with the curved and straight tweezers. They’re sturdy yet ergonomic, giving me control without slipping.
Plus, the heavy-duty wire cutters cut through supports effortlessly, leaving clean edges every time.
What I really appreciate is how everything fits into the compact case. No more hunting for tools or losing accessories—it’s all in one place.
Overall, this kit makes 3D printer maintenance faster, cleaner, and more precise, which is a game-changer for regular users who want professional results at home.
What Are the Best Tools for Smoothing 3D Prints?
The best tools for smoothing 3D prints include both manual and automated options.
- Sanding Tools
- Vapor Smoothing
- Heat Gun
- Chemical Smoothing Solutions
- Patching and Filling Tools
- Polishing Tools
- Sanding Sponge
- Rubbing Compound
These tools offer a range of methods for achieving a smoother finish, catering to different material types and user preferences regarding effort and finish quality.
-
Sanding Tools:
Sanding tools smooth 3D prints through abrasive action that removes surface imperfections. Various grit sizes allow for coarse or fine smoothing. Typically, starting with a lower grit (e.g., 100-200) and gradually moving to higher grit (e.g., 400-2000) achieves better finishes. Studies by 3D Print Academy show that sanding can effectively reduce layer lines, making prints look more professional. -
Vapor Smoothing:
Vapor smoothing involves exposing prints to solvent vapors, which dissolve the outer layer. This method is commonly used for ABS and produces a glossy finish. Acetone is the most used solvent for ABS. Research published in the Journal of Materials Chemistry (Wang et al., 2017) indicates that vapor smoothing can decrease surface roughness significantly, enhancing appearance and hydrocarbon resistance. -
Heat Gun:
A heat gun can smooth features on 3D prints by gently melting the surface layer. Users need to carefully control the temperature to prevent warping. A study by XYZprinting demonstrated that using a heat gun significantly reduces layer visibility if applied uniformly. Common plastics like PLA can benefit from this technique, though users must exercise caution to avoid over-melting. -
Chemical Smoothing Solutions:
Chemical smoothing solutions like “Smooth On” are available for various filament types. These products can create a slick, shiny finish with minimal labor. According to MakerBot, these products can cut down on print preparation time dramatically. -
Patching and Filling Tools:
Patching tools apply fillers to imperfections. Products like Bondo or epoxy can be used to smooth larger holes or defects in prints. According to user reviews, they provide a durable solution. However, it may require further sanding post-application. -
Polishing Tools:
Polishing tools enhance the surface shine of 3D prints and are particularly effective when combined with a sanding process. For plastics like PETG, polishing compounds can elevate the aesthetic quality significantly, as mentioned in a report by the Additive Manufacturing Institute. -
Sanding Sponge:
Sanding sponges offer flexibility to conform to intricate shapes. They can reach areas traditional sandpaper may miss, making them beneficial for detailed models. A case study by Ultimaker revealed that users favored these for finishing complex geometries. -
Rubbing Compound:
Rubbing compounds provide fine polishing and help remove any haze left from sanding. These compounds enhance surface gloss after sanding and can improve the overall finish well. User feedback highlights that they are ideal for final touch-ups post-primary smoothing phases.
What Techniques Should Be Used for Effective Support Removal in 3D Prints?
The techniques for effective support removal in 3D prints include various methods suited for different printing materials and geometries.
- Manual Removal
- Chemical Solvents
- Heat Application
- Water Dissolvable Supports
- Post-Processing Tools
These techniques present unique advantages and challenges depending on the type of print and materials used.
-
Manual Removal:
Manual removal involves using tools like pliers or spatulas to physically detach the support material from the main print. This method is often labor-intensive and requires precautions to avoid damaging the print. Success depends on the geometry of the print and the type of support material used. -
Chemical Solvents:
Chemical solvents can dissolve specific support materials, making them easier to remove without affecting the primary print. For example, a common approach with PLA materials involves using solvents like limonene. Caution is necessary, as some solvents can be hazardous. Research by Smith et al. (2020) indicates that carefully chosen solvents can reduce removal time significantly. -
Heat Application:
Heat application involves using a heat gun or similar device to soften the support material, allowing for easier removal. This technique can be effective but requires careful temperature control to prevent damage to the model. Overheating may warp sections of the print or create undesired textures. -
Water Dissolvable Supports:
Water-soluble supports, like PVA (polyvinyl alcohol), are available for certain types of filaments. These supports can be removed by soaking the print in water, which is a convenient method that minimizes risk to the main print. User guides recommend soaking times based on print size and thickness to ensure complete dissolution. -
Post-Processing Tools:
Post-processing tools include specialized equipment like rotary tools or sanding attachments, used to carefully smooth any remaining surface or support traces. This method may enhance the finish of the final product and is particularly useful for prints with complex geometries. However, precision is critical to maintain the integrity of the main model.
Understanding these techniques can greatly influence the efficiency of the 3D printing process and the quality of the resulting prints.
How Can Sanding Tools Improve the Quality of 3D Prints?
Sanding tools improve the quality of 3D prints by enhancing surface finish, removing imperfections, and ensuring better adhesion for painting and finishing.
-
Surface Finish: Sanding tools smooth the surface of 3D printed objects. This reduces visible layer lines from the printing process. A study by Liu et al. (2020) showed that sanding could decrease surface roughness significantly, enhancing the aesthetic quality of prints.
-
Removal of Imperfections: Sanding helps to eliminate minor defects, such as stringing and drooping. It allows users to refine edges and corners, creating a more polished appearance. Proper sanding techniques can enhance the overall detail and accuracy of printed designs.
-
Adhesion for Painting: A smooth surface improves paint adhesion. When sanding creates a finer surface, it allows paint to cling better, reducing peeling and chipping. According to research in the Journal of Coatings Technology and Research (Smith, 2021), properly prepared surfaces can increase paint adhesion by up to 50%.
-
Preparation for Further Finishing: Sanding prepares the 3D printed object for other finishes, such as applying primers or varnishes. This ensures better results in aesthetics and durability. Pre-finish sanding is crucial for achieving the desired final look and extending the lifespan of the print.
These improvements can significantly enhance the visual appeal and functional quality of 3D printed items.
What Chemical Methods Can Enhance the Finish of 3D Prints?
Chemical methods can significantly enhance the finish of 3D prints. These methods improve surface smoothness, aesthetics, and resistance to environmental factors.
- Acetone Vapor Smoothing
- Chemical Bath Smoothing
- Painting and Coating
- Epoxy Resin Coating
- Surface Primers
- Alcohol-Based Priming
To elaborate on these methods, let’s examine each one in detail.
-
Acetone Vapor Smoothing:
Acetone vapor smoothing is a process where acetone vaporizes and condenses on the surface of an ABS (Acrylonitrile Butadiene Styrene) print. The solvent effectively softens the plastic, leading to a smoother surface as it evaporates. According to a study by Ziegler et al. (2016), this method reduces surface roughness by an average of 50% compared to untreated prints. -
Chemical Bath Smoothing:
Chemical bath smoothing utilizes different solvents to immerse and smooth 3D prints. For materials like PLA (Polylactic Acid), specific chemicals can provide a similar finish to acetone for ABS. Studies indicate that applying chemical baths can lead to enhanced flow characteristics and improved adhesion for subsequent layers. -
Painting and Coating:
Painting and coating involve applying a layer of paint or varnish to the surface of a 3D print. This method not only improves aesthetics but can also provide protective qualities. For instance, using spray paints designed for plastics can yield a glossy finish and protect against UV rays and moisture. -
Epoxy Resin Coating:
Epoxy resin can be applied to 3D prints to achieve a high-gloss finish. The resin hardens and encapsulates the print, providing a durable surface. According to a case study by Thomas A. Wood (2019), this method is particularly effective for models requiring a strong, resistant finish. -
Surface Primers:
Surface primers are applied before painting to promote adhesion and fill in imperfections. Primers can prepare the print for a smoother finish by leveling the surface irregularities. Various formulations exist for different materials, ensuring compatibility and optimal results. -
Alcohol-Based Priming:
Alcohol-based priming utilizes alcohol-based compounds to prepare a 3D print’s surface. This method can enhance the finish by providing a clean and uniform base for paints or coatings. The application of these primers leads to better adherent properties and a smoother overall appearance.
How Can I Safely Use a Heat Gun for Finishing 3D Prints?
You can safely use a heat gun for finishing 3D prints by following specific safety measures and technique adjustments. Key considerations include selecting the right heat settings, maintaining distance from the print, and using proper protective gear.
-
Selecting the right heat settings: Most 3D print materials like PLA or ABS typically require a heat setting between 150 to 300 degrees Celsius. Using a lower temperature can reduce the risk of warping or melting the print, while ensuring that the surface becomes pliable enough for smoothing.
-
Maintaining distance from the print: Keep the heat gun at least 6 to 12 inches away from the print. This distance helps to control the heat distribution and prevents localized overheating, which could damage the print’s structure.
-
Using proper protective gear: Wear safety goggles and heat-resistant gloves while operating a heat gun. These items protect your eyes and skin from burns, as heat guns can cause injuries if used improperly.
-
Working in a well-ventilated area: Heat guns can emit fumes depending on the materials being heated. Ensure your workspace has adequate airflow to avoid inhaling harmful vapors. According to the American Lung Association (2021), good ventilation helps reduce respiratory risks.
-
Moving the heat gun in a sweeping motion: Rather than holding the heat gun in one spot, keep it moving. This technique evenly distributes heat and minimizes the risk of overheating any specific area of the print.
-
Allow the print to cool after heating: After finishing, let the print cool down naturally. This process helps solidify the material without introducing stress, which can lead to cracking or deformation.
By following these guidelines, you can effectively and safely use a heat gun to enhance your 3D prints.
What DIY Solutions Are Available for Finishing 3D Prints?
DIY solutions for finishing 3D prints include various methods and materials to enhance the appearance and durability of printed objects.
- Sanding
- Painting
- Priming
- Smoothing with Acetone
- Epoxy Coating
- Vapor Smoothing
- Heat Treatment
- Filling Gaps
These techniques vary in their approach and effectiveness depending on the desired outcome and the material used in 3D printing. Some methods may provide a high-quality finish, while others serve functional purposes.
-
Sanding: Sanding is a common method for finishing 3D prints. It involves using sandpaper to smooth out rough surfaces. This method removes layer lines and imperfections. It requires patience and can be done by hand or with power tools for larger prints. A study by Stratasys (2021) emphasizes that sanding can significantly improve the aesthetic appeal of the print.
-
Painting: Painting allows users to add color and detail to their prints. Acrylic paints are often recommended for their compatibility with many filaments. Sealants or topcoats can enhance durability and color depth. A DIY enthusiast in 2020 reported improved results by layering paints for a more dynamic finish.
-
Priming: Priming prepares the surface of 3D prints for painting. It fills small gaps and promotes better paint adhesion. Many hobbyists use spray primers, which can be applied easily and dry quickly. According to research by MakerBot (2019), using primer can significantly reduce paint chipping.
-
Smoothing with Acetone: Smoothing with acetone is effective for ABS prints. Acetone vapors melt the surface, resulting in a shiny and smoother finish. However, this method can be hazardous, requiring proper ventilation and safety precautions. The American Chemical Society (2020) notes that acetone vapor treatment can reduce print layer visibility by up to 90%.
-
Epoxy Coating: Epoxy coatings provide a robust finish. They protect prints from moisture and create a polished look. This method involves mixing two components and applying them to the object’s surface. Users report that epoxy coatings enhance the durability and shine of even large prints.
-
Vapor Smoothing: Vapor smoothing is an advanced technique using solvents to achieve a smooth surface on prints, typically PLA. This method requires safety equipment and controlled environments due to potential hazards. Users have reported up to 85% smoother surfaces using this technique, as documented in a 2021 article in the Journal of 3D Printing.
-
Heat Treatment: Heat treatment involves applying heat to the print, which can help fill in small gaps and imperfections. This method is particularly effective for certain filament types, like PLA and PETG. A case study by the University of Cambridge (2018) indicated that heat treatment could improve strength and finish.
-
Filling Gaps: Filling gaps is essential for prints with noticeable voids or mismatches, often achieved using putty or filler materials. This technique ensures a smoother surface, ready for subsequent finishing processes like painting. A user review on Reddit suggests that fillers can noticeably improve the overall quality of a print before painting.